Plants are still growing.

willow in living room.jpg

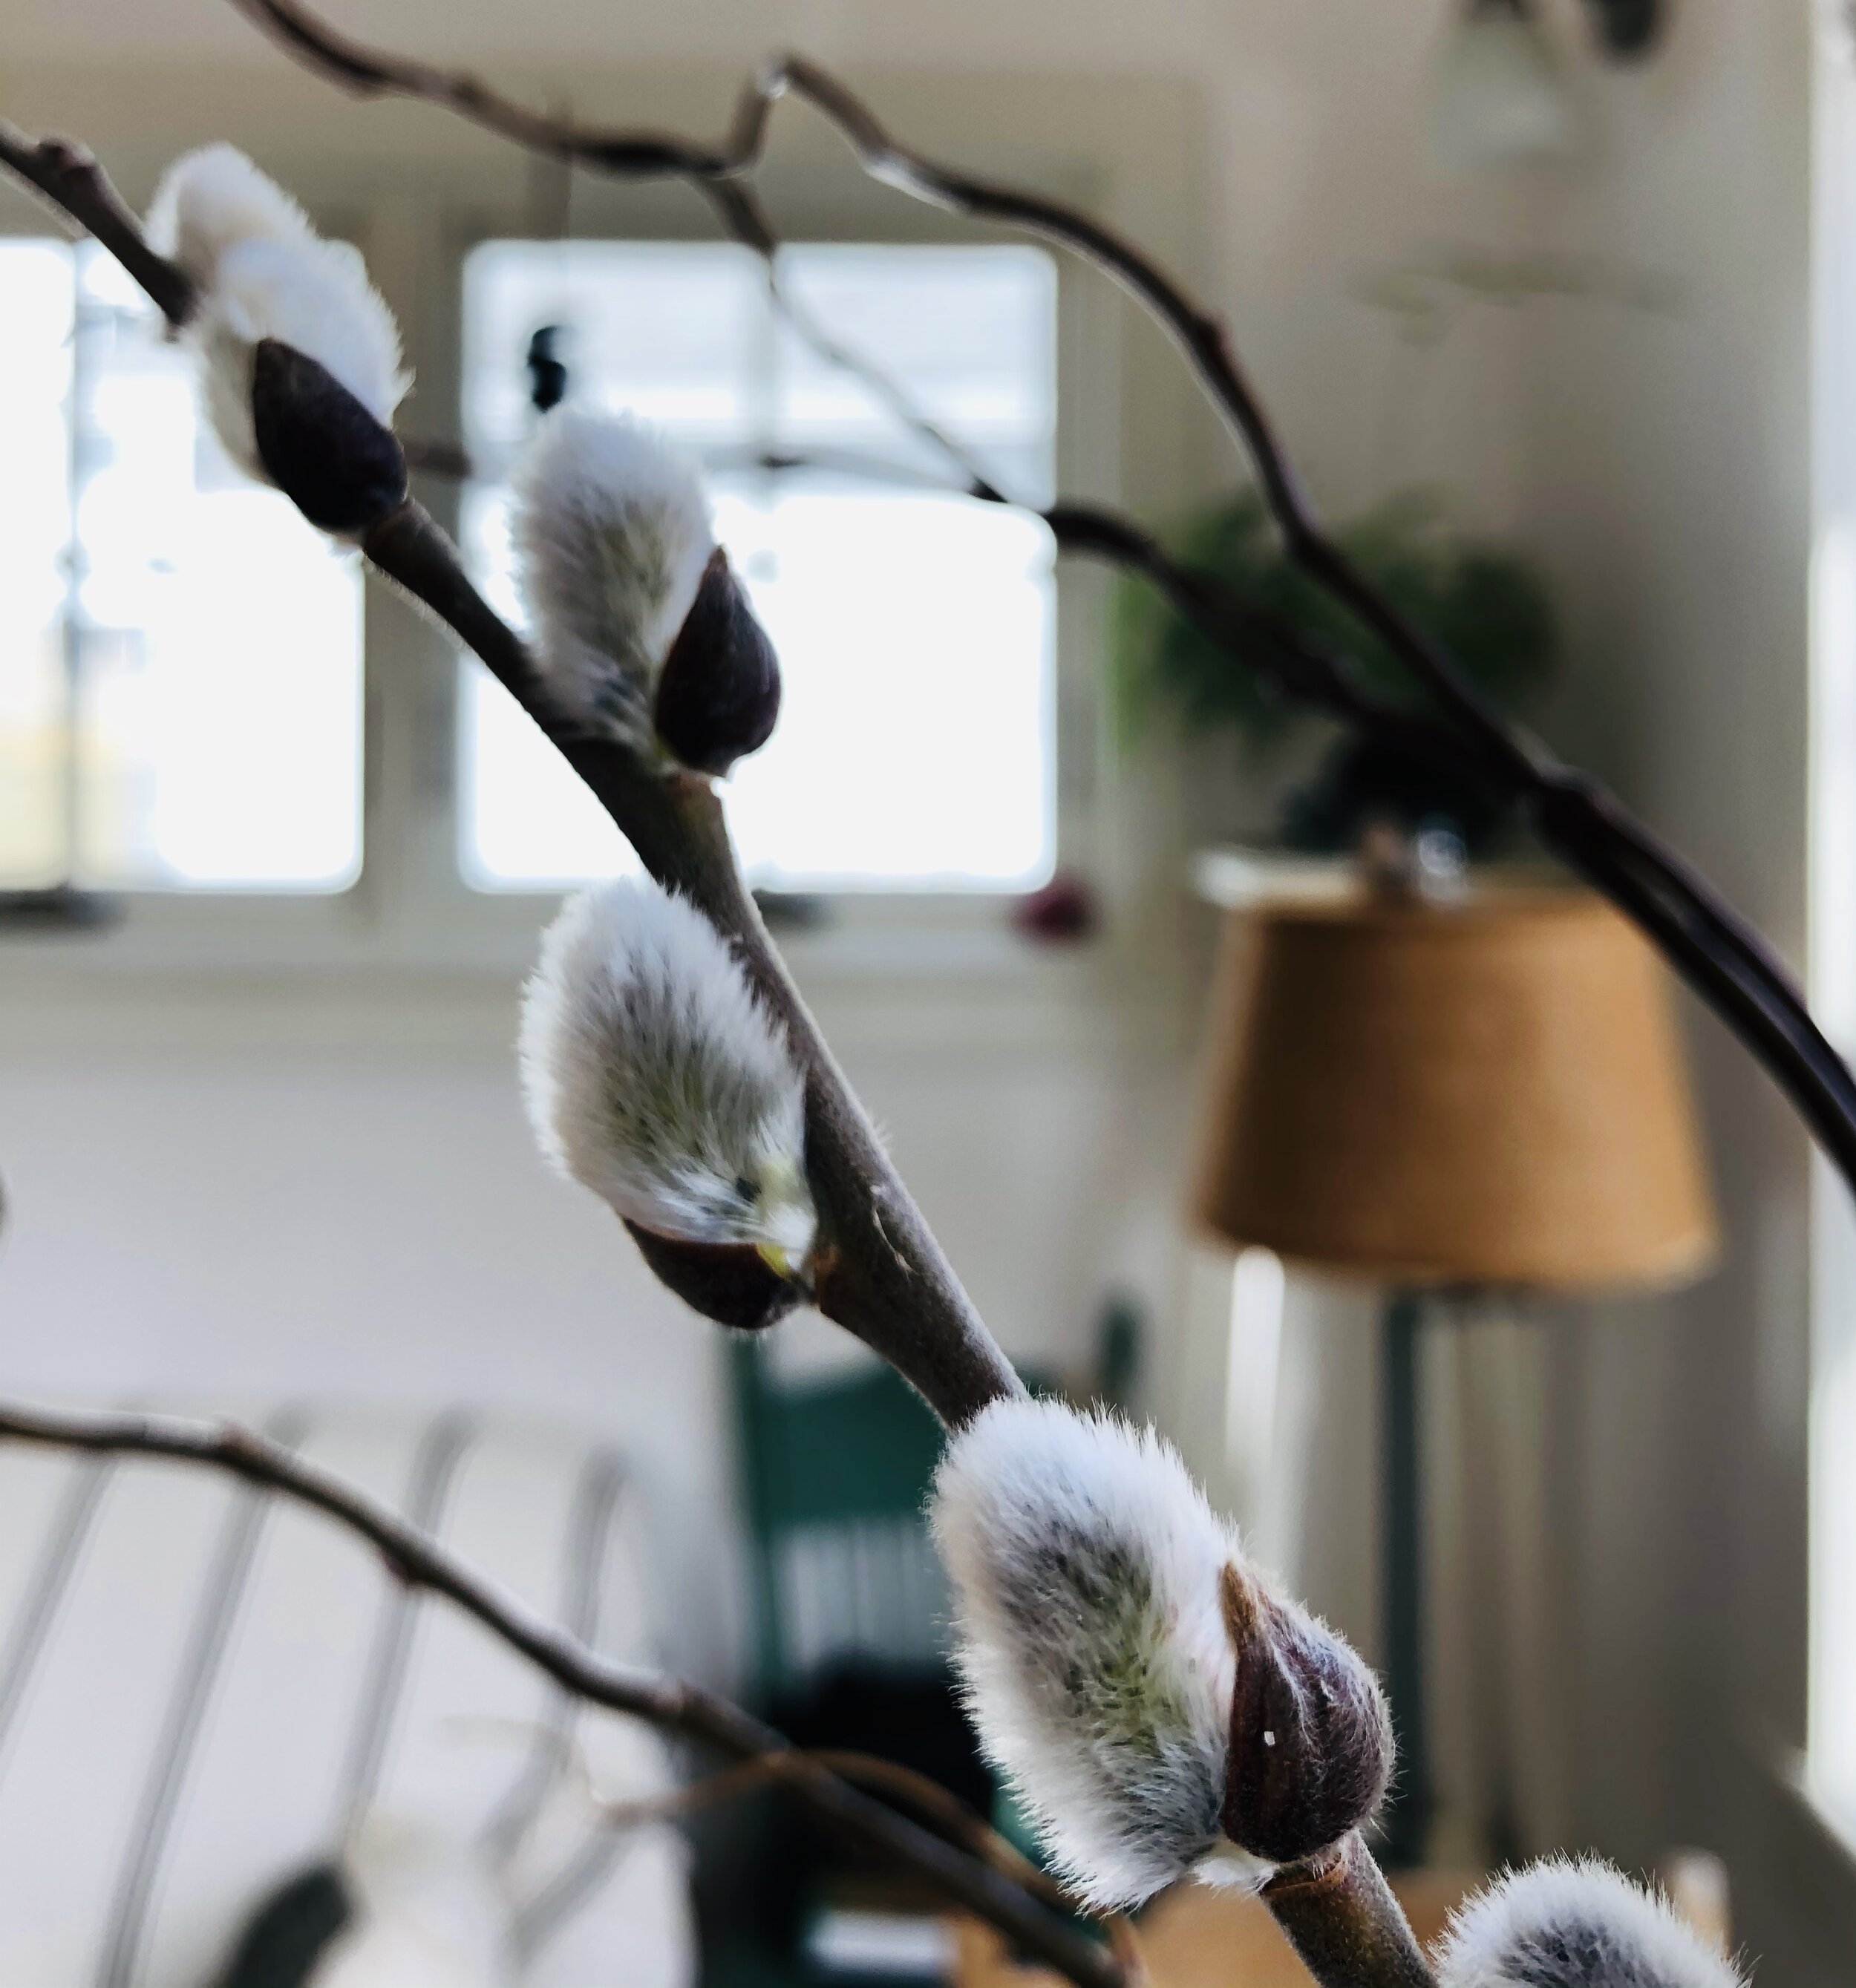
The willows stopped me in my tracks as I was leaving the greenhouses on Friday. I was on my way home, and looked up just in time to see them just bursting with life, reminding me to pause and catch my breath. I had forgotten about spring. I snipped a few stems to bring home. There is a lot more there, and I welcome you to stop by and clip a stem or two for your own house. It feels good to share. Always having clippers in the car is a handy thing.

There are so many unknowns right now about what a small business like ours is supposed to do. I am a list maker, I love a well organized drawer, I own stacks of graph paper notebooks and I love logic. These are my coping mechanisms so our house has never been so clean, nor our weeks so organized as lately, but of course that does nothing for the looming unknowns.

Here are a few things we are doing at Red Wagon right now:

  • We are growing plants as if all the same gardens will grow that grew in years past. The plant world is not adjusting or stopping. I have heard from a few of you that you would like to know if you can plan your garden as usual, and yes, you can. That is one thing I feel secure about.

  • We are adjusting our calendar of events on a week by week, day by day basis. If you are signed up for a class or seminar, you will receive an email with updates. Video conferencing, very small in person groups with lots of distance, one on one consults on the phone, cancellations and full refunds are the options we are considering.

  • We plan to open on April 17th with normal retail hours. But of course, this might change as we get closer. That evening’s cocktail party will likely be postponed. Again, we will keep you updated.

  • We will offer home delivery of plants once the weather warms up. More details coming soon.

  • We will also offer pre-picked plant orders that can be paid for online or over the phone and picked up in the parking lot. .

  • We will continue to deliver plants to our wholesale partners as long as they are open.

  • As of now, we still hope to hold our April 4th Open House. Since this is a small group, dispersed amongst 4 greenhouses and the outdoors, it seems possible to provide some much needed activity in an airy and clean space full of growing plants. Again, we will adjust as needed as we get closer.

Our amazing crew is taking all of the precautions possible to work safely - more distance, more gloves, tons of hand washing. Because we are in large open spaces, this feels doable, and frankly there is no other place any of us would rather be outside of home. We are offering paid leave should anyone need it, and because of this, I am sending out this little plea: please continue to support small businesses in any way you can. We must rely on each other.

In the meantime, please send us your gardening questions and stories, share photos of your garden, engage with us on social media, and help your neighbors as best you can. In my more fantastical, utopian moments, I dream of us as a current day, virtual land army, with plants, flowers and home grown food helping us get through anything together.

With love,

Julie

P.S. At the top of the driveway, please check out all of Family Cow Farmstand’s offerings. Their store is well stocked with gorgeous local foods in addition to their stellar raw milk. The store is self-serve and open every day. And they will be raising chickens again - shares available for sale now. These are the most delicious chickens I have ever eaten, raised in the nicest way possible by two very smart and wonderful people.

Fennel, Foeniculum vulgare, Apiaceae family

by Sophie Cassel, guest blogger, herbalist, and Red Wagon team member

fennel.jpg

With these plant profiles, my hope is to inspire gardeners to consider growing and using some of the lesser known herbs that Red Wagon propagates, both for their beauty in the garden and their myriad uses in the kitchen and medicine cabinet. Fennel definitely fits the bill here. At Red Wagon, we grow two varieties of Foeniculum vulgare- bulb fennel, which is grown as a vegetable and also known as Florence fennel, and bronze leaf fennel, which is grown as an ornamental and culinary herb with potent medicinal uses. 

If people are unfamiliar with bulb fennel in the garden or on the table, they are usually even less aware of bronze leaf fennel, but both of these varieties deserve a spot in the garden. In terms of medicinal usage, we’ll focus on bronze leaf fennel, which is actually quite a bit easier to grow than its bulbous relative, offering interest and uses throughout the growing season.

But first, we should acknowledge the long and celebrated history of fennel across cultures and healing modalities. The emperor Charlemagne reportedly required the cultivation of fennel on all imperial farms, and ever since Holy Roman conquerors introduced their favorite herbs to Anglo-Saxon Europe, western herbalists have extolled the virtues of this plant. My first introduction to fennel seeds, as a digestif following a rich Indian meal, points to its trusted use in Indian Ayurvedic medicine as well. In Longfellow’s 1842 poem “The Goblet of Life”, he too references the plant’s historic values:

Above the lowly plants it towers,

The fennel, with its yellow flowers,

And in an earlier age than ours

Was gifted with the wondrous powers,

   Lost vision to restore. 

It gave new strength, and fearless mood;

And gladiators, fierce and rude,

Mingled it in their daily food;

And he who battled and subdued,

   A wreath of fennel wore. 


Even if you’re not planning on going into battle or restoring sight to the blind this summer, fennel still deserves a place of honor in your herb garden. These days, it is chiefly used in all manner of digestive complaints like cramping, bloating, and that weighty feeling that comes after eating something that may not sit well. Like many of its cousins in the Apiaceae or Umbelliferae family (i.e. dill, coriander) fennel is considered carminative, meaning it helps to relieve gas and bloating. I have also seen this work in a similar way to alleviate the cramping that comes with premenstrual symptoms. Traditionally, the seeds of the plant have been the most trusted part for medicinal use, the feathery fronds and flowers also make an excellent tea or addition to salads and fresh summer dishes. 

From a gardener’s perspective, bronze leaf fennel is much easier to grow than its finicky vegetal sibling, bulb fennel. While bulb fennel requires consistent adequate moisture, fertility, and mulch,  bronze leaf fennel can thrive in a wider variety of soils and tolerates dry conditions. Sow or transplant once the ground has warmed, and offer plenty of sunshine, although some afternoon shade doesn’t seem to slow this plant down much. It can grow up to 2 feet high before flowering, and looks wonderful as a backdrop supporting other sturdy flowers, such as calendula or marigolds. 

Once the fronds have begun shooting skyward, you can harvest the leaves continuously for culinary use and bouquets, but make sure to let some go to flower. Insects (including swallowtails) adore the flowers, and as the they mature you can delight in the flavor of the slowly ripening seeds. Be sure to harvest dried seed before frost, unless you’d prefer a garden full of bronze leaf fennel in subsequent years because they self-seed generously. But with its copious culinary and medicinal uses, that wouldn’t really be such a bad thing. 

Using fennel for medicine is as easy as popping a pinch of the seeds in your mouth following a rich meal. I like to toast them a little before using to bring out their aroma and offer a pleasant crunch, and you can also fry the seeds in a small amount of honey to candy them and increase palatability. They also brew into a lovely tisane, steeped for 10 minutes in hot water (bonus points for your belly if you add some chamomile flowers to the brew). Fennel is very safe, and has been used for colicky babies as well as to promote lactation following birth. Fresh (or freshly dried) fennel is often considered decently palatable even to folks who have an aversion to the sticky-sweet taste of anise, another Apiaceae cousin of the plant.

Let this be the year you let fennel into your garden, your kitchen, and your heart!


References:

Ken Adams and Dan Drost, Fennel in the Garden, March 2012. https://digitalcommons.usu.edu/cgi/viewcontent.cgi?referer=https://www.google.com/&httpsredir=1&article=1267&context=extension_curall

Longfellow, H.W. Ballads and Other Poems, 1842. Found at https://www.hwlongfellow.org/poems_poem.php?pid=75 

Rohde, Eleanour Sinclair. The Old English Herbals. Originally published 1922: Longmans, Green and Co.


Grieve, M. A Modern Herbal. Originally published 1931: Harcourt, Brace & Co.

Tulsi (aka Holy Basil)

This is the first installment in our medicinal herb series by Sophie Cassel, Red Wagon Plants employee and Burlington herbalist. Please check our events calendar for her medicinal herb workshops this year.

sophie+with+tulsi.jpg

Tulsi (aka Holy Basil), Ocimum tenuiflorum Ocimum sanctum, Lamiaceae

While you won’t find Tulsi- also known as Holy Basil and Tulasi- in any classic English herb gardens or older western herb books, it has risen to prominence over the years both for its medicinal benefits and relative ease of growth, even while our northern climate is far removed from its native habitat on the Indian subcontinent. There, pots of perennially-blooming Tulsi bless the doorways of houses, where the plant is considered sacred by many. What a gift, then, that those of us far away in the western hemisphere can experience the joy of growing and using this plant!

Tulsi basil is in the same genus as our culinary basils, and within the umbrella of Ocimum tenuiflorum there are multiple subtypes and varieties, including Rama, Vana, and Kapoor Tulsi. While all three can theoretically be grown in Vermont, I have found that Kapoor Tulsi is consistently the easiest and most rewarding to grow, and that is the variety we grow and sell at Red Wagon Plants. Since I began growing Kapoor Tulsi in my gardens in 2015, I have become completely, utterly hooked on this plant. From watching its little paw-print shaped leaves evolve as seedlings, to inhaling its heady perfume as the flowers open, to sipping the tea of its dried leaves in the winter, I keep Tulsi close at hand all year long.

From a medicinal perspective, Tulsi is compelling as one of the easier “adaptogenic” plants to grow- adaptogen referring to plants that have been used to regulate and support our nervous systems and have a wide range of positive actions on our body, mind and spirit. While the uses and impacts of adaptogens are too complex to dive into here (although I like Jim McDonald’s credit card analogy), it’s worth noting that Tulsi can be helpful to both calm an overactive system, as well as provide some energy to a burnt-out one. It’s packed with antioxidants and is strongly anti-inflammatory. Plus, it tastes amazing- I often hear folks liken the flavor to an herbaceous bubblegum, and its sweetness makes it palatable to basically everyone, picky kiddos included. The Indian medical system known as Ayurveda considers Holy Basil a “rasayana”, translated as “to lengthen the lifespan” in Sanskrit. Most of what we in the West know about its uses stems from what Ayurveda has taught us from a 3000 year history of use and reverence. 

Growing Holy Basil is quite similar to growing other types of culinary basils- it prefers fertile garden soil with decent moisture and full sun, although it’s not as moisture-dependent as the Italian basils. It’s important to wait for the ground to fully warm up before planting Tulsi, so start seeds indoors or purchase plants to give yourself a leg up. Once established, you can get up to three or four big harvests over the season- once the plant has started to set flowers, cut down to about a foot and watch it spring back, bushier than before. However, its important to leave plenty of flowers for the bees, who go absolutely bananas for this plant. I have spent delightful stretches of time lying belly-down on the warm summer ground, watching the insect cacophony surround my row of Tulsi plants. If you’re really lucky and observant, a blissed-out bee will leave you a little red pollen sac on one of the leaves- a tiny treat! Left to drop seed, Tulsi may actually volunteer back into your garden, but don’t expect to see seedlings until early July when it’s finally warm enough to resemble the plant’s natural growing conditions.

The real question with Tulsi is what to do with your bounty once it’s been harvested. The high water content makes it a little finicky to dry. I’ve had the best luck in a dehydrator on low heat, but it can also be hung in small bunches in a warm, well ventilated area until the leaves can be stripped from the stems, which take much longer to dry. 

The easiest way to enjoy Tulsi is to use the fresh leaves and flowers. Fresh Tulsi sun tea is a transcendent experience on a hot summer afternoon. Simply place a handful of bruised leaves in a mason jar, cover with cool water, and leave in a sunny spot for a few hours (with the lid on to keep in all those aromatic oils!) It also makes a stellar vinegar infusion:

Tulsi Vinegar

  • 4-5 big handfuls of Tulsi leaves and flowers, chopped

  • Apple cider vinegar

  • Honey (optional)

Pack leaves and flowers into a jar, then cover with apple cider vinegar and steep for 2-3 weeks. Strain, add honey to taste, and bottle. Use this sweet, floral vinegar in salads, or mix with seltzer water for a summer-infused sparkling beverage. This will keep for at least 3-4 months, indefinitely in the refrigerator. 


Let Tulsi into your garden, and you’ll reap its blessings and benefits all year long!

tulsi.JPG


Resources:


De la Foret, Rosalee. Health Benefits of Tulsi. https://www.herbalremediesadvice.org/health-benefits-of-tulsi.html 

8 Plants to Grow for Your Home Medicine Chest

Thyme. Photo courtesy of Lisa Cassel Arms

Thyme. Photo courtesy of Lisa Cassel Arms

8 Plants for Your Medicine Chest

This year, make the commitment to add plant-based, home grown remedies to your life! Whether in the bathroom cabinet, the first aid kit, or the spice rack, medicinal herbs deserve a place in your home. Below are eight easy-to-grow herbs that you can grow and process to provide your family with plenty of herbal TLC. If you’re looking for more guidance on growing and using herbs this year, we’ll be discussing medicinal gardening in full on March 28th from 10-12 in the Red Wagon classroom!

  1. Yarrow (Achillea millefolium): This common roadside “weed” is actually a treasured medicinal wunderkind. The genus refers to its alleged use by the warrior Achilles, who brought the plant into battle to staunch the sword wounds of his soldiers. Swords aside, yarrow is the premier first aid herb for all sorts of cuts and scrapes. It is both styptic (staunching bleeding) and antimicrobial, so it is quite safe to put directly on a wound. When fresh, the leaves and flowers can be mashed or chewed into a juicy poultice and put directly on the skin. For year-round use, simply dry the aerial parts of the plant (as flowers begin to open), and powder the leaves and flowers. This can be stored in a first aid kit for easy access, and will keep for a couple years. Yarrow is a popular ornamental, so while the wild white variety is traditionally used medicinally, the brightly colored ornamental varieties can also be used in a pinch.

  2. Calendula (Calendula officinalis): Sunny, cheery “pot marigold” is one of the first flowers to burst forth in June, and one of the last to die back as frost looms in October. Harvesting is as simple as plucking the flowers from the stem as they open and drying them for a couple days in a warm, sunny location, then storing in a dark place. Once the plants start flowering, harvest can happen as frequently as every other day, which helps keep the plant in bloom consistently. Calendula is healing to all damaged tissue, internal and external, and can help foster immunity and a bright spirit in the depths of winter. Deb Soule of Avena Botanicals in Maine encourages everyone to “Grow a Row” of calendula as a way of supporting folks healing from abuse and trauma. 

  3. Echinacea (Echinacea purpurea, angustifolia): Many folks already have Echinacea growing as an easy native ornamental in their perennial gardens, but haven’t harvested it before. A favorite of nectar-seeking butterflies, both the flowers and roots of the plant are harvested for medicine. Pop the matured flower heads off the stalk through the late summer (leaving plenty for the pollinators), and either dry for tea or chop up and cover with vodka to make your own immune-boosting tincture. Harvest roots in late fall and add to the vodka, and in a month you’ll have enough Echinacea tincture to keep your loved ones healthy through the winter! 

  4. Tulsi (Ocimum sanctum, tenuiflorum): A relative of basil, tulsi brings joy to the garden with its heavenly scent and flower stalks that attract all manner of pollinating insects. Tulsi leaves and flowers can be harvested fresh for tea, or hung in a dry, warm place to dry, then stripped off their stems and stored for a burst of sweetness throughout the year. Though native to farm warmer climates, this plant thrives through our northern summers and is a favorite tea plant for children and adults alike.

  5. Thyme (Thymus vulgaris): We offer a few varieties of thyme at Red Wagon, and this culinary staple is equally useful as infection-fighting medicine. My favorite to dry for tea is the French variety, which is a bit more floral and sweet than the German variety. Harvest by giving the plant a “haircut” right as it begins to set blossoms, and dry in a basket or paper bag, then strip from the stem. Strong thyme tea with a bit of honey provides welcome warmth during cold and flu season, and it can be added to biscuits and other baked goods for a dash of herbaceous brightness.

  6. Rose (Rosa spp.): Growing roses can be as simple or as complicated as you like, but harvesting their bounty is easy regardless of the species you cultivate. As the flowers bloom, pluck the petals and allow to dry in a basket out of the sun. You can certainly harvest the buds, but that robs the pollinators of the nectar, and reduces the showiness of your plants. Often once the bloom has been pollinated, it will begin to drop its fragrant petals on its own, and you can come along with your basket to catch them! Rose petals brighten and sweeten any tea blend, add luxury to chocolate treats, and are a classic skin-soothing secret. To learn more about using roses in skincare, join us June 30th for a Make-and-Take skin spray class at RWP!

  7. Mint (Mentha spp): This year at Red Wagon we’re growing fifteen different kinds of mint varieties, all with distinct aromatic profiles! I’m personally a big fan of the Kentucky Colonel and Chocolate mints, but it’s tremendously fun to plant a variety (in pots if you’re concerned about spreading) and see which types work best in your kitchen. Mint dries well, and I often will combine a few varieties into a tea blend for greater depth of flavor. In addition to settling digestion and brightening the spirit, mint can be used to literally cool down in the heat of summer- a strong mint tea can be chilled, and applied with a washcloth to the face and neck after sun exposure (as well as drunk for maximum cooling!)

  8. Lavender (Lavandula spp.): What could be more classic in the garden than lavender? With its beautiful purple blossoms and sturdy upright habit, it’s the definition of classic English gardening. We have quite a few lavender varieties in the greenhouses. For harvesting, the Phenomenal (L. intermedia) type seems to be a frontrunner in terms of quantity and fragrance of blooms, but Hidcote and Provence also work well. Cut flower stalks in early bloom and make a fresh lavender wand, or dry flowers and leaves to crush for homemade sachets. I also love infusing lavender into bath salts, and drying to use in the winter for uplifting facial steams


I hope this list piques your interest in planning your herb garden this year! There’s more inspiration to be found on the Red Wagon Herbs We Grow list, so be sure to peruse before the planting season begins!

Classes and Events 2020

Our workshop space is lush and changes with the seasons from cold hardy violas in March to heat loving tropical plants in high summer. We set the stage each week to reflect the themes at hand and to help our visitors orient to the micro-changes of t…

Our workshop space is lush and changes with the seasons from cold hardy violas in March to heat loving tropical plants in high summer. We set the stage each week to reflect the themes at hand and to help our visitors orient to the micro-changes of the gardening cycle.

Photo credit to Kate Bentley

We are so excited to introduce our 2020 program. Please head over to the events page to see all the details.

New this year: our $5 Thursday 101 classes. Each one hour class is focused on a specific topic and is a quick and dynamic introduction to one type of plant. We hope to encourage a deeper understanding of the specific plants we grow, and to do so in an accessible and fun way.

We have expanded our Herb Farm Kitchen classes with lots of fun projects involving herbs, hot peppers and two very special classes with master jam maker, V Smiley. She will show us how to use honey, herbs, flowers, and fruit to preserve the garden bounty as sunshine in a jar.

Our popular Tuesday evening “Make and Take” classes are back. These are fun project parties in our greenhouses in the beautiful light of sunset . We provide you with the space, instructions and materials; you can customize the experience by choosing from a wide array of plants. We provide snacks and you are free to supply your own (grown up) beverages if desired. This is really fun with a group of friends or a family get together.

And finally, our Saturday Seminars each focus on an in depth topic that will improve any gardener’s skill set when it comes to planning, maintaining and establishing all types of gardens.

We are so grateful for the community of plant lovers that make up Red Wagon Plants. Thank you for making this teaching and growing opportunity an integral part of our business. Please spread the word about these classes and events. And WELCOME to a whole new year.

Face Steams for Winter Vibrancy

Guest blogger, herbalist and RWP staffer, Sophie Cassel will be writing a series of blog posts this year with the goal of giving us some ideas for using the herbs we grow. This month’s post is just in time to provide some relief to congested sinuses and dry skin. Thanks, Sophie.

photo by Lisa Cassel Arms

photo by Lisa Cassel Arms

Winter in the north country is known for snowy hills and cozy times by the woodstove, but it’s also a time of dry skin, stuffy noses, and the lingering spectre of colds and coughs. The dry air both outside and in our heated homes robs our skin and respiratory system of its moisture, leaving us with nosebleeds and cracked lips and making us more susceptible to infections. While humidifiers and hot tea are wonderful allies, my favorite way to combat winter dryness is with the simple process of facial steaming. 

I love face steams for a few reasons. First, they’re cheap and easy. If you have access to boiling water and a big towel or blanket, you’ll be able to do a steam. They’re also effective on multiple levels, relaxing the mind while bringing needed heat and moisture to dry, irritated passageways. And finally, they’re luxurious- call it a “home spa” and make it a regular part of your winter self-care routine!

While a basic face steam can be achieved by simply hanging out under a towel with with a bowl of boiled water, the addition of aromatic herbs doubles the benefits. That’s because the strong aromas we associate with herbs like mint, lavender, or sage come from volatile oils- otherwise known as essential oils, and considered part of a plant’s communication and defense systems. These oils pack a punch because they readily volatilize into the air, which is why when you brush past your rosemary plant you get such a strong odor. They are also readily absorbed by our body, having effects on both mood and our own immune system. 

When we add fresh or dried aromatic herbs to hot water, those essential oils vaporize from the plants into the air, where we can absorb them directly into our respiratory systems, bringing that antibacterial action directly where it’s needed. It’s a great way to use the bounty of your garden through the winter, and more environmentally responsible and affordable than using vials of store-bought essential oils.

To make, you’ll need:

  • Glass or metal bowl (my gallon-sized measuring bowl works great)

  • Large bath towel or thick blanket

  • Freshly boiled water

  • 2-3 tablespoons of your favorite aromatic dried herbs. For mucus-busting, my favorites are sage, thyme, peppermint, and species of Monarda (commonly known as bee balm or Oswego tea). To restore dry skin and soothe the mind, I love using lavender (flowers and/or leaves) and rose petals. Experiment with combinations of your favorite herbal scents, knowing that if it smells fragrant when you crush the leaves or flowers, it will make an excellent steam. You can definitely use store-bought tea bags if you’re without freshly dried herbs, but they won’t be quite as potent.


To use: 

Toss the herbs in your bowl and place on a table where you can sit comfortably. Have your towel ready as you pour about a quart of freshly boiled, very hot water into your bowl (be careful!) Quickly cover yourself and the bowl with the towel so that the steam rises towards your face. It should be quite hot, but not uncomfortably so. Practice taking deep breaths through your nose and mouth and sit quietly with the steam for about 10 minutes, or until the quantity of steam dies down. You can add more hot water if you’d like, or use the cooled tea to water your houseplants. I also like to leave the bowl out near a radiator to fill the house with the remaining aromatics. Finish up with a gentle skin cream to seal in all that moisture.

Try to do this a couple times a week to maintain radiant skin and a healthy respiratory system, or at the first sign of any cough or cold. Bonus points if you have a hot cup of tea waiting for you at the end! 

Openings for our Retail Crew in 2020

sarah watering.jpg

Open Positions for the 2020 season in our retail operation in Hinesburg, VT

 Red Wagon Plants is known for high-quality organic plants and stellar customer service. Our retail crew is the face of the operation and we count on our staff to be knowledgeable, courteous, and confident. When not helping customers, people on the retail crew are moving plants all day long, restocking, and keeping the greenhouses clean and tidy. We are continuously making room in the retail greenhouses for new plants from the production greenhouses, creating displays and filling our space with color. We expect our retail crew to have a strong memory so that they can recognize our regular customers, remember plant names and  also know where all the plants are located. Our retail crew is responsible for watering and maintaining plant health within the retail greenhouses. We have a fun work atmosphere with fellow plant lovers, a paid lunch break, free plants for your own garden, a living wage, and a beautiful work environment.


Interested in being a Retail Crew Member?

Requirements:

·         You are a gardener and plant lover with a strong background of gardening in Vermont.

·         You have a growing interest in perennials, annuals, container gardening, vegetable gardening, You have the confidence to give advice to beginner and more advanced gardeners.

·         You are physically fit to work outdoors in all weather and lift heavy plants repeatedly.

·         You are friendly, kind, and patient.

·         You enjoy working in a team.

·         You are able to keep your calm in a busy and crowded retail setting.

·         You love plants and love talking about them!

·         You can work independently and have a sense of responsibility.

·         You have already worked in either a retail garden center, a vegetable or flower farm, for a landscaper or a nursery OR you have at least 5 years of experience gardening in a climate like Vermont's.


When?

·         Seasonal Position, Mid April to June/July - we have some flexibility on end dates.

·         Our open shifts are 7:30-3:30, 5 to 3 days a week, and must be available for 1 weekend shift per week.

·         Fulltime preferred, part time considered.


If you would like to apply, please contact:

Retail Manager,  Lily Belisle, lily@redwagonplants.com with resume, 3 references, and a cover letter describing why you’d like to work with plants and with Red Wagon.  Tell us what you love most about gardening! Show us why you want to share your love of gardening with others.

Peanuts!

Chad’s homegrown peanuts

Chad’s homegrown peanuts

The following is Chad's account of how he grows peanuts in his home garden in Addison, VT.


I bought my seeds from Baker Heirloom Seeds; I did one pack of White Spanish Pearl

--------A small shelled variety that contains 2 good sized nuts. The kernels are wrapped in white wrappers. Was believed to be donated to the USDA by Israel in 1964. They are rare and often sold out so make sure to order really early.

I planted my seeds (Shell and all) in the first week of June to avoid all chances of a frost and give the soil a chance to heat up to avoid any rot. I planted a 5' wide by 10' long bed with two rows (~24" between rows) and a seed every 6" in that row. They recommend 12" spacing and I was going to thin to that, however, the peanuts seemed to be doing fine in a little less space because in our climate they don't get nearly as big as they do down south.

Three weeks in I had great germination and roughly 3-4inches of growth on all my plants and then overnight the rabbits decimated my patch. They took nearly everything down to the ground in 12 hours. I then placed a 4' tall chicken wire fence around them with the base anchored down with landscape staples. This worked great, and I left it up until harvest.

The plants were flowering by Early July and began to set their fruiting pegs by end of July.

Most people don't know, but Peanuts flower above ground like most other plants in the Fabacea family, however, once the flower is pollinated it grows a thick, dark stem like growth called a peg that grows straight down into the surrounding soil where the peanut develops. It takes roughly 2 weeks from pollination for the peg to hit the soil. It takes roughly another 10 weeks for the peg to develop a mature peanut.

Therefore, once you see the first round of flowers you should start to cultivate and loosen the soil surrounding the plants. This will help by allowing the pegs to penetrate the soil much easier especially in our typically clay soils. I personally cultivated the soil at first sight of flowers and then lightly cultivated and mounded the soil once I saw the pegs just starting to touch the soil. I didn't do anymore cultivation after that for fear of disrupting the already established pegs.

I didn't do any type of fertilizer, or any supplemental watering and my plants did great.

The plants starting to turn a light yellow as the first few light frosts hit in early to mid October. At this point I began to pull up a couple pegs to determine how far along the developing peanuts really were. On October 20th I harvested everything. From Seed to Harvest it took roughly 20 weeks. From first Flower to Harvest it took roughly 12 weeks.

For Harvest you simple lift the whole plant with a garden fork, spray the peanuts clean, hang dry on the plant for 2 weeks (the peanut should start to rattle inside the shell), dry off the plant for another two weeks, and then roast or boil and EAT!

Green Tomato Salsa Verde

photo: Kate Bentley

photo: Kate Bentley

Here is a perfect way to use up lots of tomatoes from the garden even if they have not ripened yet. Everyone who tastes this salsa loves it, and it is very easy to make. If you would like to freeze it, it does so very nicely in bags or jars or plastic containers; however, I usually can mine in 1/2 pint jars so that it is ready to go. If you do not have experience with hot water bath canning, please read about it on the ball website. The instructions below assume that you know how to sterilize jars and that you know what “process in a hot water bath” means. You also can just share with friends, and eat this fresh, right now. Or preserve some for later, and keep some to eat now, depending on how many green tomatoes you have to use up. This recipe is from a blog called Local Kitchen, where I have found many recipes that I love for winter preserving. I usually double this recipe for a bigger batch.

Salsa Verde

INGREDIENTS

  • 4 cups green tomatoes, finely chopped

  • 1/2 cup red onion, diced to 1/4-inch (about 1 tennis ball-sized)

  • 1/2 cup green bell peppers, diced to 1/4-inch

  • 1/2 cup minced hot peppers (a mixture is great), with or without seeds (about 3 – 4 large) (wear gloves)

  • 1/4 + 1/8 cup white wine or cider vinegar

  • 4 tbsp lime juice

  • 3 large cloves garlic, minced

  • 2 tbsp fresh cilantro, chopped

  • 1 and 1/2 tsp ground cumin

  • 1/2 tsp sea salt

  • 1/4 tsp chile pepper flakes

  • 1 tsp raw sugar (optional)

METHODS

  1. If canning, prepare canner, jars and lids.

  2. Chop vegetables. Add all ingredients except cilantro to a medium stockpot; bring to a boil over high heat. Reduce heat and boil gently for 10 – 15 minutes, or until vegetables have softened and the salsa has thickened slightly. Add cilantro, mix well and return to a boil.

  3. Ladle hot salsa into hot, sterilized jars; remove air bubbles and push all vegetables down below the level of the liquid, adding more salsa to yield a 1/2-inch headspace if necessary. Wipe rims, affix lids and process for 15 minutes in a boiling water bath.

Yields about 5 half-pints.

Secret Sauce to Remember the Herb Garden in Winter

Photo by Kate Bentley

Photo by Kate Bentley

This blog post is guest written by Sophie Cassel, Red Wagon Team member and herbalist educator. Thanks, Sophie!

As much as I love ripe tomatoes and blooming flowers, high summer to me is all about the fresh herbs. While this time of year you’ll find me outside snipping chives and parsley to add to my meals, it’s also a great time to prepare for a day when we don’t have a bouquet of fresh herbs outside our doorstep. Dried herbs have their purpose in the kitchen, but fresh-frozen herbs can add a whole new depth of flavor and color to any midwinter meal. The easiest way to do this is by employing some ice cube trays and a little creativity to make what I like to call my “secret sauce cubes”. 

If you’ve ever made fresh pesto, you’ll recognize the general technique, but the beauty of this technique is that you can really let your imagination, as well as your garden, guide your recipe.

Basic Recipe:

  • Gather your herbs from the garden or farmer’s market. This is a great time use up the leaves from those woody basil plants or the kale that’s looking a little bug-eaten but still has good flavor. Try to pick a selection of flavorful plants and good bases like spinach, parsley, or kale. You’ll need somewhere between 2-3 largeish bunches of herbs per ice cube tray.

  • Roughly chop herbs and remove woody or tough stems. Rinse everything and shake the excess water off, but don’t dry the herbs out.

  • Toss it all in the blender! Now’s the time to add things like garlic, ginger, chili flakes or citrus zest. You can also add a little salt to taste, but I keep mine salt free so I don’t have to worry about the extra salt when I’m throwing the cubes in my cooking.

  • Pulse in the blender until everything is evenly pureed, scraping down the sides as necessary. Add just a little water to emulsify, a tablespoon at a time.

  • Spoon your herb puree into ice cube trays and freeze for a few hours or overnight.

  • Transfer the frozen cubes to a plastic bag that is labeled with all ingredients, and store in the freezer for a snowy day! 

  • To use the cubes, thaw on the counter while you’re preparing your food. You can add them in while you’re sweating onions at the beginning of a dish, or toss in towards the end to lend a bright green hue and tons of flavor. Remember that if the cubes are still cold, they will lower the cooking temperature of your dish, so slowly bring it back up to heat through. 

If you’re the type to can fresh tomatoes for winter sauces, adding a couple cubes of fresh-frozen oregano and parsley when it comes time to make pasta will result in a transcendent trip back to summer. Many a meager rice-and-vegetable stir fry was elevated this past winter using chef Amanda Cohen’s “Secret Weapon Stir Fry Sauce” (from the New York Times) which was my inspiration for breaking out of the basic basil pesto mold. Amanda Cohen’s delicious Asian-inspired blend is just one of many combinations based on what you have on hand throughout the season. Cohen recommends blanching her ingredients before blending, but I’ve found that you can also keep things raw if you’d rather not boil water in the heat of summer. Below I’ve included some combination ideas, but feel free to experiment! Your future self will thank you.  

Amanda Cohen’s Secret Weapon Stir-Fry Sauce:

  • Cilantro

  • Parsley

  • Thai basil or other basil

  • Spinach

  • Garlic, peeled

  • Fresh ginger


Pesto inspired

  • Basil

  • Parsley (about 1/4th the amount of basil)

  • Garlic cloves

    • I prefer to keep my pesto basic at this stage, and leave room for adding cheese or nuts during cooking. 

Chimichurri inspired:

  • Parsley

  • Arugula

  • Oregano

  • Garlic or shallots, chopped

  • Chili flakes

    • Add lime juice, oil and a little rice vinegar when cooking

“Scarborough Faire”:

  • Parsley

  • Sage

  • Rosemary

  • Thyme

  • Oregano

  • Marjoram

    • Make sure to strip leaves off any tough or woody stems

Zucchini Days

costata romanesco zucchini on chair red wagon plants
  • It is that time of year, when the zucchini plants needs to get checked every couple of days or you end up with some giant baseball bats in no time. I have unfortunately not followed my own advice, and ignored my plant for 2 weeks straight, only to be confronted with vegetable mayhem. But, in need of some inspiration, I have turned to social media to find out what you all are doing with your big zucchini and here is a round up of the brilliant ideas:

  • shredding all the zucchini in 2 cup measurements and freezing it. I make zucchini tots and bread in the winter! Also made a zucchini pie with corn and mushrooms, one for the freezer, one now.

  • Bread, cookies, zucchini noodles

  • I just made zucchini chocolate chip bread

  • Zucchini pizza crust: There’s recipes online but also in the old-school Moosewood cookbook: grate and salt zuke, wring it out, mix with eggs, a small amount of flour, parmesan and mozzarella, bake, dress with toppings and bake again. I’m still tweaking things to make the crust more crusty and less soggy, but it’s really tasty.

  • Bread or baked stuffed zucchini .

  • Roasted in tomatoes, garlic scapes and butter. Finish with fresh goat cheese

  • Among my favorites: grated into fresh spaghetti sauce, roasted w/ olive oil as a side veg, zucchini relish using my Mom’s recipe!

  • Walk around Shaw’s and Hannaford’s parking lots and put some in every vehicle with its windows down. 😂 That’s what my grandfather used to do.

  • Zucchini lemon bread with apple juice from how to cook everything- Mark Bittman ( fruit and veg bread)-

  • Smitten kitchen zucchini fritters!

  • obviously you could install an engine into that big guy. take it for a spin.

Thanks for all the suggestions! Here are the two I am making this week:

Chocolate zucchini bread from King Arthur and the zucchini fritters from Smitten Kitchen.

Design Inspiration and the Gardens of Chicago

Echinacea (maybe ‘white swan’?) at Lurie Garden in Chicago.

Echinacea (maybe ‘white swan’?) at Lurie Garden in Chicago.

I am writing this from Chicago where I have been lucky to spend a few days with other plant people attending the Perennial Plant Association’s annual symposium. Legendary garden designer and plantsman, Piet Oudolf, gave the keynote address and spoke on a panel on Tuesday, and on Wednesday, we spent time touring the Lurie Garden that he designed in Millenium park. Also present were other designers such as Roy Diblick and Kelly Norris. Roy’s gardens include the Shedd Aquarium, which I captured a tiny corner of in this little video. This movement in garden design, which has been around for a while in Europe and here for about 20 or so years, is naturalistic, based on prairies, and inherently ecological. In this case, Lake Michigan is an important migratory pathway for birds and the addition of prairie plantings on the water’s edge has attracted a huge amount of butterflies, birds, and pollinators to the area. If you are in the Chicago area, I strongly recommend a visit to these two gardens, about a 20 minute walk from each other along the water’s edge.

I feel so inspired to bring you more perennials in 2020. The future of ornamental gardening has to be ecological, in my opinion, and part of that is being affordable. These types of plantings require a huge amount of transplants, and the benefit is less weeding because of the planting density. If you are interested in this, let me know. I would love to work on growing plants for specific projects and am doing all of my ordering now. This style of planting requires lots of small plants, not showy 2 to 3 gallon plants that bloom right away. I am not a designer, but I can certainly help make suggestions and point you in the right direction for resources about this style of gardening. Maybe a winter book group would be a good idea? I would like to read this. Does anyone local want to join in and meet up to talk about it sometime in September or October?

I find that August is a great time to start planning. It is when I make plant lists for the coming year, it is when I evaluate the current year’s garden and take notes and it is when I actually place orders for cuttings and bare root stock for the following year. If you would like to take a step back from your ornamental garden to evaluate or make plans to adjust things, now is a great time to do it. It is often too hot to be in the garden, but you can certainly be working on the garden. I would rather do big plantings and edits in the cooler weather of September - plants will still have plenty of time to get established before the cold hits, and the watering requirements are a little less demanding.

I am so excited to get back to Vermont and put into motion some of what has inspired me this week. And I am especially happy about the timing of this Saturday’s workshop with garden designer Charlotte Albers, who owns Paintbox Garden. She will be coming to Red Wagon to talk about the use of color in the garden. She will give us an inside look at how we can select and combine plants for maximum effect. There are still a few spots left, and you can sign up here. Here are some words from Charlotte for inspiration:

The garden is constantly changing. It's a living artwork, nothing is static. When I walk through my gardens each day is an exploration of shape and texture, color and scent. But for me, color is the thing that brings the most joy. I love certain combinations - right now it's the purple spikes of gayfeather (Liatris spp.), Siberian catmint, and 'Rozanne' geranium mixing with deep yellow gloriosa daisy and the clean white blooms of 'Becky' shasta daisy. Easy to snip and put in a mason jar too.

As a designer I look primarily at foliage - it's what interests me most after form and suitability (I prefer to design with native plants and cultivars). I like leaves with unusual colors - chartreuse, mahogany, variegated forms of hosta and coral bell add character and energy. Foliage is what stays around the longest so it matters more. Flowers are secondary to me.

In this workshop we'll cover the color spectrum including many of my favorites for containers, beds and borders. There will be a handout plant list; after the horticulture portion and a yummy snack break everyone will have a chance to design a garden of their own to take home as a guide.

And we are having some sales at the greenhouse. All annuals are 50% off and all shrubs are 15% off. See you soon!

Early July Garden Tips and Chores

beans growing on vine.jpg

Early July is the perfect time to do a little garden make over in the veggie garden and with your potted plants. One question we get a lot - Is it too late to plant beans? Not at all! I recommend that you plant bush beans in small amounts, but every 2 weeks or so for a continuous harvest all summer long. A good rule of thumb is that for every handful of beans you want to harvest, grow about 2 feet of beans. The seeds should be sown about 2 inches apart in a shallow trench about 1/2 inch deep. Seeds should be covered as deep as they are tall, so not too deep. Press the soil down gently with the palm of your hand, and water thoroughly. The seeds will germinate in a few days, and when they are about 6 to 10” tall, you can plant another small patch. I do just 4 or 5 feet at time usually. And if you want to have a large amount of beans for pickling or freezing, make sure that one of your generations is really big. Having a big bean batch is perfect if you are prepared for the harvest bounty. If you just want a few meals’ worth of beans during part of the summer, a small patch is just enough. Too many beans can feel overwhelming and cause you to feel guilty about not harvesting in time. We don’t want that. My favorite variety is Provider. They are really dependable and can be planted from late May all the way to August 1st. So you have another month of bean planting ahead of you. They are the perfect thing to throw in the garden where you may have cleared out a patch of salad greens from an early planting.

Speaking of clearing out spots in the veggie garden, now is the perfect time to use those cleared out spots for fresh batches of cut flowers, scallions, fennel, greens, lettuces, and beets. It is fine to sow beets up until mid-August. I always tuck scallions into little corners of the garden, and lettuces can go into the shade of the tomato plants. If you want a big batch of pesto, plant lots of basil now - if you planted basil early in this cool and wet spring, it might not be happy right now, and you will be better off with a new planting. You will see the difference warm soil makes - basil is much happier planted in July than in May. Cut flowers are such a fun thing to add to the garden - some of my favorites for right now are scabiosa (we have three or four colors available), annual asclepias (a milk weed relative that is a stunning orange and red color), celosia for hot colors and fun texture, sunflowers, euphorbia ‘snow on the mountain’, snapdragons, and lisianthus. Our plants are big and healthy and will start blooming in just a couple of weeks from the time you transplant them.

If you are interested in making a big batch of salsa with your tomato harvest, make sure to plant some cilantro now. Pickles in your future? then plant more dill now too. You should probably plant dill from transplants if your cucumbers are going to be ready soon or you can do it from seed if your cucumbers are timed to be ready in mid-August. You have control over so much in the garden, and there is no reason to have a crazy jungle and bounty all at once. Timing is everything!

On that note, I just took a look at our top Google searches that send people to our website, and was surprised that for three years, our most popular page is this one. Cilantro and dill bolt (go to seed) and that is just their life cycle. The best way to cope with that is to plant often. Both from seed and from plants - it will give you two generations at once if you do that. If you are eager to make lots of salsa this summer, make sure to replant cilantro so that it is ready at the right time - now from seed or early August from plants. We also have another Mexican herb called Papalo which some people love to use as a substitute for cilantro. They don’t taste the same, but are equally delicious in a salsa, and papalo has a summer long harvest window - no need to replant. Next time you visit, feel free to try a leaf from the plants in the greenhouse…we are curious what you think!

Another chore for right now is feeding your containers. As heat sets in, many annual plants will feel stressed. Keep them well watered, and give them a little boost against the stress with a good, well balanced fertilizer. My absolute favorite is Compost Plus from Vermont Compost Company. It is a compost based fertilizer with all the micro nutrients plants need to thrive all summer long. Just sprinkle a handful or two on the top of the soil around the base of each plant, then scratch it in a little, and water gently to soak it it into the soil. I use it on houseplants, hanging baskets, all my potted annuals, and hanging strawberry plants.

And finally, some homework. Please make sure to just enjoy the garden. Sitting with morning coffee, wandering through in the evening with a glass of rosé, taking a morning stroll of appreciation, sitting quietly to hear the birds and watch the bees….creating these moments for myself has been the most important part of gardening lately.

mid-June Garden tips and chores

We can help you get set up with row cover just like this. Photo from Johnny’s Selected Seeds.

We can help you get set up with row cover just like this. Photo from Johnny’s Selected Seeds.

Hopefully you have been able to put some tomatoes in the ground at this point. And if not, don’t worry. It is not too late. I have successfully planted tomatoes as late as July 1st and still had a decent harvest. The trick is to look for varieties that will mature in under 72 days or so. Our tags usually have the days to maturity listed. This means you can count the days from the time of transplant and get an estimation of when you will be harvesting. This varies with the size of the seedling somewhat, and because we sell such beefy, healthy plants, we are often ahead of what the tags say. Here are some varieties I would recommend right now - any of the cherries, Juliet, Celebrity, Big Beef, Black Prince, Cosmonaut Volkvov, Mr. Stripey, Clementine, Jaunne Flammée, Eva Purple Ball, and many more. Our staff is always happy to help you with tomato selection, and I am there on Saturday if you want to ask me personally.

All of this rain has made it hard to get into some of our gardens, and we have delayed some projects and changed the course completely on others. Gardening is a humbling act and always a good teacher. You must bend and flex and adjust. Our plans to put in a display garden at the edge of the herb farm are now getting completely reworked as we see what a wet swamp it is during a rainy year. That is ok, we are taking the opportunity to research vernal pools and what type of ecological landscaping we can do in a site like that. It is easier to bend to what the site wants than to force a piece of land into something it is not meant to be. So one tip this June —don’t force it. Adapt.

We are reducing our display garden to a dry strip of three beds along the herb farm caterpillars. Sarah M. has been helping me transplant everything and it is looking great. Here are some extra steps we are taking to mitigate the wet and to ensure the plants take off at a rapid rate:

  • Compost Plus in the planting hole. I do this with all the plants I put in the garden. It is magic fairy dust.

  • Landscape fabric for weed control and extra warmth. We use a re-usable kind that can be folded up in the winter and re-used every summer. We burn holes into it with a blow torch and lay it over prepped beds with drip irrigation lines underneath. This is a lot of set up but it is a one time effort to minimize weeds all season and to guarantee that the root zone is warm and watered well (if it ever stops raining every other day!).

  • Cucurbits (anything in the squash, cucumber, pumpkin family) are getting hoops and row cover over them to add warmth, protect from wind, and protect from cucumber beetle (those little yellow and black striped guys). Once the plants are bigger and start to flower, I will take the row cover off so that the plants can get pollinated. Usually by that time, the plants are big enough to out compete any damage caused by the pests.

Cucumber beetle prevention starts now with row cover.

Cucumber beetle prevention starts now with row cover.

A lot of organic pest control methods have to do with timing….in this case it is pushing the plants along to grow quickly, so that they can outrun the pest’s life cycle. Understanding pest habits and plant habits and manipulating the plants when possible is key to good gardening. By manipulating I mean slowing down or speeding up, pruning, fertilizing, and weeding. Sometimes a weed is a host for trouble makers, and it is important to stay on top of it. Other times, planting something late gets it in the ground after the life cycle of a pest is complete. Gardening without chemicals means treating the garden like an ecological system - and we as humans, are part of that system.

  • We are watering the cucurbits once a week with a strong solution of fish / seaweed emulsion. This will help them get big before they flower so that they are really healthy when they go into the fruiting stage. Flowering and fruiting require a lot of energy and the more green leaves on a plant, the more they will be able to photosynthesize to support the fruiting and flowering. This applies to cucurbits more than to tomatoes.

  • Only fertilize tomatoes at transplant time and then again two weeks later. Tomatoes can get too green in our short season, and then they do not actually make much fruit. It is important to only feed tomatoes when they are young - at transplant time and maybe one other time before they flower. If you encourage green growth once they flower (in the form of nitrogen rich fertilizer) it will cut down on your tomato harvest. A little bit of stress is actually good to induce flowering and fruiting in tomatoes.

  • Now is a great time to keep transplanting lettuce, greens like chard and kale, kohlrabi, spinach, beets, scallions, mini onions, boc choi, cabbage, broccoli, and fennel. We have a great selection to choose from and will always encourage you to grow in successions. Running out of lettuce in the heat of summer is a drag because that is when salads are all you want to eat!

    And I hope you remember to just enjoy the garden. Stop to just breath it in, and don’t just see it as a list of chores and projects. There is always some bit of beauty to focus on. I have found great pleasure in just walking through my garden early in the morning, coffee in hand, and purposefully ignoring the thoughts of “I should do this” or “this looks bad”. It is become a morning ritual that I really love - just noticing something new in the ever changing world of my home garden.


Cafe in greenhouse 3 update

oysters.jpeg

. Julianne and Didier Murat are making coffee, juices, and treats Fridays (11 am to 6 pm), Saturdays (9 am to 6 pm) and Sundays (9 am to 6 pm). New starting in June - OYSTERS!

BYOB.

Come for oysters and your very own rosé amidst the plants for a lovely afternoon pause. We are so excited for this.

Rainy Weather Gardening

The weather lately is really putting a damper on my gardening aspirations. I am gong to make the best of it, and focus on what can actually be done in the cool and wet spring we are having, rather than on what cannot be done.

Paths are newly mulched with cardboard and bark mulch. The row cover tunnel just yielded our first harvest of mache and arugula and was just replanted with chard and broccoli raab. The row cover with hoops is one of the best ways to keep bunnies out…

Paths are newly mulched with cardboard and bark mulch. The row cover tunnel just yielded our first harvest of mache and arugula and was just replanted with chard and broccoli raab. The row cover with hoops is one of the best ways to keep bunnies out without a fence. This is the year of the bunny. We even have a bunny statue to beg off the bunnies and ask them to spare us, but it is not really working. Chamomile and stone edging is looking cute and a new patch of self seeding Marble Arch Mix Salvia will provide us with edible flowers, cut flowers, and dried flowers for a few years.

Here is what I am doing in the garden this week:

Clean up and mulch the path ways.

The weeds come out easily when the ground is wet. It is ok to walk on the pathways to clean them up and mulch them, but I avoid walking on the growing beds or doing much to the soil in the growing beds when the ground is really wet. Doing so would compact the soil and adversely affect the tilth. So, the paths are getting a little extra attention this year and I am mulching with a thick layer of cardboard and some rough bark mulch from Clifford’s lumber. This is not the regular bark mulch from a garden center - it is a byproduct of a local, family owned sawmill just down the road. I would not use it in all applications where mulch is needed, but it is perfect for paths and under trees and shrubs. It is a little too coarse for perennial beds (but that is a whole other topic, because really I don’t think bark mulch belongs in most perennial beds). Once the paths are clearly defined and mulched, the rest of the season will be so much less labor intensive in the garden. Some other mulch ideas for paths are burlap coffee bags (which you can find this Saturday at our New North End Plant Sale at Bibens Ace Hardware on North Ave in Burlington). straw (I recommend the organic straw from Aurora Farms in Charlotte), or a combination of newspapper and leaves. These are all pretty heavy duty recommendations for paths. I would not use a heavy mulch like this right under smaller growing plants because the decomposing organic matter uses up the nitrogen in the soil and starves the plants of the food they need for healthy growth. Mulching paths is satisfying and really pays off in the long run. Plus, you can do it in the rain.

Plant more salad greens and try out some new varieties of cool hardy vegetables, flowers and herbs

I just added two kinds of kohlrabi to the garden, green Swiss chard, some Italian bulb fennel, broccoli raab, dandelion greens and frisée. This weather is perfect for transplanting a few plants here and there into corners of the garden. Again, you want to avoid working your soil when it is wet, but it is entirely all right to loosen up small corners of beds and tuck in a few plants here and there. I just harvested my first planting or arugula and of mache and re-planted right into those spaces. I did not disturb the wet soil too much, and I think they will all be fine.

Make containers

Picking out colorful annuals and cool foliage plants is the perfect antidote to the grey and the wet days we seem to be stuck in lately. I am covering my mom’s balcony with pots of geraniums, agastache, salvia, herbs, petunias, argyranthemum, canna, millet, banana, and heuchera. Heurchera, or coral bells, is an under-used plant in containers, and adds broad texture, interesting contrasting color (so many to choose from), and looks good all season long. We have a dwarf red banana we are growing this year that has a beautiful glossy red tinged leaf and looks really striking with the wispy orange of the Kudos mandarin Agastache and the red veined caramel heuchera. Tuck in a red oak lettuce here and there, and you will have a gorgeous container with edibles, perennial and season long interest that holds up well in rain, cold, heat, and dry. I love helping people make containers and have two more Make and Take classes coming up in June for shade loving containers. There is still room to sign up in both.

Wistfully choose heat loving crops

This weekend, I plan to select the tomatoes, eggplants, peppers, melons, cucumbers I want to grow, but I am just hardening them off for now. I am not planting them in the ground. This means that they will come inside at night if it is below 45F and they will go back out in the day time to feel the sun (wishful thinking?), wind, and rain and get used to real life outside. What I am not doing is planting them in the cold ground. That would just stress them out. They need soil that is 50F or warmer in order to grow well, and stressing them at a young age will weaken them when they are older and diseases start to settle in. Planting heat loving crops in cool weather is just asking for trouble down the road.

Move perennials

They love this weather. If you have an area that once was sun but now is shade, it is a great time of year to move those sun loving plants to a brighter spot, away from the encroaching shadow of shrub and tree. I took advantage of the dry and warm day on Wednesday to clean up a perennial bed and replant with shade loving plants under the shrubs that now cast shade. I used tiarella, pulmonaria, variegated Solomon’s Seal, Jacob’s ladder, and hostas. I love that sun to shade switch that inevitably takes place in a garden, the moving art of it all.

Hopefully, this gives you a good amount to do and scratches the gardening itch just enough. Happy gardening!


Who likes what? Inspiration for this rainy and cool spring.

calendula.jpg

While it has been a little cool and wet, I have had some extra time to plot out some new combinations I want to try in the garden. I love to mix up edible and ornamental plants, and coming up with some new ideas is always a creative part of the garden process I enjoy

People often ask me about companion planting, with the goal of learning more about what plants keep pests off of what other plants. I usually reply by saying that a mixed garden, with flowers and herbs interspersed among the vegetables generally helps confuse insect pests and also helps attract beneficial insects who are in search of pollen. Here are some combinations that I regularly create just because they work so well. Maybe as an exercise in trying something new, you could try your hand at one or two of these combos and then come up with some of your own. It is a great way to study plants, contrast, colors, and texture in the garden.

  • Verbena bonariensis, California poppies and lacinato kale - We do this often in the demonstration garden at Red Wagon Plants because the Verbena bonariensis is self seeding, along with some California poppies, and it is just so simple to throw in a few kale plants and see the magic unfold all summer long. The poppies bloom first and are a cheery, airy note floating beneath and alongside the dark green, almost black foliage of the kale. Later on, in late summer, the kale is bigger, the poppies are finished blooming and the verbena kicks into high gear with wiry stems waving high above the kale; delicate purple blossoms nod above the mature, gnarly textured leaves of the kale.

Some other favorites include:

  • Rainbow chard, gem marigolds, and lunchbox peppers

  • Opopeo amaranth,nicotiana elata, northern sea oats and redbor kale

  • Green butter lettuce, curly parsley, and calendula

  • Tokyo Bekana mustard, chervil, green oak lettuce, pansies and alyssum

  • Bleu Solaize leeks, Hungarian bread seed poppy, and rebor kale

  • Datura, African blue basil, and dusty miller

Team Red Wagon, Vadeboncouer and Some Jobs for the Week

Team Red Wagon 2019. Front row, l to r, Julie, Claire, Sarah M., Sophie, Tina, Mary. Mid row, l to r, Chad and Conor, Carol, Jane, Lily, Lisa, Hattie, Oren, Jess. back row Kat, Sarah B., Rob, and Kate.

Team Red Wagon 2019. Front row, l to r, Julie, Claire, Sarah M., Sophie, Tina, Mary. Mid row, l to r, Chad and Conor, Carol, Jane, Lily, Lisa, Hattie, Oren, Jess. back row Kat, Sarah B., Rob, and Kate.

Best Crew EVER! It feels like summer camp when we all get back together for the season. Our work is about to get incredibly fast paced, but we are enjoying the last week or so of the ramp up. I love the end of April because we are starting our wholesale deliveries, the production crew is on its own well-oiled trajectory each day, the retail staff has returned for the season and the plants look fresh and gorgeous. There are many mini- transitions within our short season, and the longer I go through each cycle, more patterns emerge.

And I love that I get to see all of you! Have you stopped by the new cafe yet? In April, Vadeboncoeur is open Saturdays and Sundays. In May, Didier and Julianne will be set up every Friday, Saturday and Sunday from 9 am until they sell out. It has been so nice to have a place to meet up with friends in the greenhouse, enjoy coffee and pastries, and just soak in the plants. Please come have a peek if you have not been yet. If you plan to linger a while, please use our north parking lot (follow the signs for “extra parking”) when you drive in. Today, Julianne has made Hot Cross Buns, radish tartines on rye, tangerine cake, chocolate cookies, and more. So good.

The Hutch.jpg

Garden tasks for the week:

Sow peas - Snow peas, sugar snap peas, and shelling peas can all get planted now.

Find a spot in the garden where you can set up a good trellis.

Make a trench that is flat across the bottom, about 6” wide, and 3” deep.

Scatter seeds across the whole flat trench, then cover with about 2” of soil and sprinkle with some Compost Plus on top of the soil.

Pound in posts or erect trellis at the same time or after they have germinated. They do best if given something to climb within a few days of germinating.

Watching the plants bend towards the trellis and seek it out with searching, gentle tendrils is pure magic. Show the kids.

Greensprout your potatoes to get a stronger crop that is ready earlier.

First, select your potatoes - we do sell out of certain ones, and we have some very good varieties this year. It is still a little early to plant them, but you could be like a professional grower and greensprout them. Here is how:

Spread potatoes out on a tray (cardboard or wood is best), then keep them in a warm spot. It can be light during the day because you are trying to break dormancy. Ideally, they should be at 70F to 80F.

Once you see sprouts, in about 7 to 10 days, put them outside to harden off. They can just stay like that another week, day and night. I leave mine on the picnic table, someplace where I won’t forget about them.

When you are ready to plant, cut any large potatoes in half or thirds, making sure each piece has at least one or two sprouts. Leave smaller potatoes whole.

When ready to plant, make a trench about 4” wide by 4” deep in a prepped garden bed.

Lay the pre-sprouted potatoes out every 8 to 12” in the bottom of the trench.

Cover the trench back up, and gently walk along the line of potatoes you have just planted to pack them tight against the soil. You could even make a little ritual of it, and take your shoes off. Feeling garden soil against bare feet is a nice way to usher in this new phase of spring.

Vermont adage - potatoes can go in the ground anytime that dandelions are blooming. So if you buy and sprout now, you will be getting the timing just right.

Mid-April Garden Jobs

onions.JPG

It is finally time to get into the garden after a long and very cold winter. Here are some jobs that can happen right now.

Sow from Seeds

Peas, carrots, beets, radishes, turnips

Transplant

Onions - they need the cooler days and long nights of April in order to make large onions in summer. Here are a couple of videos that will give you an idea of how to do it quickly. First, make a trench and sprinkle in some Compost Plus:

Then separate the clump of onion plants into individual plants. Onions should be planted about 4” apart, so just lay them in the trench, all in a row, then gently pat the soil around them to fill in the trench and stand them upright.

Leeks are planted the same way, but require more space, so I do those 6” part with 2 feet between the rows. Onions can have 1 foot between the rows. One 4-pack of our onion or leek plants has about 80 plants in each pack, so it is great to buy a few varieties and share with a friend so you can try multiple kinds. We grow red and yellow storage onions, Italian cipolinni onions, mini purple onions, 2 kinds of sweet onions, and early New York onions. We also grow scallions, 3 kinds of leeks, and shallots. All are planted in the same way, except scallions can be planted in small clumps of 10 to 15 plants. And they don’t need to grow in rows, but can be tucked into individual spots between other plants.

You can also be planting kale, arugula, mache, mustard greens, cabbage, and collards.

Herbs that can take the cold of April: Sorrel, chervil, cilantro, dill, chives.

alyssum clear chrystal mix.jpg

In the flowering plants department, it is a good time to plant alyssum, violas, and pansies. They are a good food source for bees this time of year when very few other things are flowering.


I wrote more about onions a few years ago here.

Happy gardening! They are announcing rain later today, so I am getting out there now.


First workshop of the season is coming up!

Our new classroom space in Greenhouse #3.

Our new classroom space in Greenhouse #3.

Open House yesterday started with snow and slush and ended with bright, sunny skies. Thanks so much to all of you who turned out and helped reel in this elusive spring. The plants loved all the attention. And our spirits were lifted.

Did you miss the open house, but are craving a little gardening inspiration? You are in luck because coming up this Saturday, I will be teaching a class about some of the harder to grow vegetables like cardoons, artichokes, leeks, and other trouble makers. If you want to challenge your self with something new this season and are the type of gardener who likes to dig a little into the how's and why's of plants, this class is for you. We will discuss plant physiology and other characteristics that will help you read the cues plants generously provide as a little code of sorts. You will leave a little more fluent in plant-speak and a little more confident in your abilities to branch out with your plant selection. You will get a better understanding of the relationship between the way a plant looks and what it needs to grow well. In terms of the real botany here, I am pretty much self-taught, with a degree in English and Philosophy, so rest assured that this won't be a deeply scientific thing. More like the poetry of plants, the love language of plants. This workshop will make you a more intuitive gardener, and hopefully will shed light on why certain things have not worked for you in the past. Hope is at hand.  

I will make us a lunch to share, highlighting some of the vegetables we will be focused on.