food preservation

Herbes Salées - a Traditional Quebequois Preservation Method

Recipe for Herbes Salées (adapted from Spruce Eats)

Here is a traditional Quebequois way to preserve large amounts of herbs to use all winter.

Suggested uses: A teaspoon in hot water makes a soothing and instant herbal broth. Stir into soups and stews, mix into salad dressings and tomato sauce, mix with cream cheese, yogurt or cottage cheese for dips, spreads and snacks….the uses are endless and a jar of these preserved herbs will be a welcome reminder of summer’s freshness during the depths of winter.

  • 1 cup chives (fresh, chopped)

  • 1 cup savory (fresh, chopped)

  • 1 cup parsley (fresh, chopped)

  • 1 cup chervil (fresh, chopped)

  • 1 cup carrots (grated)

  • 1 cup celery leaves or lovage or cutting celery (chopped)

  • 1 cup green onions (chopped)

  • 1/4 to 1/2 cup coarse salt

    In a large bowl, combine chopped chives, savory, parsley, chervil, carrots, celery leaves, and green onions.. Layer 1 inch of herb mixture in the bottom of a crock or glass bowl and sprinkle with some of the salt. Repeat layers until all of the herb mixture and salt is used.

    Cover and refrigerate for 2 weeks. Drain off accumulated liquid and pack herb mixture into sterilized jars. Refrigerate until ready to use. Can keep for up to a year in the refrigerator.

Herbes Salées photo by Kate Bentley

Herbes Salées photo by Kate Bentley

Peppers

pepper pickles.JPG

We grew an abundance of peppers this year. With 35 varieties on our plant list, it is hard to not grow too many. Every variety deserves a chance and some are absolute favorites and I end up planting 6 or more plants of each, but really I am making a giant note to stop this madness next year. Every day, for the past month, I am starring at huge bags of peppers in the fridge and figuring out what to do with them. Not a bad problem to have, especially these days. Here are a few things I have been doing.

Pickled Cherry Bomb and other Hot Peppers

I make a brine that is based on this basic recipe from the cook book 6 Seasons by Joshua McFadden and Martha Holmberg. This amount is about enough for 3 pints.

½ cup rice vinegar

1 tablespoon white wine vinegar

1 ½ cups water

3 tablespoons sugar (original recipe calls for 5 TBS)

1 tablespoon plus 1 teaspoon kosher salt

Bring ingredients to a boil,

Pack washed, stemmed and seeded (optional) peppers into clean glass jars. Add a clove of garlic and a sprig of thyme to each jar.

Pour hot brine over the peppers, filling each jar to the top. Let cool to room temperature and then store in the refrigerator. Please note this brine solution is not acidic enough to preserve the peppers with a hot water bath method of canning. These are refrigerator pickles that will keep for months. I pack big ½ gallon jars of them into the back of the fridge and use them all winter, chopped into tacos, as a topping for sandwiches, stuffed, etc.

You can pickle sweet peppers too, using this method.

Hungarian Hot Wax peppers are perfect for pickling.

Hungarian Hot Wax peppers are perfect for pickling.

I also made this pepper relish recently and really liked it. You can incorporate some hot peppers into the mix if you want it spicy. This is for canning with a hot water bath method. If you have never done this, please make sure to look up a reliable tutorial, like this one.

Pepper Relish

adapted from Well Preserved by Mary Anne Dragan

6 cups of finely chopped sweet peppers, combination of colors. A few hot peppers can be included in the 6 cups for a spicy relish.

2 cups of finely chopped onion

2 cups of cider vinegar

1 cup of sugar (I used ¾)

2 tablespoons of mixed pickling spice (I did not have a pre-made blend, so made my own with coriander seed, bay leaf, a few cloves, a few black peppercorns, 2 dried chilies, and a tsp of mustard seed) in a cheesecloth bundle or a tea ball.

2 teaspoons of dried hot pepper flakes or substitute with fresh hot peppers

2 teaspoons of salt

Combine peppers and onions into a bowl, and pour boiling water over them. Let sit 5 minutes, then drain well.

Combine the remaining ingredients into a large pot, and bring to a boil. Add the vegetables, and stir to combine. Reduce the heat to medium, stirring occasionally for about 30 minutes.

Remove from the heat, take out the spice bag. Spoon the relish into hot sterilized jars, leaving ½ inch of head space. Release the air bubbles, wipe the rims of jars clean, seal according to manufacturer’s directions. Process the jars in a boiling water bath for 10 minutes. Please refer to this process here if you are not familiar with canning.

Other ways to preserve peppers

I freeze them. Just chop up raw peppers, and slide them into a freezer bag. That is it. They can be used in all kinds of stews, soups and braises over the winter.

I make a big pot of sautéed peppers and caramelized onions and freeze that in small bags. In winter, it can be turned into a tasty spread or dip by placing the thawed mixture in a blender with some walnuts, or cheese, or olives or dehydrated tomatoes.

I roast peppers, tomatoes, eggplants, onions and summer squash or zucchini with olive oil, salt, garlic and herbs at 400F for about 45 minutes. I freeze that mixture in freezer bags and then use it as a base for pasta sauces, soups, and a topping for pizza.


Fermented Fresh Salsa

by Guest blogger, herbalist, and RWP Staffer, Sophie Cassel

This is a salsa you make to eat fresh and eat in the fridge, not canned for storage.

This is a salsa you make to eat fresh and eat in the fridge, not canned for storage.

Ask anyone in my house or social circle what the big culinary wonder was last summer, and they’ll all tell you: “Fermented salsa!”. Far removed from the cooked salsa in jars, fermented salsa is like a tangy, juicy version of the popular pico de gallo type of dip. This was a technique I learned about years ago on a homestead in Maine, but started preparing last summer when faced with a constant glut of tomatoes and absolutely no desire to turn the oven on for canning.

By mid-August, I was making a half- to whole-gallon of fermented salsa per week, and we were eating it just as fast. It makes a great snack and is a tasty conversation starter when brought to backyard cookouts. Suddenly, adding fermented foods to your diet is as easy as breaking out the tortilla chips! It also makes the best topping for tacos and grilled meats. 

Below is the basic recipe. I change the proportions a little each time, based on what I have ripening in my garden or on the kitchen counter at that moment, and how much I could fit into the half-gallon jar. 

Ingredients:

  • 2-3 lbs ripe tomatoes 

  • 1 small onion

  • 1-3 cloves of garlic

  • 2-3 bell peppers

  • Hot peppers of your choice (I like my salsa more mild, so I use 1 jalapeno or 2 hungarian hot wax peppers, but the sky's the limit!)

  • Cilantro (stems included), or a mix of cilantro, pepiche, and papalo leaves

  • Salt to taste

Method:

  • Finely chop all ingredients into similar sizes and layer into a half-gallon mason jar. Add salt and taste; it should be just shy of “too salty”. Stir well (a long-handled cocktail stirrer works well), and cover loosely with the jar lid. Place jar on a plate to catch any overflow during fermentation, and leave on your kitchen counter. 

  • Shake jar (with lid tight) 2-3 times per day, loosening the lid to allow for gas to escape through the course of the day. You will start to see bubbles rising to the surface, but shaking ensures that all ingredients stay below the liquid.

  • After a day or two, taste to evaluate how the tanginess is developing. Depending on weather, it could take anywhere from 2-5 days to achieve desired levels of fermented flavor. You get to decide when you think it’s ready!

  • Eat immediately, or funnel into smaller jars and store in the fridge. It will store indefinitely, slowly building its fermented flavor, but good luck getting it to last long enough!

  • Note: If your tomatoes are really juicy, you may want to strain some of the excess liquid when transferring to storage jars. This fermented tomato juice is a refreshing drink, and makes a great addition to gazpacho or cocktails! 

Thank you, How to Find our Plants and Herbs, plus a Recipe

Thank you from all of us for an incredible, memorable, and unique season!

Thank you from all of us for an incredible, memorable, and unique season!

As our regular retail hours for 2020 end today at 5pm, our team would like to thank you for a wonderfully unique season. We are closing a little earlier than usual, but will keep up a once a week pick up with online sales and will continue twice a week deliveries to our wholesale partner stores. Read below to find out more!

During the month of August, we will be doing curbside pick up once a week, on Fridays between noon and 5. If you would like to order plants, please do so here, and we will have it ready the following Friday as long as orders are placed before midnight on Wednesday.

Our online store will carry an assortment of veggies and herbs for the fall kitchen garden, perennials, and houseplants. For the first time, we will also be offering directly to you the herbs and herbal products coming from our herb farm: freshly harvested herbs in bulk quantities for your drying and processing needs, herb salts, herbal vinegars, and pesto. Please check the website every Saturday for the latest updates, and place your orders by the following Wednesday at midnight for Friday pick ups between noon and 5.

If you need something sooner than the following Friday, just let us know and we can make another arrangement.

Confused? Have questions? Drop us a line at info@redwagonplants.com.

Thanks for a fantastic season in weird times. We are just so grateful for all of the orders and purchases you made this year. You kept our crew going, and you planted gardens like never before. We loved hearing from you and seeing you in person once we opened for shopping.

You can continue to find our plants at our wholesale partner stores:

  • Shelburne Supermarket

  • Gardeners Supply, Intervale and Williston locations

  • Healthy Living

  • CIty Market, South End and Downtown locations

  • Bibens Ace Hardware, North Ave location

Recipe for Herbes Salées (adapted from Spruce Eats)

Here is a traditional Quebecois way to preserve large amounts of herbs to use all winter.

Suggested uses: A teaspoon in hot water makes a soothing and instant herbal broth. Stir into soups and stews, mix into salad dressings and tomato sauce, mix with cream cheese or cottage cheese….the uses are endless and a jar of these preserved herbs will be a welcome reminder of summer and freshness during the depths of winter.

  • 1 cup chives (fresh, chopped)

  • 1 cup savory (fresh, chopped)

  • 1 cup parsley (fresh, chopped)

  • 1 cup chervil (fresh, chopped)

  • 1 cup carrots (grated)

  • 1 cup celery leaves or lovage or cutting celery (chopped)

  • 1 cup green onions (chopped)

  • 1/4 to 1/2 cup coarse salt

    In a large bowl, combine chopped chives, savory, parsley, chervil, carrots, celery leaves, and green onions.. Layer 1 inch of herb mixture in the bottom of a crock or glass bowl and sprinkle with some of the salt. Repeat layers until all of the herb mixture and salt is used.

    Cover and refrigerate for 2 weeks. Drain off accumulated liquid and pack herb mixture into sterilized jars. Refrigerate until ready to use. Can keep for up to a year in the refrigerator.

Herbes Salées photo by Kate Bentley

Herbes Salées photo by Kate Bentley

Pesto Time

photo by Kate Bentley

photo by Kate Bentley

PESTO for eating fresh or freezing


In food processor, blend until coarsely chopped:

2 cups fresh basil leaves, packed (can sub half the basil leaves with baby spinach)
1/2 cup freshly grated Romano or Parmesan-Reggiano cheese (about 2 ounces)
1/3 cup pine nuts (can sub chopped walnuts)
3 garlic cloves, minced (about 3 teaspoons)
Slowly drizzle in:
1/2 cup extra virgin olive oil
Do not over blend, the heat from the food processor will bring out the bitterness in the oil and the basil.
Taste, and season with
1/4 teaspoon salt, or more to taste
1/8 teaspoon freshly ground black pepper, or more to taste

Secret Sauce to Remember the Herb Garden in Winter

Photo by Kate Bentley

Photo by Kate Bentley

This blog post is guest written by Sophie Cassel, Red Wagon Team member and herbalist educator. Thanks, Sophie!

As much as I love ripe tomatoes and blooming flowers, high summer to me is all about the fresh herbs. While this time of year you’ll find me outside snipping chives and parsley to add to my meals, it’s also a great time to prepare for a day when we don’t have a bouquet of fresh herbs outside our doorstep. Dried herbs have their purpose in the kitchen, but fresh-frozen herbs can add a whole new depth of flavor and color to any midwinter meal. The easiest way to do this is by employing some ice cube trays and a little creativity to make what I like to call my “secret sauce cubes”. 

If you’ve ever made fresh pesto, you’ll recognize the general technique, but the beauty of this technique is that you can really let your imagination, as well as your garden, guide your recipe.

Basic Recipe:

  • Gather your herbs from the garden or farmer’s market. This is a great time use up the leaves from those woody basil plants or the kale that’s looking a little bug-eaten but still has good flavor. Try to pick a selection of flavorful plants and good bases like spinach, parsley, or kale. You’ll need somewhere between 2-3 largeish bunches of herbs per ice cube tray.

  • Roughly chop herbs and remove woody or tough stems. Rinse everything and shake the excess water off, but don’t dry the herbs out.

  • Toss it all in the blender! Now’s the time to add things like garlic, ginger, chili flakes or citrus zest. You can also add a little salt to taste, but I keep mine salt free so I don’t have to worry about the extra salt when I’m throwing the cubes in my cooking.

  • Pulse in the blender until everything is evenly pureed, scraping down the sides as necessary. Add just a little water to emulsify, a tablespoon at a time.

  • Spoon your herb puree into ice cube trays and freeze for a few hours or overnight.

  • Transfer the frozen cubes to a plastic bag that is labeled with all ingredients, and store in the freezer for a snowy day! 

  • To use the cubes, thaw on the counter while you’re preparing your food. You can add them in while you’re sweating onions at the beginning of a dish, or toss in towards the end to lend a bright green hue and tons of flavor. Remember that if the cubes are still cold, they will lower the cooking temperature of your dish, so slowly bring it back up to heat through. 

If you’re the type to can fresh tomatoes for winter sauces, adding a couple cubes of fresh-frozen oregano and parsley when it comes time to make pasta will result in a transcendent trip back to summer. Many a meager rice-and-vegetable stir fry was elevated this past winter using chef Amanda Cohen’s “Secret Weapon Stir Fry Sauce” (from the New York Times) which was my inspiration for breaking out of the basic basil pesto mold. Amanda Cohen’s delicious Asian-inspired blend is just one of many combinations based on what you have on hand throughout the season. Cohen recommends blanching her ingredients before blending, but I’ve found that you can also keep things raw if you’d rather not boil water in the heat of summer. Below I’ve included some combination ideas, but feel free to experiment! Your future self will thank you.  

Amanda Cohen’s Secret Weapon Stir-Fry Sauce:

  • Cilantro

  • Parsley

  • Thai basil or other basil

  • Spinach

  • Garlic, peeled

  • Fresh ginger


Pesto inspired

  • Basil

  • Parsley (about 1/4th the amount of basil)

  • Garlic cloves

    • I prefer to keep my pesto basic at this stage, and leave room for adding cheese or nuts during cooking. 

Chimichurri inspired:

  • Parsley

  • Arugula

  • Oregano

  • Garlic or shallots, chopped

  • Chili flakes

    • Add lime juice, oil and a little rice vinegar when cooking

“Scarborough Faire”:

  • Parsley

  • Sage

  • Rosemary

  • Thyme

  • Oregano

  • Marjoram

    • Make sure to strip leaves off any tough or woody stems

Zucchini Days

costata romanesco zucchini on chair red wagon plants
  • It is that time of year, when the zucchini plants needs to get checked every couple of days or you end up with some giant baseball bats in no time. I have unfortunately not followed my own advice, and ignored my plant for 2 weeks straight, only to be confronted with vegetable mayhem. But, in need of some inspiration, I have turned to social media to find out what you all are doing with your big zucchini and here is a round up of the brilliant ideas:

  • shredding all the zucchini in 2 cup measurements and freezing it. I make zucchini tots and bread in the winter! Also made a zucchini pie with corn and mushrooms, one for the freezer, one now.

  • Bread, cookies, zucchini noodles

  • I just made zucchini chocolate chip bread

  • Zucchini pizza crust: There’s recipes online but also in the old-school Moosewood cookbook: grate and salt zuke, wring it out, mix with eggs, a small amount of flour, parmesan and mozzarella, bake, dress with toppings and bake again. I’m still tweaking things to make the crust more crusty and less soggy, but it’s really tasty.

  • Bread or baked stuffed zucchini .

  • Roasted in tomatoes, garlic scapes and butter. Finish with fresh goat cheese

  • Among my favorites: grated into fresh spaghetti sauce, roasted w/ olive oil as a side veg, zucchini relish using my Mom’s recipe!

  • Walk around Shaw’s and Hannaford’s parking lots and put some in every vehicle with its windows down. 😂 That’s what my grandfather used to do.

  • Zucchini lemon bread with apple juice from how to cook everything- Mark Bittman ( fruit and veg bread)-

  • Smitten kitchen zucchini fritters!

  • obviously you could install an engine into that big guy. take it for a spin.

Thanks for all the suggestions! Here are the two I am making this week:

Chocolate zucchini bread from King Arthur and the zucchini fritters from Smitten Kitchen.

Planting the Fussy Onion

Onions are some of the first things to go in the ground each spring. You may not know this, but onions are finely tuned creatures with a rigid hormonal profile. They are completely and utterly dependent on the sun's cycle to grow into the lovely round orbs we think of as onions. Those plump layers only grow in relationship to the lengthening days of spring. If onions are planted too late, they will never bulb out and become big and round. An onion that has been planted too late, let's say after the middle of May, will never quite size up, but will create a thick stem, and a barely bulbous orb. The engorged stem will not create rounded layers at all but rather look more like a slightly ovate leek. These are still fine to eat, but won't really be onions you can store through the winter.

We recommend that people plant onions in mid-April. When it is muddy, and cold, and you think there is no way a plant wants to go into the garden, well guess what? The onions really want to go into that cold earth. The way we grow onion plants for sale is that we seed about 80 plants into a 4 pack, and your job as the gardener is simple:

  • Prepare a bed in the garden - deep, well worked, rich soil is best. I prepare my onion beds in the fall, that way they are ready for onion plants first thing in the spring.
  • Gently pull the clumps of soil and roots and plants out of the 4 pack.
  • Separate each plant and shake off the excess soil. The individual plants are like tiny blades of grass, but each one will grow into a big onion plant.
  • Make a trench about 4 inches deep the length of your planting area. Onion rows can be about 8 inches apart, so depending on the size of your bed, you can plant up to 4 rows of onions in one bed and still reach across the bed to weed comfortably.
  • Plant the individual plants in the trench, about 4 to 6 inches deep. Only a few inches of the thin green stems will be above ground. You should have about 2-3 inches between plants.
  • Tamp the earth tightly around each plant.

The onions plants won't grow much at first, but they are just hanging out in the cold soil, programming themselves to grow once the soil warms up. It is these cold, long days that help make onions nice. I know, it is hard to believe that they prefer this, but they do. Southern growers, who have shorter summer days than northern growers, have entirely different onion varieties than we do. That illustrates just how much onions are day-length sensitive. A few degrees difference in latitude necessitates a whole different set of genetics.

The other things to keep in mind with onions:

  • Keep them well watered. Water and day length is what makes onions big. Some straw mulch applied in late June is a good idea for keeping the moisture even and consistent.
  • Keep them well weeded. Onions plants are slender and upright. They do not create any shade, therefore weeds like to grow near them, in the sunny under-story of the onion patch and because onions really don't want to compete for food, water and sunlight. They are not good at sharing.
  • Keep them well fed. An application of Compost Plus in May is a good idea. It will help them get big and strong.
  • Growing onions in black plastic mulch is a good option if you want to eliminate weed pressure and heat up the soil. Once onions are big, they like it hot.
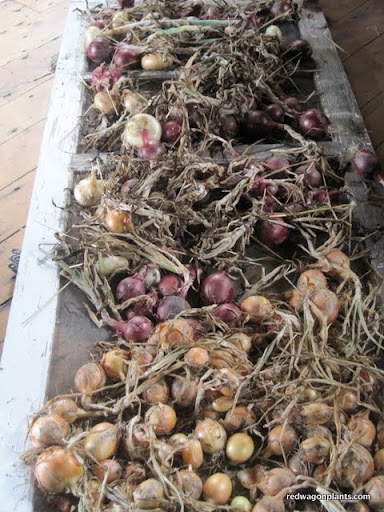
  • Harvest onions once the tops start to flop over. You can eat them fresh, as "green onions" or you can cure them by laying them out in a dry, airy place, away from direct sunlight. This usually happens in late July or early August. It depends on the varieties you grow and on the kind of weather we are having.

Onions are best stored in a dark, cool, airy place. A damp basement is not a good storage spot. A cold, dry, dark attic is better. Or an unheated closet, or a garage that does not get too cold. Ideal onion storing temperature is about 35F. That is pretty cold - colder than most basements.

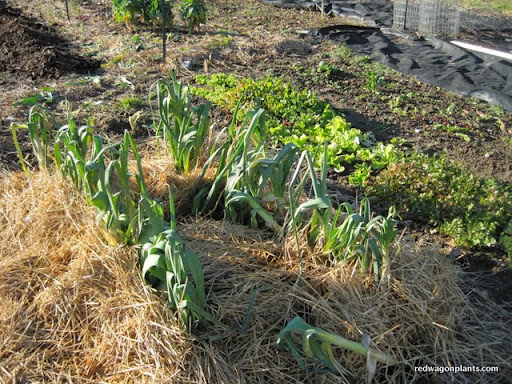
Some onion relatives can be planted later in the season. This includes scallions, mini-purplette onions, pearl onions, and shallots. Leeks are also tolerant of a later planting, and can be planted multiple times throughout the gardening season if you would like to harvest baby leeks. 

The onion varieties we grow each year:

Cipollini Gold Coin - a flat, disc like onion that stores very well in the winter. It is a strong flavored onion which mellows when cooked and is delicious caramelized, glazed, or roasted. One of our favorites for flavor.

Yellow Storage Cortland - a huge, good keeper which means that it stores well all winter. Dry the onion once harvested in a cool, airy spot, and you will be eating it until March or April of next year. 

Red Storage Onion Mars - also quite big, and also a good winter keeper. Slightly milder in flavor than Cortland and can be eaten raw when sliced thinly. Red Onions develop their red interior only once they have been cured. Once harvested, coll in an airy dark spot until the tops are completely dried and can be pulled off by hand. That is the curing process for all storage onions.

Sweet Onion Walla Walla and Ailsa Craig - both are gigantic sweet onions. They do very well with lots of water and mulch. Sweet onions do not keep over the winter. They do not need to be cured, but rather get refrigerated once harvested. They are delicious roasted, grilled, or eaten raw in sandwiches. 

Scallions - These can be planted in clumps of 10 or so plants. They can be planted every few weeks for a continuous harvest. If you do not want to buy scallion plants or seeds, you can eat young onion plants as scallions.

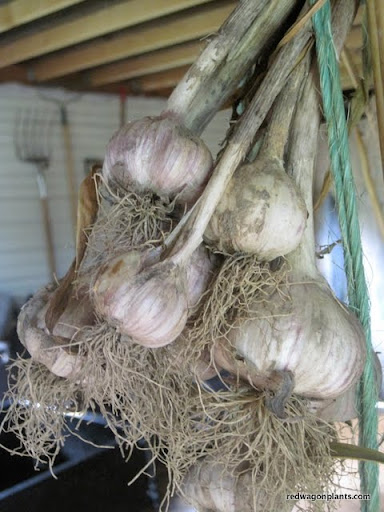
Shallots - These store very well after being cured like onions. They add a sweet and complex flavor to winter dishes, marinades, and dressings. 

Mini-purplette - these are lovely purple pearl onions that are delicious in a spring braise with salad turnips and peas. They can be planted in clumps of 4 to 6 plants and can be planted multiple times throughout the season for more than one harvest. They also make great pickles. About 1" to 2" across.

Cabin Fever Gardening

It's the dead of winter and the weather has been...well, let's not even talk about it. The seed catalogs have poured in, they are lying all around the house, tempting us with dreams of future sunshine, dirt under the nails, baskets of produce, and all those things we are deprived of in these short, dark days.  Here are a few things I like to do to get through winter. I would love to hear other people's coping strategies, so please share your thoughts on cabin fever gardening. For one thing, meditate. Not necessarily in a formal way, but just sit still. Imagine seeds, roots, and bulbs that are buried deep in the frozen earth.  This period of short days is necessary in the life of a plant. It is a time of dormancy and rejuvenation, for plants as well as for humans. Rather than fight the dark days, embrace this as a time of year when you get to slow down, evaluate, and regenerate. I love that, because of my work, my life can follow seasonal rhythms to a certain extent. Winter is when I plan, plot, analyze, and restore.


Next, look for signs of green. As the days slowly lengthen, find a special shrub or tree to study on a regular basis. We have a row of willows along the edge of our property, and I love to check out the progress of the softening that happens very slowly, and then after mid-February, it speeds up a bit. The buds begin to swell, the color of the stems changes ever so slowly and slightly. Because plants are our best teachers, we can be the best students of plants with simple observation.

Focus on your houseplants. At our house, we neglect these poor plants all summer, but try to baby them a bit in the winter. Careful watering, cleaning, fertilizing as needed, potting into bigger pots, moving them around...these are all tasks we never have time for the rest of the year. You can also try your hand at propagating your own house plants. It is a great way to learn about plant physiology, and it gives you new plants as a bonus. Think holiday gifts for next year!  There is a great series of 15 short tutorials on You Tube that will teach you everything you need to know to multiply your houseplants. Ask friends for cuttings from their plants, diversify your own collection and learn about the various ways that all types of plants root.  Again, observation is key here, and the lesson learned in plant physiology will transfer to and inform your practical gardening knowledge outdoors.

Grow some sprouts.  There are great resources locally and on line. Here are some suggestions.


Grow some greens and shoots. You'll need a grow light, otherwise, things will be leggy and less nutritious, even in a south facing window. You will also need some trays with drain holes, about 2 inches high, some good potting soil, and some good quality seeds. You can sprinkle seeds onto the surface of the soil, press down, and cover with a very thin layer of soil. Press down again, and water very gently and evenly. Try these crops for a quick 3 weeks to harvest: arugula, tatsoi, mustard greens, boc choi. If you are willing to wait a little longer, in 5 weeks, you can harvest baby lettuce, spinach, kale, chard, cilantro, or dill.  The trick here is to stick to varieties that grow quickly. You can only cut them once, the light will just not be strong enough for them to grow again.  Here are some instructions for growing pea shoots.


You can do this so easily in any kitchen and it is a great way to add some fresh, living foods to your winter diet.

Hope this helps, and don't hesitate to get with us on facebook, twitter @redwagonplants, or leave comments here. We really want to hear your winter gardening habits, tricks, trials, and successes.

Rosemary

Rosemary is a great herb for winter use. It can be grown as a houseplant, it can be used fresh, dried, or frozen, and it adds a warming, deep flavor to roasted vegetables, all kinds of braised meats, roasted chicken, pork, lamb or beef, and can be used in soups and dips. Here are a few ideas that will help you make friends with this uplifting and aromatic herb all winter.
As a houseplant, rosemary is best brought indoors as late as possible. It can take some really cold temperatures, down into the teens, and still look rugged and healthy. When you do bring it indoors, give it a large pot, and keep it away from direct heat sources (woodstove, radiators) and place it in a window with indirect light (east or north facing). In winter time, in your house,  rosemary would like to have cooler temperatures and moist air. You can give it moisture by spraying the foliage with a spray bottle of water every couple of days. And only water the soil when it is very dry.  You are trying to recreate a foggy, cool San Fransisco winter.
When you harvest fresh rosemary or buy it in the store, the sprigs can be kept in the fridge, in a plastic bag that is not sealed tightly for up to 3 weeks. It can also be left out on the counter in a basket, where it will dry nicely and can be used all winter. Once fully dried, pull the leaves off of the stem and place in a jar, in a dark, cool place.
Here are some ideas for using the rosemary:
Toss a sprig under any meat you might roast - a holiday turkey, ham, chicken, lamb, roast beef, or pork loin. While roasting, the rosemary will add wonderful flavor to the pan juices and the gravy made from those pan juices.
Finely chop the leaves and add them to the onions that are sauteed for making stuffing or other casseroles.
Infuse some whole milk or heavy cream over low heat for about 15 minutes with a sprig of rosemary, and use this in making creamed soups....squash, tomato bisque, broccoli, any kind of vegetable potage, potato-leek, etc, These soups will all benefit from the earthy, woodsy fragrance and flavor of the rosemary-infused cream or milk. 
For a rosemary dipping or basting oil, finely chopped 1 or 2 TBS rosemary, mix with 1 or 2 cloves finely chopped garlic, salt and pepper and add in 1/2 cup of good olive oil. Serve in a small bowl and drizzle with a 1/2 TSP of balsamic vinegar and use as a dip for bread or raw veggies.
The same mixture can be used to baste a roasting chicken, or drizzled on roasted root vegetables (before roasting, you can toss the veggies with the herb oil), or used as a sautee oil for greens such as kale and chard.
Rosemary can also be used as a fragrant addition to hot baths, massage oils, and home made cleaning products. It is one of the most versatile herbs we can grow, and even though it prefers a California climate, with a little persuasion and help, it can adapt beautifully to our Vermont weather.
We've been harvesting lots of rosemary this fall, and you can find it locally at Healthy Living and City Market and in the Boston area through Farmers to You.
Happy gardening and cooking,
Julie

Red Wagon Herbs

What's a greenhouse grower to do when the spring season winds down and there is still plenty of great weather for summer growing and the greenhouses are empty? Well, start a new business, that is what. We are so happy to introduce to you our new sister business, Red Wagon Herbs. We are growing Certified Organic herbs for year round harvest and selling to local stores, restaurants, and food hubs. Our focus is on the popular culinary herbs for now, but we are likely to branch out into the more unusual once we have had a chance to explore our markets and have gotten familiar with our new growing practices. This is a perfectly natural extension of our plant business since we already partner with fantastic stores and we love to grow herbs more than anything else. As a matter of fact, the plant business, in its earliest days, was just a potted herb business. In a way, we are going to back to those days and loving the continuity, evolution, and expansion.

Our herbs are grown using three different methods: in the ground for summer and fall harvest, in a new, unheated greenhouse (paid for in part by a grant from NRCS EQIP) for fall, winter and spring harvest, and in our existing, heated houses for those coldest months. We are excited to be the only Vermont farm offering organic herbs year round and hope you enjoy cooking with them as much as we enjoy growing them.

Please be on the look out for an Open House this fall so we can show you what we have been up to and give you a chance to smell, touch, taste, and see it all.

Our current line up consists of :

  • Basil (March through November only)
  • Chives
  • Cilantro 
  • Dill
  • Curly and Flat Parsley
  • Sage
  • Thyme
  • Oregano
  • Tarragon
  • Rosemary
  • Savory
  • Marjoram
  • Spearmint
  • Bouquet Garni ( a mixture of aromatic herbs for roasting, stocks, and more)

Please try this at home.

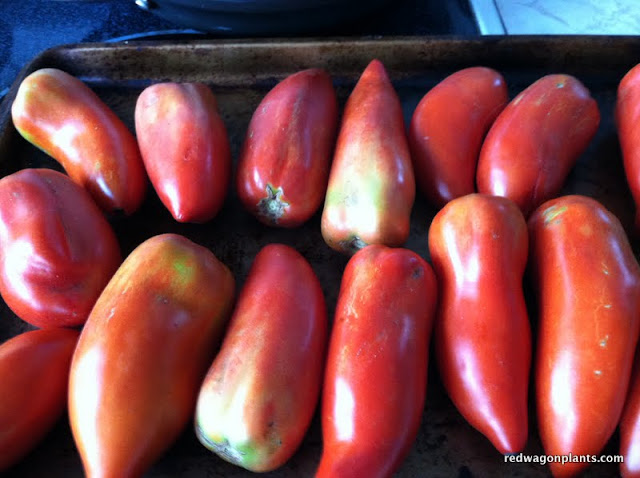
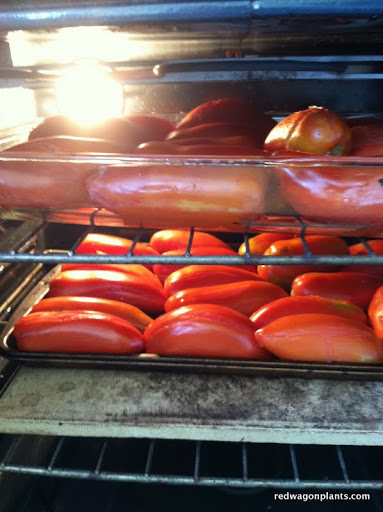
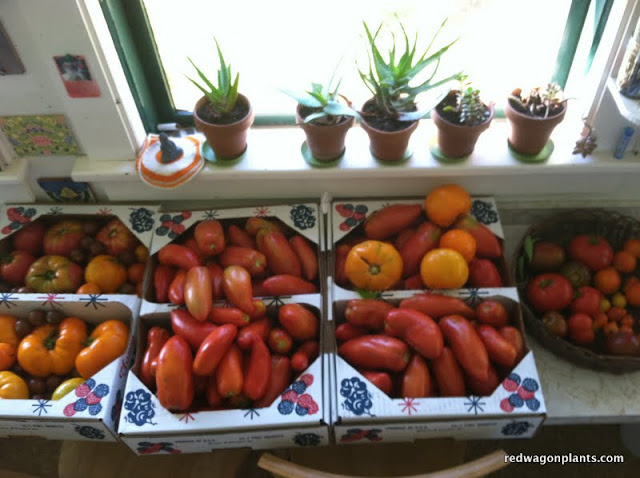
Does your counter look like this during tomato season? Do you feel pressed for time, don't want to be indoors too much with the canning pot, yet hate to see a single precious tomato go unused? Well, I can relate. I love to eat tomatoes in winter, the ones from our garden at least, but I don't love spending all that time indoors, canning and fussing. I have been trying something new this year, and I want to share it with you just because I think you will really like it.

I have been roasting the tomatoes in a hot oven, peeling them, and then throwing them in ziploc bags for the freezer. This gives maximum taste for minimal work. I know you can just throw raw tomatoes in bags and throw those in the freezer, but then you are left with watery, ice shattered, flavorless blobs. I prefer to let the oven do a little work to concentrate the flavors and then have an item to pull out of the freezer that tastes special, an item that has some flavor layers already built in. I used to make this with olive oil and garlic and herbs, but realized that I can do a simpler version with naked tomatoes that is quick, easy, and lends itself well to the preserving process.

Roasting tomatoes is super easy.

You just lay out some paste tomatoes (it works with other tomatoes too, but the cooking time will be longer since they are more watery) in a single layer on a cookie sheet. Pre heat the oven to 400F.  Don't add anything - no oil, salt or anything else. We are just going for tomato flavor here. This will allow you to really customize your dish the way you want it when it is time to use the tomatoes in winter. Slide them into the hot oven. Wait 30 minutes.

After 30 minutes, take them out of the oven and flip them over. Tongs are handy for this process. If they have released a lot of water, you can drain off some of it, carefully, in the sink at this point.

Then they go back in the oven for another 30 minutes. The beauty of this recipe is that you don't have to watch over them. There is alot of what is called "passive time" in cooking and this method is chock full of passive time- I love that I can be doing other things while this is going on.

When they are done roasting, I turn off the oven, walk away and ignore them for a while until they have cooled down or I am done whatever project I started or wait until even later that night, when it is dark and the late summer sunshine is no longer tempting me out of doors. Then it is time to peel them. Just cut the tops of with a small serrated knife, and the skins just slip off in one or two quick motions. It is super simple. The fleshy, juicy, thick tomatoes have been reduced to a lovely consistency and can just go into freezer bags at this point.  I usually get two quart bags out of one cookie sheet;s worth of tomatoes.

So then what do you do with all those frozen tomatoes? Sauces, soups, stews,vegetable sautees, pizza, lasagna, and more will all benefit from these. Anytime a recipe calls for whole canned tomatoes, you can substitute these. I will be posting recipes using these tomatoes throughout the winter, so if you find yourself with a good supply and a lack of ideas of how to use them, check bag for some tips. Enjoy!


Garden Breakfast for a Cold and Rainy Day

The weather's turning and so is my attitude towards the kitchen. In summer, I would rather be outside, just like you, and it can be hard to make time for all that garden produce to make it into anything but some quick salads and grilled dishes (at the beach, no less).  Here is a great dish that works for breakfast, brunch, lunch, dinner and pretty much anything in between. I made a big batch last Sunday and it kept us happy pretty much all day.

A green bean and ham hash - take some of those older green beans from the garden (the ones that did not get killed by the frost because they were hiding under the cover of leaves) and chop them up into 1/3 inch pieces. I like Romano beans for this, the wide and flat kind that is loaded with extra flavor and can be cooked a long time if you like a slowly simmered green bean, which I do, in case you are asking.  Chop up an onion, some garlic, and a potato. Chop everything pretty small, this is hash, not stir-fry. Heat a tablespoon or so of olive oil, add the onion, garlic and potato and cook until starting to soften, about 8 minutes over medium heat to high heat. I also added pimenton, a smoked paprika, at this point. If you don't have any, a little sweet paprika and cumin might be nice. Keep stirring the onions, garlic and potatoes every minute or so, but letting it all stick a little and brown is okay - that is how you build flavor. Once the potato is softened somewhat, add the chopped or sliced green beans, some chopped ham (I bought an incredible petite ham from Bread and Butter Farm last week) and a good splash of cooking sherry, white wine, broth or water (my order of preference for the liquid). Scrape the pan so the browned bits get incorporated into the liquid, lower the heat, and put a lid on the pan. At this point, the vegetables are both sauteeing and steaming. Wait about 10 minutes hear, stirring once or so and adding another splash of liquid if it is getting very dry. Add salt and pepper to taste, after 10 minutes, and a splash of cream, half and half, or milk - the dairy helps bind all the flavors and keeps the vegetables from getting dry.  Stir and sautee another 5 mintues or so, adding another splash of dairy as needed, and that is it.  This is great served with an egg on top, over easy or over hard, or scrambled on the side. But really, it is great on its own with nothing else and will keep you going for the whole day. So you can go out and pick apples, take a hike, put the garden to bed, and all the other stuff that still keeps you outside a little longer. Winter is not here yet!

High Priority - Roasted Ratatouille for the Freezer

I have to admit that I don't love frozen vegetables for the most part. So if you have a favorite way to freeze a vegetable from your garden, please share it with me. Here is one I like and eat willingly out of the freezer come the dark days of winter. I want to share this simple thing with you in hopes you might have a similar beloved thing to pass on to me. For some reason, this year has not been a year when I put up a lot of food for winter. A few jars of tomatoes and this amazing thing I will now show you are the only things I have done. No beans, no salsa, no jams, no chutneys. Well there is still time, so maybe I will play catch up and do a plum chutney with the amazing plums passed on to us by our friend, Yvan.

This recipe starts in the spring. I basically plan part of my garden just so I can have all the right veggies to make this. You need

  • onions
  • garlic
  • peppers
  • eggplant
  • tomatoes
  • zucchini or summer squash

The garlic gets planted the previous fall, the onions go in in late April, and everything else goes in June 1. I like to freeze about 10 to 20 quart bags of this ratatouille, so I usually plant about 6 pepper plants (3 Ace and 3 Italia) ,  6 San Marzano tomatoes, 6 eggplants (usually a combination of Listada di Gandia, Orient Express, and Hansel), and 1 zucchini plant ( I do two plantings, one June 1 and one July 1 that way the plants are always healthy). Most households do not need more than 1 zucchini plant. Really.

Harvest all the veggies, wash them well. And start chopping. This year, I was a bit lazy and bought a few disposable pans to do the roasting. It made for easy clean up, but the veggies did not caramelize as much as they would have on metal or pyrex. Lesson learned.

So basically you just chop up all the vegetables into 1" chunks or so. The proportions are different every year, but it is usually about 1 part onions, 1 part peppers, 3 parts eggplant, 2 parts tomatoes, and 2 parts zucchini. I chop everything separately and then add it to the pans. I then drizzle olive oil over every thing. Add lots of salt, good sea salt is best, and then handfuls of chopped herbs to each pan. I like a blend of thyme, oregano, and rosemary. But other combinations work well.

Preheat the oven to 375F and slide in the pans. Turn and toss every 20 minutes, until everything is cooked and starting to caramelize. The overall cooking time really depends on the amount you are doing, the type of pan you are using, the thickness of the vegetable layer in each pan, etc. Basically, cook it until the whole house smells really good and the veggies are very soft and starting to brown. If I were making this for a meal to be eaten that night, I would do a single layer, in pyrex, and let it get golden brown. This is much harder to do in big batches in a home oven, and since freezing compromises texture and flavor anyhow, I think of these roasted veggies as additions to other recipes all winter long, not the main showcase in a meal.

Once everything is cooked, let it cool down completely, and then carefully scoop it into plastic quart-sized freezer bags. I usually use a measuring cup and one of those funnels for jars, since it makes life a little easier. Once frozen, the veggies can be used in pasta sauces, on pizza, in lasagnas, in soups and stews, as fillings in calzones, or as a topping for polenta, etc. You get the picture. It's such a nice way to have a little taste of summer in the winter and uses up so much of that amazing garden produce. Even in a summer like this one, when I have had to take some time away from gardening and preserving, I made sure to do some of these roasted veggies for the freezer.

The Overwintered Garden

“Overwintered” is a term used to describe a vegetable that is planted in the spring, summer or fall of one year in order to be eaten in the spring of the following year. This is a great way to extend the growing and eating season in our Vermont climate. Overwintered crops generally are dormant all winter long and then come back to life with the lengthening days and warming temperatures of spring.

Overwintered Spinach - Not all vegetables can survive our VT winters, but the few that can include spinach, parsnips, leeks, garlic, and parsley. Spinach for early spring eating (mid to late April) should be sown in the first two weeks of September. Once it germinates, allow it to grow without harvesting or touching it. You can eat a little if you want, but ideally you will leave as much of the plant in the ground as possible. Once very cold weather hits, in early to mid-December, you can protect the spinach under a layer of straw, or leaves, or a few layers of thick row cover (Reemay or Agribon can be found at Gardeners’ Supply Company or ordered online at Johnny’s Selected Seeds). In the early spring, as soon as the ground has thawed out, remove the layers of protection and you will see the spinach slowly coming to life, long before any other plants begin to stir. It won’t look like much at first, but will quickly grow to be the size of spinach planted during normal times. It will be extra sweet from having survived the cold and will be incredibly rewarding - a truly vibrant food. This is such a delicious treat for early spring and really worth the trouble.

Overwintered Parsnips- parsnips are a long season crop. They are best when planted in very early spring and harvest the following year. This allows them to grow to a good size and then sweeten up with the cold temperatures. Plant the strange looking seeds in shallow trenches, ¼ inch deep (that is NOT very deep!). Keep well watered and well weeded all summer long. In the fall, you can harvest a few of the larger parsnips to eat September through December, but be sure to elave a few for spring time meals. Once the ground is frozen, in later December, mulch heavily with a layer of straw. The straw moderates the soil temperatures and prevents the soil from buckling and heaving with the freeze and thaw cycles. Pull off all of the mulch as soon as the ground thaws, and then in late April and early May, you can dig up huge, sweet roots that are a lovely addition to spring time soups, roasted vegetable dishes and purees.

Leeks are another crop that is planted very early in spring - mid to late April is ideal. The small and slender plants are planted in trenches, about 6 to 8 inches apart in rows that are 12 inches apart. Keep leeks well watered and weeded. Once they are about 10” tall, you can fertilize them with a good organic fertilizer such as Pro Gro from North Country Organics or Compost Plus from Vermont Compost Company. Then hill up the plants with soil from in between the rows. A good hoe makes this job much easier. The more you hill, the larger the plants will be. This allows for more of the white, edible portion to grow. Hilling also helps to keep the moisture even, another condition which encourages bigger growth. You can hill leeks one more time before fall, in early August or so if you choose to. If you cannot eat all of your leeks in the fall, leave a few in the garden for overwintering. Mulch well with straw (about 6” in depth) and let sit in the garden all winter long. On warmer winter days, you may be able to still harvest some of the leeks if the ground has not frozen solid under the mulch. With whatever leeks are left in the ground come snow melt, pull off the mulch and wait to see what happens. Not all leeks will have successfully lived through the winer, but about 40 to 60% should if you have followed these steps. You will see some yellow and rotting foliage with fresh green growth poking through. These are the leeks that have made it through winter. Let them size up a bit before harvesting. They will come back to life and can be picked and eaten in later April or mid-May. You will have to peel back some of the outer layers, but underneath will be a luscious, silky treat. So sweet in spring, and a great addition to soups, vegetable tarts, or braised meats.

Other crops: I have had good luck with late seedings of lettuce, scallions, cilantro and dill. These all overwintered fine and were good for a few salads in very early spring before they decided to go to seed. The lettuce varieties that I have found to be most well adapted to overwintering are Merveilles des Quatres Saisons, a beautiful French heirloom variety,  and Tango, a green oakleaf. You can also plant shallots and garlic in fall for early harvests. Green garlic is an immature head of garlic that tastes milder than its full grown version.  Parsley is a biennial and will also come back to life in the spring before it goes to seed. Biennials make a flower in their second year, so this is normal plant behavior! Remember, every winter is different. This type of growing requires flexibility, observation, and a willingness to experiment. Exact planting and harvest dates are not easily determined because they are a function of weather, where you garden is sited, and micro climates. The best way to understand overwintering is to start doing it, and see what works well for you. Observe each crops natural life cycle, and learn to work with it in the context of our long and cold winters. There is no better way to say “Hello, Spring!” than by harvesting your first salads in April when green life is just beginning to stir.


Gratitude

I woke up today feeling grateful and recharged with a blue sky blasting through the window and a full night of sleep behind me (the first in a while.) Here are a few pictures I took with the early morning sun casting a bittersweet glow on everything. What to make of that late fall look? Winter is coming, summer has produced all it can, and it is time to settle back and enjoy the dark days ahead. The dormant days ahead work for the seeds that need it in order to crack into life come spring - it can work for us too. It is a just fine time of year for sinking into the couch, making soups, catching up on reading, and over all feeling gratitude for the cycles of the seasons, the sweetness in the people around us. While the basement is full of jars of applesauce, tomatoes, jams, chutneys and pickles, I also try to keep a few things going in the garden as long as possible.

Like these .....

The straw keeps the soil from freezing around the leeks so that I can harvest them even in deep snow. The lettuce, arugula, cilantro and dill behind them will keep going a little while longer. I can cover them up with row cover, but most likely they will be eaten before I even need to do that. I will plant 2 or 3 times more next year so that I can have enough to take us through December.

I love this close up of dill with all of its fine texture.

Dill is one of the hardiest herbs to grow in cold weather and gives such brightness to late fall salads, potatoes, eggs, and fish. I use it quite a bit this time of year after pretty much ignoring it all summer long except for using it in a pickle jar or two or three.

I always bring in a few baskets of herbs. I don't do anything to them except cut them, pile them into a basket and leave them around the house. They smell great and love to go to work by the handful when I am making soups, broths and stocks. I don't think they object to being stuffed into a poultry cavity every now and then either. There is nothing like using herbs in big bunches of branches to feel like I am living a rich and luxurious life.

I want to say thanks to compost too.

Parts of the garden are ready for spring, and parts still have a ways to go, but there is so much satisfaction in seeing the raised beds awaiting next year. Soil building organisms busy making teeming, hot life. The ones who really get some of the credit for this are these lovelies......

Enjoy your next few days of rest if that is your luck and your lot. And thank you, deeply, for being a part of all this beauty and grace, coldness, sunshine, poop, and all.

On Vacations and Onions

Last week, I came back from our ocean vacation, the one during which I  tried not to think about the garden for a week. This was preceded by some fast and furious hours hoeing, weeding, mulching, watering and generally preparing all plants for a week of neglect. Everyone survived, tomatoes are in high production mode, spitting out ripe orbs faster than I can use them; and the peppers and eggplant are jumping into harvest baskets, big and ripe. Potatoes are ready to be dug, garlic is cured after a couple of weeks hanging from the barn rafters. Onions are next on the harvest and cure list. I never seem to have enough onions to last through the winter even though I plant so many of them each spring. I think the culprit this year was poor bed preparation prior to planting. I try to get onions in as soon as possible in April, the same time that coincides with peak greenhouse production and growing wholesale orders. So yes, once again, the onions are on the small side because we planted them into some soil that was a little compacted and not rich enough in composted donkey manure.  What do I love most about gardening? Being able to say, "there is always next year."

Onions: harvest the onions by pulling up the whole plant once the tops die back and start to lie on the ground. It's best to pull them up on a sunny, breezy day so that they can spend a few hours drying in the sunshine and wind. Before night falls, on that same day, bring them inside, out of direct sunlight so that they may cure for a few weeks. The curing process is what turns the outside layer of the onion into the paper-like skin. This outer layer, when dried properly, is what gives onions their real staying power as a storage crop. It is best to place onions in an airy, dark place - a garage with airflow but no direct light, an attic with air circulation, a shed, or even an extra bedroom with the curtains drawn and the windows open. You can braid the onion tops, bundle them into bunches and hang them up from the ceiling or rafters. You can also leave them in a single layer on the floor, but they must be turned over at least once a week. Once the tops are completely dried and the outer layer is paper-like, you can pull off the tops and store the onions in baskets, brown paper bags (with slits cut for ventilation), milk crates, apple crates, or cardboard boxes. Again, the important thing is to make sure the onions are in a dark place and it is well ventilated. Basements are often too humid for onion storage. In the winter, onions can go down to the low thirties and be fine. Colder temperatures better for onion storage than warmth with the ideal storage temperature being 35 to 45 degrees F.

Bringing in Herbs for the Winter

Herbs are one of the key ingredients in summer cooking that make the food really stand out, but we don't have to stop once winter comes.  The key, in my mind, to things tasting good is to layer in flavors using various simple techniques.  Herbs are the fastest and simplest of those methods, other than say, adding salt.

We have had such a warm November that I am still clipping herbs right out of the garden and the herbs in pots are still doing well on the back porch.  I have also started to bring in herbs from the garden to dry them.  The simplest method is to cut whole branches of  the woody herbs such as thyme, sage, winter savory, and rosemary and tie them into bundles and hang them in a dark, well ventilated place.  I usually leave them hanging for a month or so, and then place all the bundles into a large basket lined with a clean dishcloth.  I use a large amount of herbs all winter, by the handful, in simmering stews, soups, under and over roasted meats, inside the cavity of roasted poultry, etc.  I just can't think of a simpler and more effective way to add depth to whatever is cooking.

The leafier herbs, such as basil, cilantro, parsley and chives can be frozen for year round use.  This is best done with the aid of a food processor.  I take handfuls of washed herbs (stems removed) and pulse them in the bowl of the processor until they are finely chopped. I then drizzle in a little olive oil while the machine runs. Once it all looks like a nice green mush, I scoop it all into freezer bags and shape it into a thin, flat layer before placing the bags (lying down) into the freezer.  This allows the herb puree to freeze in a thin sheet that can be broken into smaller pieces when you are ready to use it. This frozen herb puree is a great addition to soups, stews, sauces, roasted or steamed veggies, and salad dressings.  I simply toss in a chunk of the herb popsicle at the end of the cooking time of whatever I am making so that the fresh flavor really comes through.

You can also bring herbs inside in pots for the winter and place them near a sunny window.  I keep a few herbs in pots all summer just for this purpose, but you can dig up whole plants out of the garden and repot them with some good potting soil. These are nice herbs to use as garnish, or chopped into a fresh salad.  These are not the herbs I use by the handful, but when I want just a teaspoon of fresh, chopped herbs to add a final punch to a dish.  Some of the herbs that work well for bringing indoors are thyme, parsley, rosemary, sage, oregano and basil.  The sunnier the window, the better luck you will have. You can also use some grow lights on a timer for even better results.  It's best to water these indoor herbs about once a week, but since they are in a semi dormant stage, they don't need to stay as moist as they would in the summer. The herbs won't always look great, but they will always smell good and have enough flavor boosting powers to earn their keep.

Black Bean and Butternut Squash Chili

This is one of my favorite things to do with butternut squash, and every time I make it, I am reminded of my friend, Robin Holland.  She made it for a mom's group I was a part of when my daughter was a baby and a toddler.  A dozen or so of us would get together once a week, share an amazing meal and, together, relish in the joys and burdens of motherhood.  I still make this often, and every time, the flavors combine together to transport me back to those days.  There is something inherently grounding and warming about this dish.

Black Bean and Butternut Squash Chili

(enough for a crowd and easily reduced)

2 cups of dried black beans, soaked overnight, rinsed and drained (turns into about 6 cups of soaked beans

1 large butternut squash, peeled, seeded, and roughly chopped into 1" chunks

2 TBS olive oil

2 large onions, chopped

1 or 2 green or red peppers, chopped

5 cloves of garlic, finely chopped

4 bay leaves

6 TBS chili powder

1 tsp dried chili flakes

2 cups of apple cider

8 cups of water

Salt to taste (at the end)

2 to 4 TBS maple syrup

Chopped cilantro, jalapeno and lime wedges for garnish (optional)

In a large, heavy pot, heat the olive oil.  Add the onion, bell pepper, garlic, chili powder, pepper flakes, bay leaves, and stir until soft and starting to brown.  Add 1 cup of the apple cider, and scrape up the brown bits and allow it to cook down by about half the volume.  This helps to concentrate the flavors of the aromatics (onions, bay leaf, etc).

It should look something like this.

Next add the squash, and the soaked beans, the remainder of the liquid, and allow to cook over medium to low heat for about 1 1/2 hours, or until everything is soft. Finish the stew by adding the maple syrup, and about 1 TBS salt (I find the beans and the squash really need lots of salt).  Stir and wait a few minutes before tasting.  Adjust with more syrup or salt if needed.

This is great served with the garnishes, some corn tortillas or corn bread, and a piece of cheddar cheese.  The warmth and sweetness create a harmonious and satisfying balance.

Chicken Broth Medicine and Reconstructed Soup

Last night, I made 2 gallons of chicken broth using 2 chickens from Shuttleworth Farm, an armful of mixed herbs (sage, lovage, thyme, rosemary, winter savory, and parsley), the tops of many leeks, a handful of carrots, some onions, bay leaf, peppercorn, and salt.  I let everything cook very slowly on medium to low heat in a big stock pot for about 3 hours.  The key is to never let anything boil...that is what makes the chiken rubbery and the broth cloudy (I am sure there are some food science explanations, I am merely going from experience.) I strained the broth, let it cool and filled up empty yogurt containers for the freezer (leaving a few inches of head space since liquids expand when they freeze).   The broth is a rich golden, green color and will be pulled out whenever I want to make a quick soup using whatever ingredients are around during the winter.  I reserved one of the cooked chickens for last night's dinner, more on that below; and with the other bird, I took all of the meat off the bone and it will go into chicken salads and such for the rest of the week.  I think using two whole birds makes such a rich broth, but it does leave a lot of meat to use up.

For dinner, I saved about a half gallon of broth, placed it in a 7 qt pot and added whole peeled carrots, potatoes, and leeks (white part only, carefully trimmed and washed).  I let the broth and veggies come to a gentle boil, and waited about 40 minutes. I served this in shallow bowls with a parsley salad, and good sea salt. In France, there is usually dijon mustard as a condiment with this, but I am all out right now.  This is one of my favorite fall and winter meals, along with some of the poached chicken,  a sort of reconstructed chicken soup.  In French it is called Poule au Pot.  (Hen in Pot).  It is the poultry cousin to Pot au Feux, (Pot on Fire)  which is made with beef -- brisket, short ribs, chuck.  And uses the same method described above.  Using fresh vegetables cooked in strained broth is preferable eating the vegetables that have simmered in the stock pot for a few hours thus becoming a wee bit mushy.

Herb Salad is the perfect accompaniment to so many things.  Parsley is probably my favorite.

Parsley Salad

2 cups chopped parsley

3 scallion, washed and chopped finely

Juice from 1/2 a lemon

1 TBS good olive oil

Sea salt to taste

Mix everything together.  Let sit about 20 minutes before serving so that the flavors combine.