Hummingbirds in the Garden

Veggie Garden Tips for every Season
Early season mustard greens add vitamins to your meals.
Mid TO LATE April
In April, when the soil is workable and there is no snow in your garden, you can sow peas outdoors. If your garden isn’t ready yet, seed them indoors in a tray of soil and eat the shoots once they’re a few inches tall. You can even try transplanting them outdoors once your garden beds are prepared. Peas, like all legumes, don’t like their roots disturbed, so don’t try to separate them out individually but instead plant them as a mat and harvest them for shoots. Some people successfully start their snow, snap and shelling peas indoors in fiber pots and transplant them outside when they’re a couple inches tall without taking them out of the pot. We recommend you put up a trellis for the peas right away before the garden tempo picks up and you are too busy to do it.
Hardy mustard greens such as the Zesty Mix we grow in little pots are a great way to get a jump on the season. They can be planted in little clumps in garden soil that is dry and thawed (a raised bed for example) and protected with row cover. They can be eaten small as leaves in a salad, or they can be planted in separate clumps that get large for steaming or braising. Those little pots of Zesty Mix are the best value because they are so versatile and mulit-purpose.
Onions and leeks don’t mind the cold, and it is important to get them in as early as possible. We have a whole blog post dedicated to growing onions, take a look at it here.
While you’re waiting for the temperatures to warm up, a good way to satisfy our gardening itch - instead of planting out tender crops too early and watching them perish in a late frost - is to set up our garden instead: Pull out any overwintered weeds, clean up last season’s debris, build a raised bed, put up a trellis, spread a layer of compost, make a succession planting plan, or start some seeds indoors.
May
This is the time to plant all cold season crops: radicchio, lettuce, broccoli, cabbages, beets, fennel, lettuce, kohlrabi, chard…
Potatoes can be planted 2-4 weeks before the last expected frost, when the soil has warmed up to at least 50F. Here in the Northeast this is typically in the month of May. Find our varieties for 2025 here.
late may / early june
After the last chance of a frost has passed (in Vermont, traditionally this is around Memorial Day), it is safe to plant all heat loving vegetables, what we call hot crops: tomatoes, eggplants, peppers, tomatillos, husk cherries. Cucumbers, zucchini, and all types of squashes can be planted as well.
Make sure you harden them off properly before putting them in the ground. Especially if you kept starts under grow lights, they will need to adjust to the outdoor world over the course of several days. Place them outdoors in the shade, protected from wind, during the day time and take them back inside for the night. Repeat this for several days, gradually increasing their exposure to sunlight and the elements, before planting them in the ground.

Peppers come in so many different flavors, heat levels, and colors.
June
Weed your onions and leeks. Remember to fertilize them every 2-3 weeks with a handful of Compost Plus or a balanced liquid fertilizer like fish emulsion.
After your first round is harvested, you can replant more radicchio, lettuce, arugula, and beets.
Late June is not too late to get your garden going: Plant a tomato, plant a zucchini, sow green beans, put some cut flowers in the ground! If you’re working with a patio garden, you can always add more pots: Mediterranean herbs like rosemary, thyme and lavender are especially well suited for sunny locations.
Here are some plants you can direct sow outdoors this time of year:
cilantro, dill
green beans
edamame
heat tolerant mustard greens like Yukina Savoy, Mizuna, Wasabina and Ruby Streaks
carrots, beets and radishes
bolt resistant lettuce varieties like ‘Purple Fusion’
cukes and summer squashes
Vegetables and herbs that you can plant as starts in the summertime:
All the herbs. For example basil, oregano, parsley and anise hyssop.
cukes and summer squashes
lettuce
fennel
chicories
kohlrabi
chard and kale
beets
Early Summer
Any spots in your veggie garden that have freed up from harvested lettuce, garlic, spinach or peas can be replanted with chicories, herbs or annual flowers.
To still get a good harvest, now is your best chance to direct seed the following vegetables:
summer squash like Patty Pan or zucchini
carrots
green beans
flowering herbs like calendula and borage
If you would like cilantro at the same time as tomatoes for salsa, now is the time to either transplant it or direct seed it. Scallions too.
It is likely time to harvest onions, and the best way to check is to see if the plants have flopped over and the skins have started to form on the bulbs. Onions need to cure before going into storage, and this is usually best accomplished by laying them out in a dark, dry, and airy space for a couple of weeks so that the green tops can dry and the skins can fully form. Sweet onions such as Ailsa Craig, Walla Walla, and Sierra Blanca should go in the fridge. They don’t store well.
If you would like peppers to ripen from green to red (or orange / yellow if that is the variety you have), it is recommended to pick one or two at the green stage. This will help the others ripen to their mature color.

A tomato trellis in Red Wagon’s display veggie garden.
Mid TO LATE Summer
During the heat of summer, here are some ways to take the stress off your plants:
water early in the day.
if you are planting some new plants, do after 4 pm so that they have the cooler night ahead of them as they adjust to life in the ground. Water well when planting.
fertilize with Compost Plus or with a liquid fish / seaweed fertilizer. It will help plants cope with the heat stress.
most importantly, we hope you keep yourself cool with dips in the lake or river.
If you are growing leeks, mid summer is a good time to hill soil around their base so that they form more of a tender white part.
It might be tempting to stop weeding as summer winds down, but this is when weeds are setting seed, so you should probably focus a little extra on taking out the weeds that are flowering. Otherwise, they’ll have plenty of time to leave you with thousands of weed seeds for years to come. Preventing weeds from flowering and setting seeds will save countless hours in the future.
If you are going away for a long weekend or vacation in summer: In just a few minutes, you can get your garden vacation ready by harvesting a few things, watering all the containers and putting the most delicate potted plants in the shade while you are away. All smaller pots can go on a tray partially filled with water so they look not so dead when you get back.
Is it time to rip out the old zucchini plants and cucumbers? Maybe you have a generation of beans that have gone by? Don’t let empty garden space go to waste, and take time to pop in radicchio, escarole, broccoli, or other fall greens. Turnips and rutabagas can be seeded directly outdoors in mid summer for a late fall harvest.

Late summer veggie garden: We love to add flowers to attract pollinators, beneficials, and to satisfy our sense of beauty.
FALL
Once the temperatures cool down, most hot crops will slow or stall their production and ripening process. You can clip the tips off of tomato plants in late summer to encourage them to send energy into ripening fruit instead of growing taller, or you can simply harvest your green tomatoes. Either turn them into a delicious green tomato salsa or let them ripen on the kitchen counter and use them for sauce.
Any plants that are diseased or otherwise unhappy should be pulled and added to your compost pile. Don’t let veggie plant debris - especially tomatoes - overwinter in your garden, you could accidentally be harboring unwanted pests and diseases that will flourish next spring.
Some plants can be left standing though, if you want them to reseed or offer the seeds as food to the birds. Examples include dill, cilantro, or tulsi seed heads and any perennial plants you might have in your veggie garden, like asparagus, anise hyssop, lovage or rhubarb.
WINTER
This is the time for us and our gardens to rest, but there is never a season when we can’t be gardening. We can plan and dream, make plant lists and order seeds. It is also a wonderful practice to review our garden notes and re-evaluate what went well, what we’d like to improve, and where we feel like experimenting. And then there are houseplants…

Red Wagon’s cold frames and greenhouses at rest.
Happy gardening!
This blog post was written by Kat Consler and Julie Rubaud.
POTATO VARIETIES for the 2025 season

It’s true: When the dandelions are blooming in your neighborhood, it is time to plant potatoes. In New England, dandelions can be used as a reasonable gauge to tell if the soil has dried and warmed enough for potatoes to be comfortable. All potatoes like well-draining soil, but some of the varieties we carry are well suited for heavier soils.
If you’re working in clay soil, give Dark Red Norland a try. This is an early season potato with high yields and great flavor, firm white flesh and red skin.
If you’re at the other end of the spectrum, working in sandy drought-prone soil, All Blue is a great performer. Blue skin, blue flesh and blue flowers make this one extra special.
If you’re growing in containers or grow bags, varieties with small tubers are your best choice. Banana is a buttery yellow fingerling variety with good storage qualities. Upstate Abundance boasts very early, golf-ball-sized potatoes with white flesh and a creamy texture.
Our overall Red Wagon favorite variety is called German Butterball. Its delicious flavor and texture lends itself to many culinary uses and never disappoints. If you’re looking for an earlier season variety with similar flavor qualities, Carola is a great choice as well. Both have yellow flesh and skin.

Find instructions on how to plant and care for your potato patch here.

This blog post was written by Kat Consler.
A Closer Look At Pea Varieties

The optimal time to seed peas here in Vermont is in April as soon as the ground can be worked. You don’t want to start too early or the seeds may rot if the soil is too wet. And you don’t want to wait too long or the pea plants will suffer in the heat later in the season and produce a smaller crop.
Following is a selection of open-pollinated pea seeds you can find in our retail store. All parts of these peas are edible - flowers, pods and shoots. All of them can be grown as micro-greens as well.
In our climate we recommend providing support for pea plants of all sizes. Four posts with a line of string surrounding a pea patch is sufficient to prevent shorter varieties from flopping over in the wind and rain. Anything taller than 4’ will benefit from a trellis. Chicken wire, cattle fence, hardware cloth or Hortonova netting attached to t-posts or wooden stakes are all great options.
Our selection for the 2025 season:
SNAP PEAS - ideal for fresh eating, they’re crisp and sweet
Sweet Gem (High Mowing) - around 4’ tall, sweet and crisp with strong powdery mildew resistance.
Sugar Magnolia (Hudson Valley) - 5’ tall with gorgeous purple flowers and pods.
Amish Snap (Seed Savers Exchange) - 5-6’ tall, sweet and crisp pods on prolific vines.
SNOW PEAS - harvest when they’re small for a stronger pea flavor or let them grow slightly puffy for sweet and crisp pods
Blizzard (High Mowing) - 3’ tall, prefers being trellised. Sweet and easy to pick.
Swiss Giant (Hudson Valley) - 5’ tall. beautiful bi-color flowers (they’re edible too). high yield of large 3-4” pods.
SHELL PEAS - these involve more work with shelling, but the tender sweet peas are so worth it
PLS 595 (High Mowing) - short, 3-5’ tall plants with high yield. Very long pods with an average of 11 peas per pod.
Champion of England (Seed Savers Exchange) - grows up to 10’ tall! A historic variety from the 1840s. Prolific and sweet, with 8-10 peas per pod.

This blog post was written by Kat Consler and Julie Rubaud
Pest and disease resources

Squash bug eggs on the underside of a zucchini leaf.
All throughout the growing season we get a lot of questions from our customers about pest and disease issues. Here are some guidelines and resources that we hope you find helpful.
My plants have a pest or a disease, what do I do?
Don’t panic.
Take a closer look:
What triggered the “my plant is sick” alarm? Is it holes in the leaves, yellow leaves, visible pests, rotten parts of the plant? Try describing the damage in words, this will help you use the right words in a Google search or describing it to someone else.
How many plants are affected? Is it just one type of plant or all plants in one area?
Can you detect an insect, caterpillar, slug or other animal?
Are there eggs? Look at the underside of leaves.
Does anything in the immediate surrounding give you clues, like a soggy spot in the garden, a vole hole nearby? Has the weather been exceptionally rainy or dry, hot or cold?
Take photos. Make sure the lighting is good - shade is often better than harsh sunlight. Take pictures from various angles. Take whole plant photos as well as close-ups.
Now that you’ve familiarized yourself with your situation, you’re ready for the next step:
See what a Google image search with the name of the plant and a description of the symptoms brings up.
Visit THIS helpful University of Minnesota Extension page and click through the questions.
Contact the UVM extension gardener helpline here. You can either fill out a form with detailed information on your plant issue and submit photos or give them a call during their hotline hours.
Send us a description and photos to info@redwagonplants.com. Give us a few days to get back to you, especially during our busy season. We’ll do our best to help.
What to do next:
This will greatly depend on what your disease or pest turns out to be. Some situations will require no action, other times you may need to remove leaves, squish bugs or use an organic spray. We’re happy to give you our tips on best practices once you know your disease or pest.
Things we don’t recommend:
Give up gardening.
Please don’t bring diseased plants or weeds to our nursery (or any other place that grows plants) for ID, not even in Ziploc bags. You could unintentionally be spreading diseases to our plants. Send photos instead.
Spray with insecticides without knowing if an insect you found is really a pest. Many bugs on your plants are either harmless or beneficial.
This post was written by Kat Consler.
Three ways to trellis and prune tomato plants

Staff garden cherry tomatoes grown with a string and clip method in a greenhouse
First of all: Why trellis and prune tomato plants? Many gardeners let their tomatoes grow without ever trimming a branch or adding any support. This may produce some great fruit, but here are a few reasons why I recommend trellising and pruning your tomato plants:
Ease of harvest - Trellised and pruned tomato plants make for easier harvest. Easier access to the fruit also means you’re less likely to damage the plants when reaching in to get a ripe tomato. Less damage means less diseases and you’re less likely to miss ripe fruit that is hidden behind overgrown foliage.
Disease prevention - Good airflow, through spacing of plants, and pruning away some branches and leaves, is the best prevention for fungal diseases. Other diseases spread when leaves come in contact with soil, so keeping your tomato plants up off the ground and trimming the lower leaves will greatly reduce this from happening.
More fruit that ripens - You can force a tomato plant to put its energy into ripening existing fruit by removing some of its foliage. This is especially helpful at the end of the season. Three to four weeks before the first expected frost, I clip the head off of my tomato plants, so they will put their energy into turning the last fruits red.
The Cage
This is the most common way to keep tomato plants upright in a home garden. Typically the cages used are too short for tomatoes and better suited for pepper plants. It can be a good option if you have limited garden space and are only growing a few tomato plants. Find the tallest cage possible, ideally 5 ft or more. The sturdier the wires, the better. Square folding cages are made of sturdier wire and won’t fall over easily. They are also more expensive.
Set up your cage right after planting your tomato starts in the ground, this way you’re less likely to damage the plant. Push the bottom wires as far down into the soil as possible.
Since tomato cages are rather short, I aim for a branched plant or choose determinate varieties that won’t grow as tall. I prune all leaves and suckers from the bottom of the plant up until right beneath the lowest flower cluster. Once that fruit is harvested, I continue pruning leaves up to the next flower cluster, always working my way from the bottom up. Always leave some foliage to shade the fruit to prevent sunscald. When the plant gets very dense inside the cage, I prune out some weaker suckers and leaves that are pointing inward. Anything that looks diseased or discolored is always my first choice for cutting off.
Basket Weave


This is a great method if you are planning to have a row of tomato plants. You could use it with as few as 2 plants and up to the full length of your garden. Mark your tomato planting holes in a straight line about 18 inches apart. Then drive a 8 ft t-post (or other tall, sturdy stake) between every 2 or 3 plants and at the ends of the row. Anchor the outer posts so they won’t pull towards each other under the weight of the plants. I usually add two shorter stakes at an outward angle to the end posts. Once your structure is in place, plant the tomatoes. When they are about a foot tall, I start weaving. Attach one end of your string to one of the end posts and start weaving between the plants: Right of the first plant, left of the second and so on. When you reach a post, loop the string tightly around it. When you reach the other end of your row, tie a knot to the last post, run the string between anchor and last post a few times and tie it off. Now do the same with an opposite weave. Each plant will now be held up by string on either side. I weave every 6-10 inches, which is about once a week. Take leaves out as described with the cages. I usually thin each plant to 6-8 strong leaders and remove all other suckers. This creates a kind of espalier look where all fruit is easy to reach and there is lots of airflow.
String and Clip

My wild veggie garden on August 1st 2021 with tomatoes trellised along front of house
The easiest pruning and harvesting will be achieved with a string and clip set-up. I grow tomatoes along the south side of my house and attach the strings with hooks to the overhang of the roof. This picture was taken August 1st - Tomatoes get tall if you let them!
If you have a greenhouse, this is a great method. Or you can build a frame of 2x4s as was done in our display garden last year. As with any of these methods, you want to sink the posts as deep in the ground as possible. I have grown tomatoes in pots on a patio and attached their strings to a nearby building. The string doesn’t have to be perfectly vertical either, you’ll just want to anchor the bottom of the string in the ground, so any wind won’t tear the plant out. In our display garden set-up we ran a horizontal string a few inches above the ground between the wooden frame and attached the trellising strings to it. You could use tent stakes or tie the string to a stick and poke it into the ground.
Next you’ll need tomato clips. These are made of plastic and can be used for many years until they break. They clip tightly to the string and then encircle the stem of the tomato plant without strangling it. I recommend clipping every 10-12 inches, beneath a leaf. Don’t place them directly under a cluster of flowers/fruit as the weight of the plant could eventually snap them off.
If you don’t have tomato clips, you could tie a piece of string tightly to your supporting string and then loosely around the tomato stem.
Pruning with this method is pretty straightforward: Each vertical string gets one leader. This means you’ll prune off all side branches. You can grow two leaders per plant, but they each need their own support string. Let your freshly planted tomatoes grow for a bit before you choose the strongest side branch as a second leader. Typically it will be the branch right beneath the lowest set of flowers.
The string and clip method can also be used for cucumbers!

Cucumbers in a greenhouse using string and clip method
Pruning best practices
Tomatoes are very susceptible to fungal diseases that can be spread from one plant to the next through your hands or tools. Avoid pruning and harvesting when the plants are wet as water can be a great vector for diseases.
Use sharp clean snips when pruning. Don’t touch the wounds and avoid tearing off branches as the large open wounds created can be entry points for diseases. Start with the healthiest plants and prune diseased plants last. You can also disinfect your snips between plants or after each pruning session. A bleach solution or alcohol works great for this.
When watering, direct your hose at the base of the plant, not the foliage itself. Mulching can be a good way to prevent water from splashing soil onto the bottom leaves when watering or from rain.
Some diseases live in the soil and can overwinter there. I recommend a good clean up of all tomato plant material at the end of the season to minimize future disease issues.
I prune and trellis once every week. All it takes is a few minutes per plant. If you have never done anything to your tomato plants but are curious to try, start with one plant and see how it compares to the others.
This post was written by Kat Consler, RWP’s tomato pruning genius.
Very Berry Weekend
Let’s celebrate berries in all their colorful delicious beauty.

To celebrate the start of berry season, we invite you to a weekend of very berry fun. We are offering a palette of berry themed workshops and classes as well as free activities and learning opportunities with topics ranging from growing your own fruit and plant care to turning your harvest into tasty treats. You’ll also have a chance to weave your own harvest basket. To round out the weekend fun, we will have delicious berry-packed lunch, snack and drink options available for purchase.
VERY BERRY WEEKEND SCHEDULE
Saturday June 8
10:00 am - 5:00 pm BASKET WEAVING workshop: BLACK ASH BERRY BASKET with penny hewitt
Here is a unique chance to make your own basket and in the process learn one of the oldest crafts in human history. For thousands of years, baskets have served as indispensable objects in every culture. Let's carry on this tradition and take home a beautiful, durable and useful berry basket, crafted from local and responsibly harvested, hand-pounded black ash logs. This is a great introduction to the extraordinary qualities of the black ash tree. In this class, participants will weave a square to round basket, approximately 6”x 6” with optional leather strap. Included is a discussion on how the material is harvested and processed.
Cost: $165. Limited to 12 participants. Sign up here.
12:30 PM - 1:30 PM BERRY GROWING Drop-In
Drop in for this free berry growing session. You may learn how and when to plant strawberries, which blueberry varieties might suit you best, or how to prune raspberries. Bring your berry curiosity. No sign-up required.

Sunday June 9
10:00 AM - 11:30 AM Growing berries in Vermont with Jacob Holzberg-Pill
From the common to the lesser known fruit, this class will cover all the bases to get your backyard berry patch going. Vermont’s climate brings its unique challenges and opportunities for berry production. Participants will learn which varieties to choose depending on their site and how to care for them. This includes propagation to multiply your plants, and pruning to keep them healthy.
Cost: $25. Sign up here.
12:30 PM - 1:30 PM BERRY GROWING Drop In
Drop in for this free berry growing session. You may learn how and when to plant strawberries, which blueberry varieties might suit you best, or how to prune raspberries. Bring your berry curiosity. No sign-up required.
4:00 PM - 6:00 PM HANDS-ON, honey-Based jams with v smiley
What better way to celebrate berries than turning them into jam with local honey and fruit. In this class with V Smiley from V Smiley Preserves, you will learn how to make delicious berry jams with local ingredients. The class covers selecting, preparing and preserving fruit with honey and without added pectin. V Smiley will teach the fundamentals of flavor construction and the stages of jam cooking, using honey instead of sugar. Through tasting a wide selection of preserves and making variations on two berry jams, you’ll open up your jam making to the spice cupboard and herb garden. This is a hands-on workshop and you’ll head home with multiple jars of berry jam.
Cost: $120. Limited to 12 participants. Sign up here.

We look forward to seeing you! Our greenhouses will be open regular hours, 8:00 AM to 6:00 PM.
Gardening 101 Extravaganza
A full day of learning in support of newer gardeners.

This is our first ever all day learning event. Our goal is to be welcoming and supportive of new gardeners. Throughout the day we will offer many opportunities to explore the basics of growing your own food and flowers and dreaming up your ideal landscape. In this new learning format, we have a whole day of activities planned and you are welcome to come for just one component or stay the whole day.
GARDENING 101 SCHEDULE
Saturday, April 20th
ASK ME ANYTHING ROUNDTABLES — 10:00 AM to 4:00 PM
Join us around the table to discuss your gardening questions with a Red Wagon expert as well as fellow gardeners. This is a free drop-in station where you can get inspiration and find answers, and no sign-up is required. Different members of Red Wagon’s team will be staffing the table and each block of time will focus on a specific theme.
10:00 am - 12:00 pm Plan your garden and create a vision board with Julie Rubaud
We are going analog! Whether you’re designing your veggie garden or your perennial beds, we invite you to get creative and dream big. All materials will be provided but feel free to bring in your own pictures, magazines, Pinterest board or favorite garden journal. This is a free “drop-in” program and you can come and go as you please. No prior registration required.
12:00 PM - 2:00 pm FOCUS on soil, from testing to amending with Chad Donovan
If you have ever sent in a soil sample and don’t know what to do with the results or you’re curious what healthy, fertile soil looks like, this is the time to stop in. This is a free “drop-in” program and you can come and go as you please. No prior registration required.
2:00 pm - 4:00 pm Focus on Seeds - starting them indoors, outdoors, reseeding and more with Kat Consler
Some plants like to be transplanted, others prefer to have their roots be undisturbed. Kat will help you determine the best way to get your plant babies off to a great start. This is a free “drop-in” program and you can come and go as you please. No prior registration required.

WORKSHOPS
Three workshops fill out this Gardening 101 day. They cost $25 each and are limited to 12 participants so we recommend that you sign up ahead of time.
10:00 am - 11:30 am Vegetative Propagation with Jacob Holzberg-Pill
Learn how to make more of your favorite plants with Jacob Holzberg-Pill. This workshop will offer a broad overview on many different types of vegetative propagation: crown division, root cuttings, scaling, tip layering, softwood and hardwood cuttings. In this hands-on workshop we will explore which asexual techniques work best for different species and genera. Participants will practice some of these techniques and take home some fun new plants. Sign up here.
12:30 Pm - 2:00 pm Favorite tools for the veggie garden with Julie Rubaud and Kat Consler
We all have our favorite tools to use in the garden. From trellising supports and row cover to weeding tools and gloves. Julie and Kat will talk about their successes and failures with various materials and how to get the most use out of their favorite garden tools without having to purchase too many things. Sign up here.
3:00 PM - 4:30 pm Growing Cut Flowers with Lily Belisle
Are you dreaming of endless summer bouquets? Lily will help you make that dream come true. In this class, she’ll talk about her favorite cutting flower varieties and which flowers and foliage plants to grow and harvest to keep bouquets on your table throughout the seasons. You’ll get tips for successful growing and learn which tools to use to increase abundance and ease. Please bring all your cutting flower questions and leave with inspiration and plant wish lists. Sign up here.

We look forward to seeing you! Our greenhouses will be open normal hours, 8:00 AM to 6:00 PM.
Starting your own raspberry patch

I love all fruit, but the aromatic flavor of raspberries is my absolute favorite. If you feel the same way and have a little space in your yard: Grow your own!
You’ll find all the instructions you need in the following quick guide - feel free to download it and print it out for future reference. To tell if your variety is of the everbearing type (primocane) or summer bearing (floricane), check the plant label or ask one of our plant experts while you're shopping in our greenhouses.
Lily Belisle has written a great post on how she prunes her raspberries. Read it here.

This post was written by Kat Consler.
Open (Green)House '24

Join us for a sneak peek into our 2024 season!
We invite you to stroll through our greenhouses to see what’s growing and chase the winter blues away with a hit of green life.
We will be open Saturday, March 30 from 10am to 2pm for a sneak peek and an early season garden pop-up shop.
Free behind-the-scenes tour with Julie at 12pm.
Lily, Julie and Kat will be there to help you out and answer any questions about your upcoming garden dreams.
Our pop-up garden shop will be stocked with seeds, tools, soil, houseplants and early season, cold hardy plants such as pansies and herbs to get your season off to a great start.

Creation Station
During our Open House, we will set up a potting station so that you can make adorable springtime planters for your indoor table scapes.
No need to sign up…this is a free activity with some guidance from Julie, Kat and Lily as needed.
Cost is based on size of basket and amount of plants used.
March 30th - 10 am to 2 pm
Starting Friday, April 12th, we will be open every day from 8 am to 6 pm.
Growing Ginger in VT

Fresh ginger is juicy and tender and the fragrance will make your head spin.
Zingiber officinale, or ginger, is a tropical plant, native to Southeast Asia. It grows attractive, bamboo-like foliage and has aromatic, fibrous rhizomes at soil level.
This year, as an experiment, we are growing ginger in small pots for home gardeners curious about trying a new crop. We will be offering these starting this Friday, June 16th. We only have 25 pots to offer, and they are first come, first served. This has been a labor of love with the ginger slowly coming to life on heat mats in our shade house (#3) after being planted back in early March. It is finely sprouted and growing enough to send off to your homes.
Growing in VT
Ginger needs warm, rich, well draining soil. It prefers part sun, frequent watering, and regular fertilizing. We recommend growing your ginger plants in a large container or raised bed. A 5 gallon grow bag would be great.
Details
Fill your container with great soil that is nutrient rich and well draining. We recommend Fort V from VT Compost Company. Gently separate your ginger plants and space them in your container. As the plants are getting established keep them moist, but never too wet or the roots will rot. As the plants grow, fertilize with a couple handfuls of Compost Plus every week or so. Keep them well watered. At the end of summer, before frost, gently dig out your ginger rhizomes and enjoy this tender homegrown treat.
Each pot has 3 to 4 ginger sprouts in it, and will yield, in ideal conditions about a half pound of ginger.
Fresh ginger should be kept in the refrigerator or frozen for longer storage.
Grow your own bouquets from our plant starts
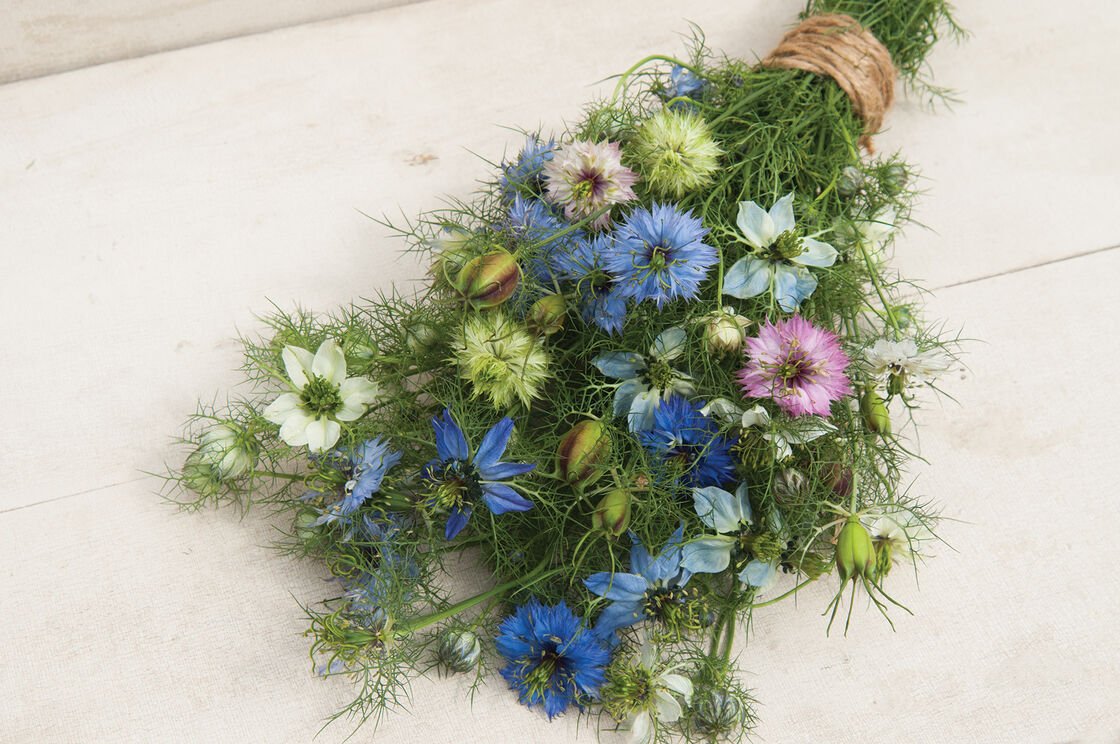
Nigella add lots of texture with their lacey leaves, bright blooms and geometric seed pods
Who doesn’t love a bouquet of fresh flowers brightening up their indoor living space?
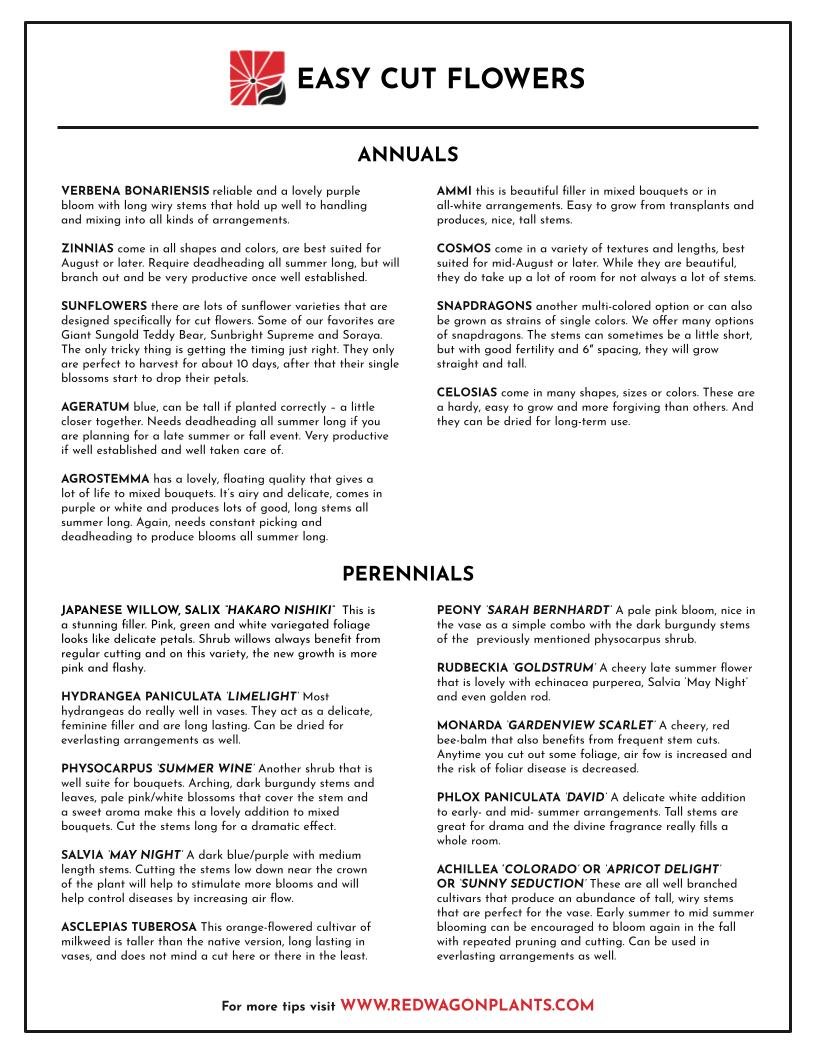
Whether you’re new to growing your own cut flowers or want to expand your bloom options, Red Wagon Plants has a wide selection of flower starts for your garden! We’ve put together a list of plants available at our greenhouses this season and sorted them by function in a flower arrangement. If you’re new to growing cut flowers, I recommend starting with the ones marked for long vase life. Zinnias and Verbena bonariensis for example, are great staples that we like to grow in our display garden every year. They bloom proliferously throughout the summer and have long stalks to make bouquets of any size. They also are great attractors for pollinators!
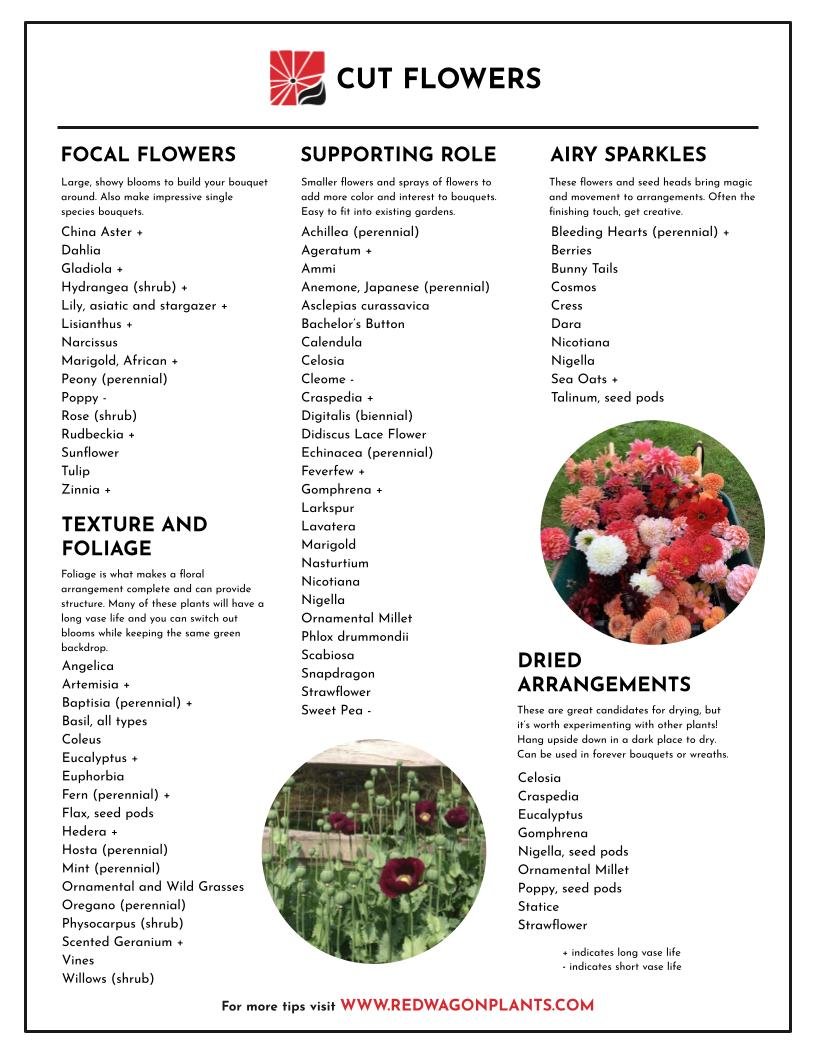
The images above are Breadseed Poppies and a wheelbarrow full of Dahlias from Lily’s garden.
To find pictures of all the above-mentioned plants, visit our “What We Grow” page on our website.
A few top picks are described in the following guide:
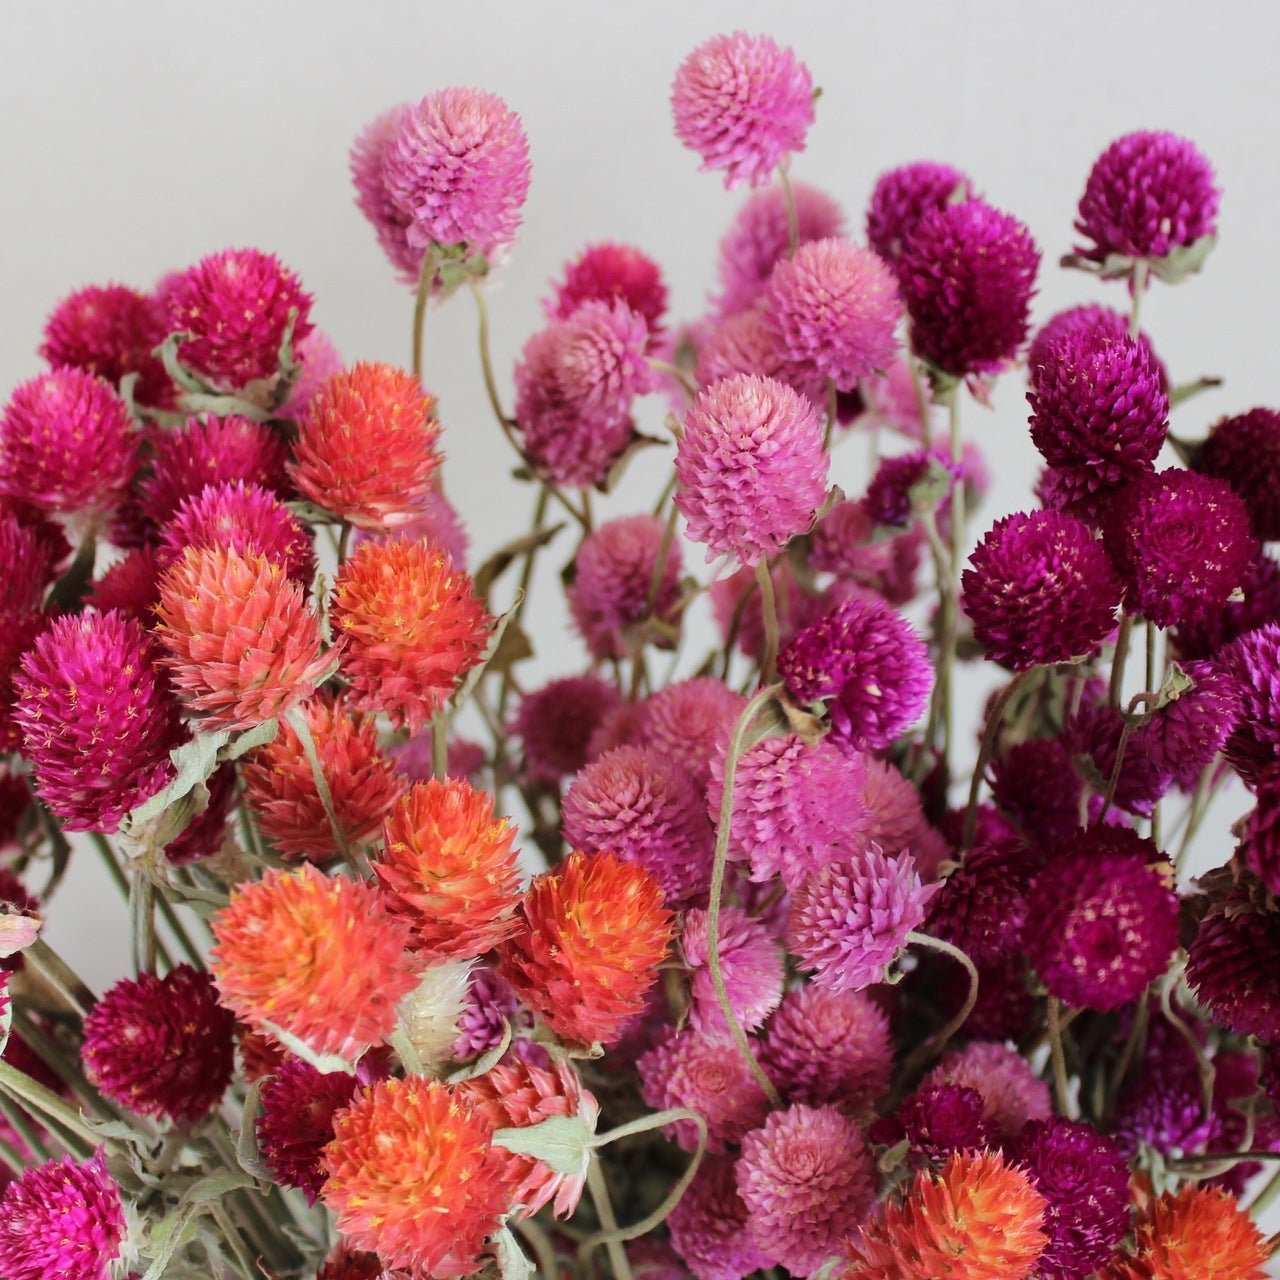
Gomphrena make great dried arrangements
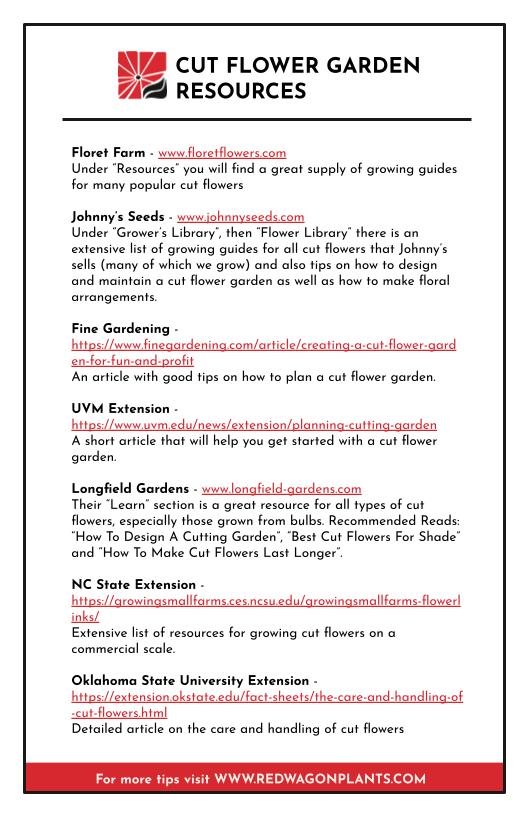
If you would like more inspiration and guidance on how to grow, harvest and arrange your cut flowers, below are some of our favorite resources. And as always, stop by at our greenhouses in Hinesburg and let us help you make the best selection for your garden.
This post was written by Kat Consler.
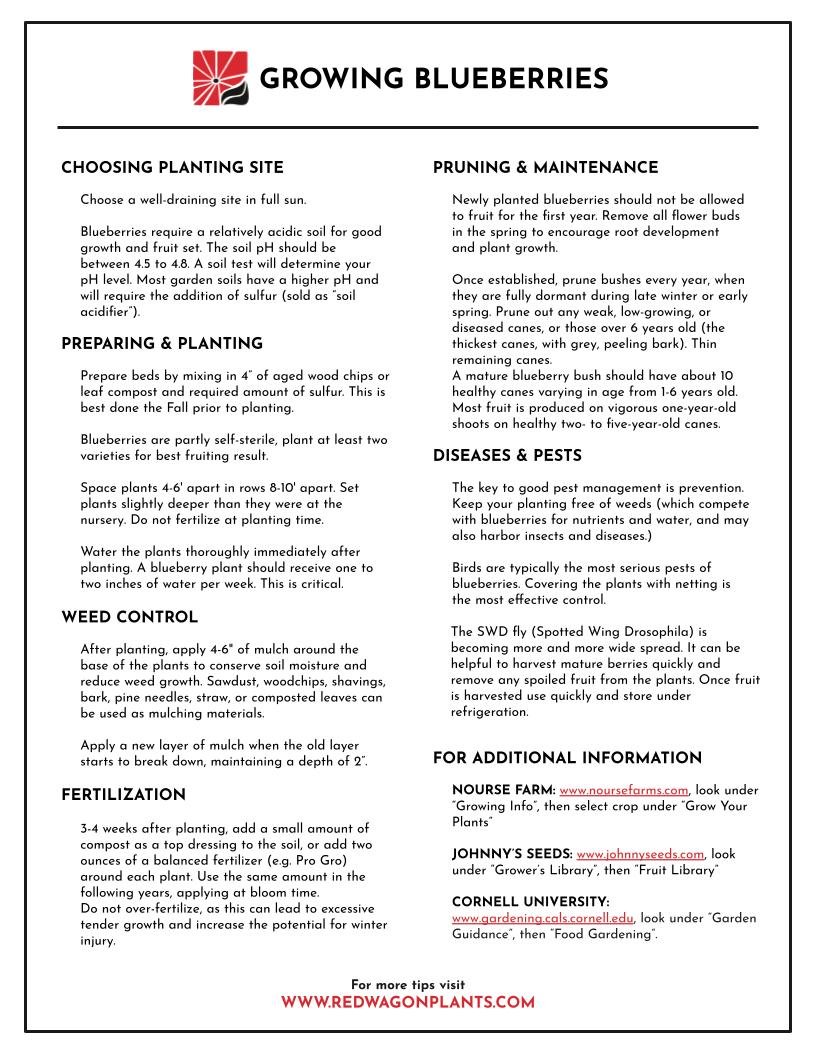
How to start your own backyard blueberry patch

Growing blueberries in your own back yard can be very rewarding. Picking the plump ripe berries make a great fresh snack for young and old!
Here are a few things to pay attention to when planning your new blueberry patch:
Cross-pollination: Like many other backyard fruits, you will need to plant at least two varieties to get good cross-pollination and fruit set. Following is a list of varieties that we carry or have carried in the past. Personally, my favorites are ‘Northland’ for their exceptional flavor reminiscent of wild blueberries and ‘Bluecrop’ for their large clusters that make for easy picking.

Your soil pH: Select a sunny site in your garden and then get your soil tested! Blueberries will only thrive in acidic soil and most garden soils will need to be amended with a soil acidifier. This is the same product you would use for hydrangeas.
Spacing: Give your blueberry bushes enough elbow room. Depending on the varieties chosen this will be 4-6 feet of space between the plants. Check the tag on the plants you purchase to know their mature size and recommended spacing.
Take your time: For the best success and least maintenance, plan ahead and prepare your planting spot in Fall, then plant in Spring as soon as the soil warms up enough to work it. Blueberry bushes can be planted any time of year but will require good watering (mulching helps!) and weeding especially in the first few seasons. As tempting as it is to let your berry bushes fruit as soon as possible, it is recommended to remove all flowers in the first year. This way your plants can put all their energy into growing a healthy root system. That will in turn give them more energy to bear more fruit the next season. Patience pays off.
For more growing and maintenance tips, please refer to this handy growing guide or come by in our greenhouses and ask one of our plant experts!
This post was written by Kat Consler.
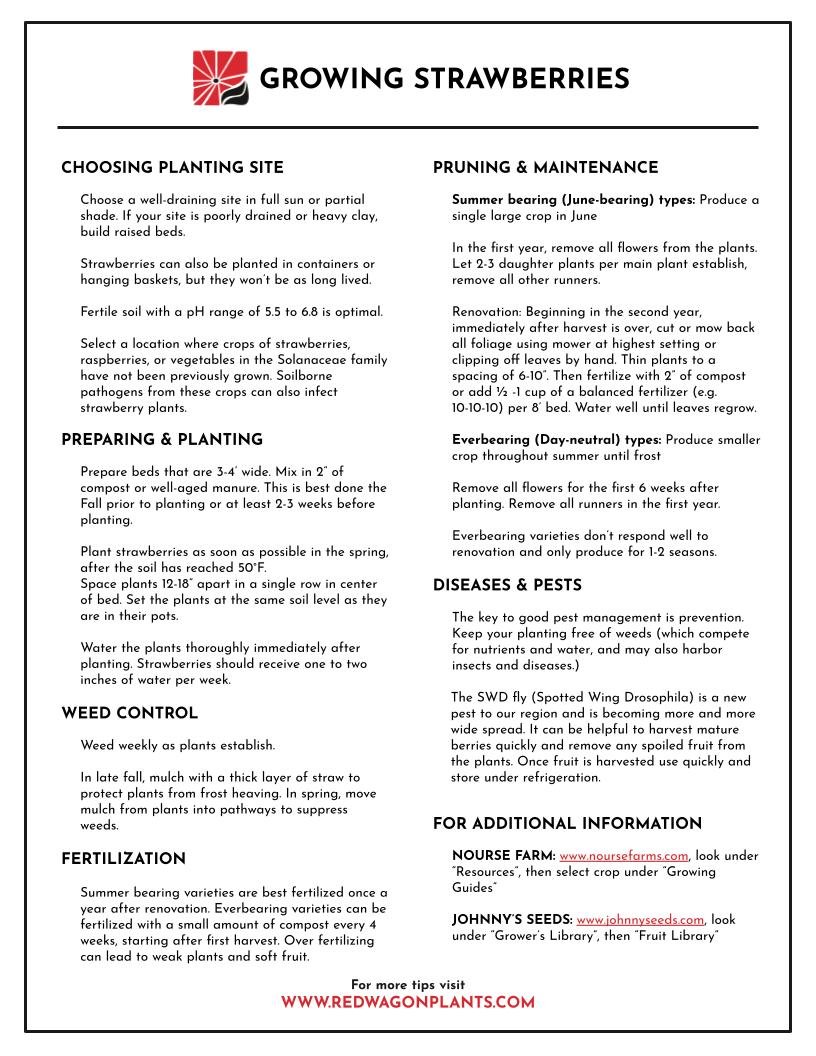
The first fruit of the season: Strawberries

Strawberries, our first delight of Summer here in the Northeast!
They are easy to grow in your own garden and will produce for several years, if well maintained. The secret to success is renovation: After your first harvest in the second year, mow down all of the old foliage and thin plants back to a spacing of 6-10”. Select healthy vigorous plants to keep and weed out old or very small ones. Mulch with a layer of mature compost and keep well watered until the leaves grow back.
Everbearing varieties are best grown as an annual crop. Remove all flowers for the first 4-6 weeks after planting and remove all runners. Everbearing varieties will produce berries from Summer until frost! We sell them in hanging baskets, which make them a great option if squirrels and chipmunks are a problem or you have limited garden space.

This post was written by Kat Consler.
Behind the Scenes: Pest Management at Red Wagon Plants
Red Wagon Plants operates as an organic agricultural business. What does this mean for pest and disease management?
Beneficials, our best friends
When visiting our greenhouses you will occasionally find a hanging basket with nothing but tall grass growing in it. Aesthetically maybe not quite pleasing enough to hang on your front porch, and you might wonder what it’s doing here! When you look more closely, you will see that the grass is covered in little black aphids. Depending on how long this ‘banker plant’ has been in use, you will likely also find aphid-sized golden balls attached to the blades of grass. Some of them have a tiny hole cut into one end.

Parasitized aphid mummies
What’s going on here? One of our best and most effective ways to control aphids is the use of parasitoid wasps. If you’re imagining a swarm of yellow jackets buzzing around in our greenhouses, let me paint a different picture: These tiny wasps are less than an ⅛ of an inch long and won’t sting us, so they are not very scary to humans. Aphids are the ones that should be afraid, though. The female wasps lay their eggs into live aphids! When the egg hatches, the larva eats the aphid from the inside, then pupates, turning the dead aphid into the golden-tan mummy out of which it emerges.
We use these beneficials as a preventative measure, so we may not have aphids in our greenhouses when we release them, but we want them to be ready as soon as we have an aphid outbreak. This is where the banker plants come in.
The banker plants - made up of some species of grain and bird cherry-oat aphids - is a nursery for the wasps to lay their eggs in. Bird cherry-oat aphids will only attack cereals and not other crops in our greenhouses, so we are not spreading one pest while trying to manage another.
There are various types of parasitoid wasps, many of which will also visit your garden and aid in your pest management. One of my favorites are the ones that lay eggs on tomato hornworms and eat them up from the inside!
Parasitoid wasps are not the only invertebrate helpers we employ here at Red Wagon Plants. There are many other beneficials that can be used as a preventative measure. Most of them specialize in eating aphids, thrips, spider mites or all of the above, as well as other tasty pests.

Lacewing larva enjoying an aphid meal
Scouting for pests and diseases
Besides beneficials, scouting is the key ingredient to good pest and disease management. This means taking a close look at one plant of each variety each week. This is a lot of work, but it keeps us up to date with what is going on in the greenhouses. As soon as a pest or disease is detected, we can intervene. Oftentimes this means squishing pests by hand, picking off diseased leaves, or moving plants to a dedicated “hospital” area for special treatment and monitoring. Knowing where the pest hotspots are, tells us the most effective place to spread our beneficials each week.
Only if all other measures fail, do we apply broad-spectrum insecticides. Even though these products are approved for organic production, they do not differentiate between friend and foe. So we use them very sparingly and in a localized manner. This is how Integrated Pest Management (IPM) differs from conventional pest control: We only spray after a certain level of pests have been detected, not on a calendar schedule. This has obvious benefits for the environment, and the health of staff and customers.
Preventative Sprays
As any gardener in Vermont knows, fungal diseases are widespread in our humid climate. To limit diseases like powdery and downy mildew, we use preventative sprays. Some of these products actively kill spores on contact by drying them out and changing the pH level. Others contain a beneficial bacterium that will compete for space with pathogens. This means that if the beneficial bacteria is there first, the mildews have less room to spread. Unfortunately every new leaf that grows will need to be treated with this beneficial, so this spray is applied on a weekly schedule as soon as conditions are conducive for mildews. So if you see me walking around at Red Wagon Plants with a Ghost-Busters backpack sprayer, that’s likely what I’m doing!
A display of healthy blooms and foliage plants
This post was written by Kat Consler, RWP’s Integrated Pest Management specialist.
Cleaning up the Asparagus bed
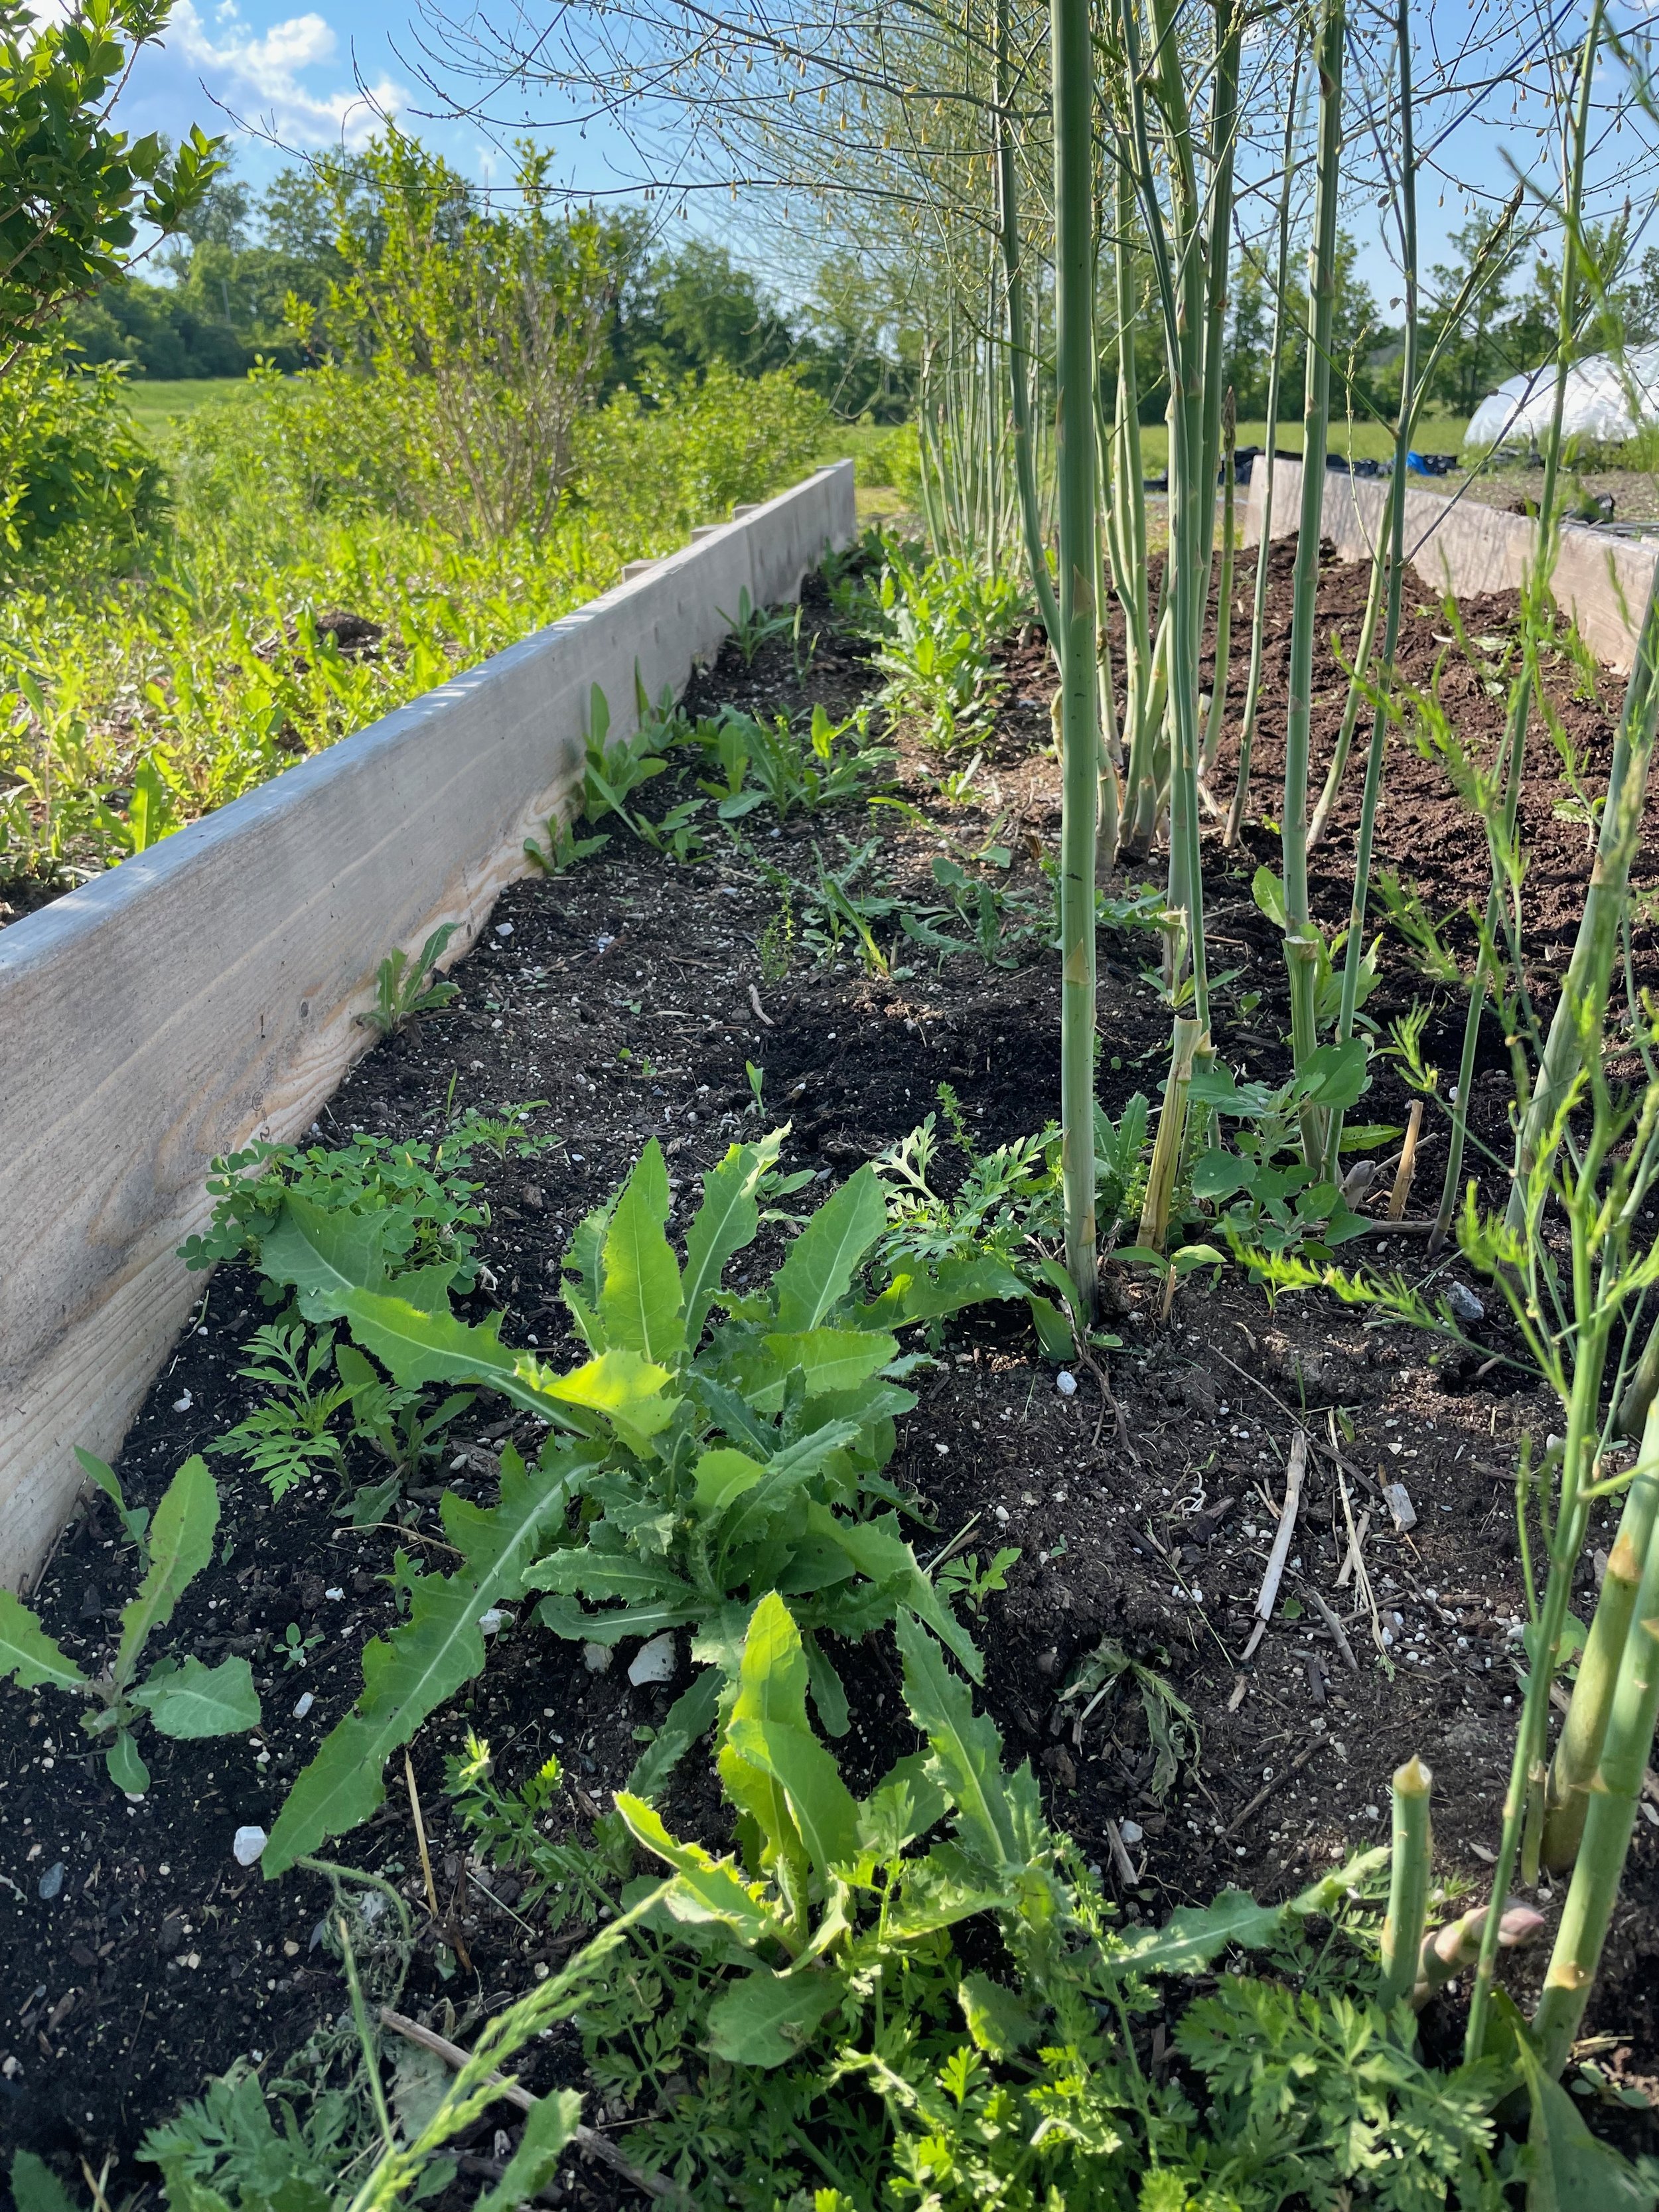
After producing all spring, asparagus benefits from a clean up and some fertility. First, weed the bed carefully using a knife and your hands. You want to cut the weeds out and gently remove them without disturbing the asparagus roots.
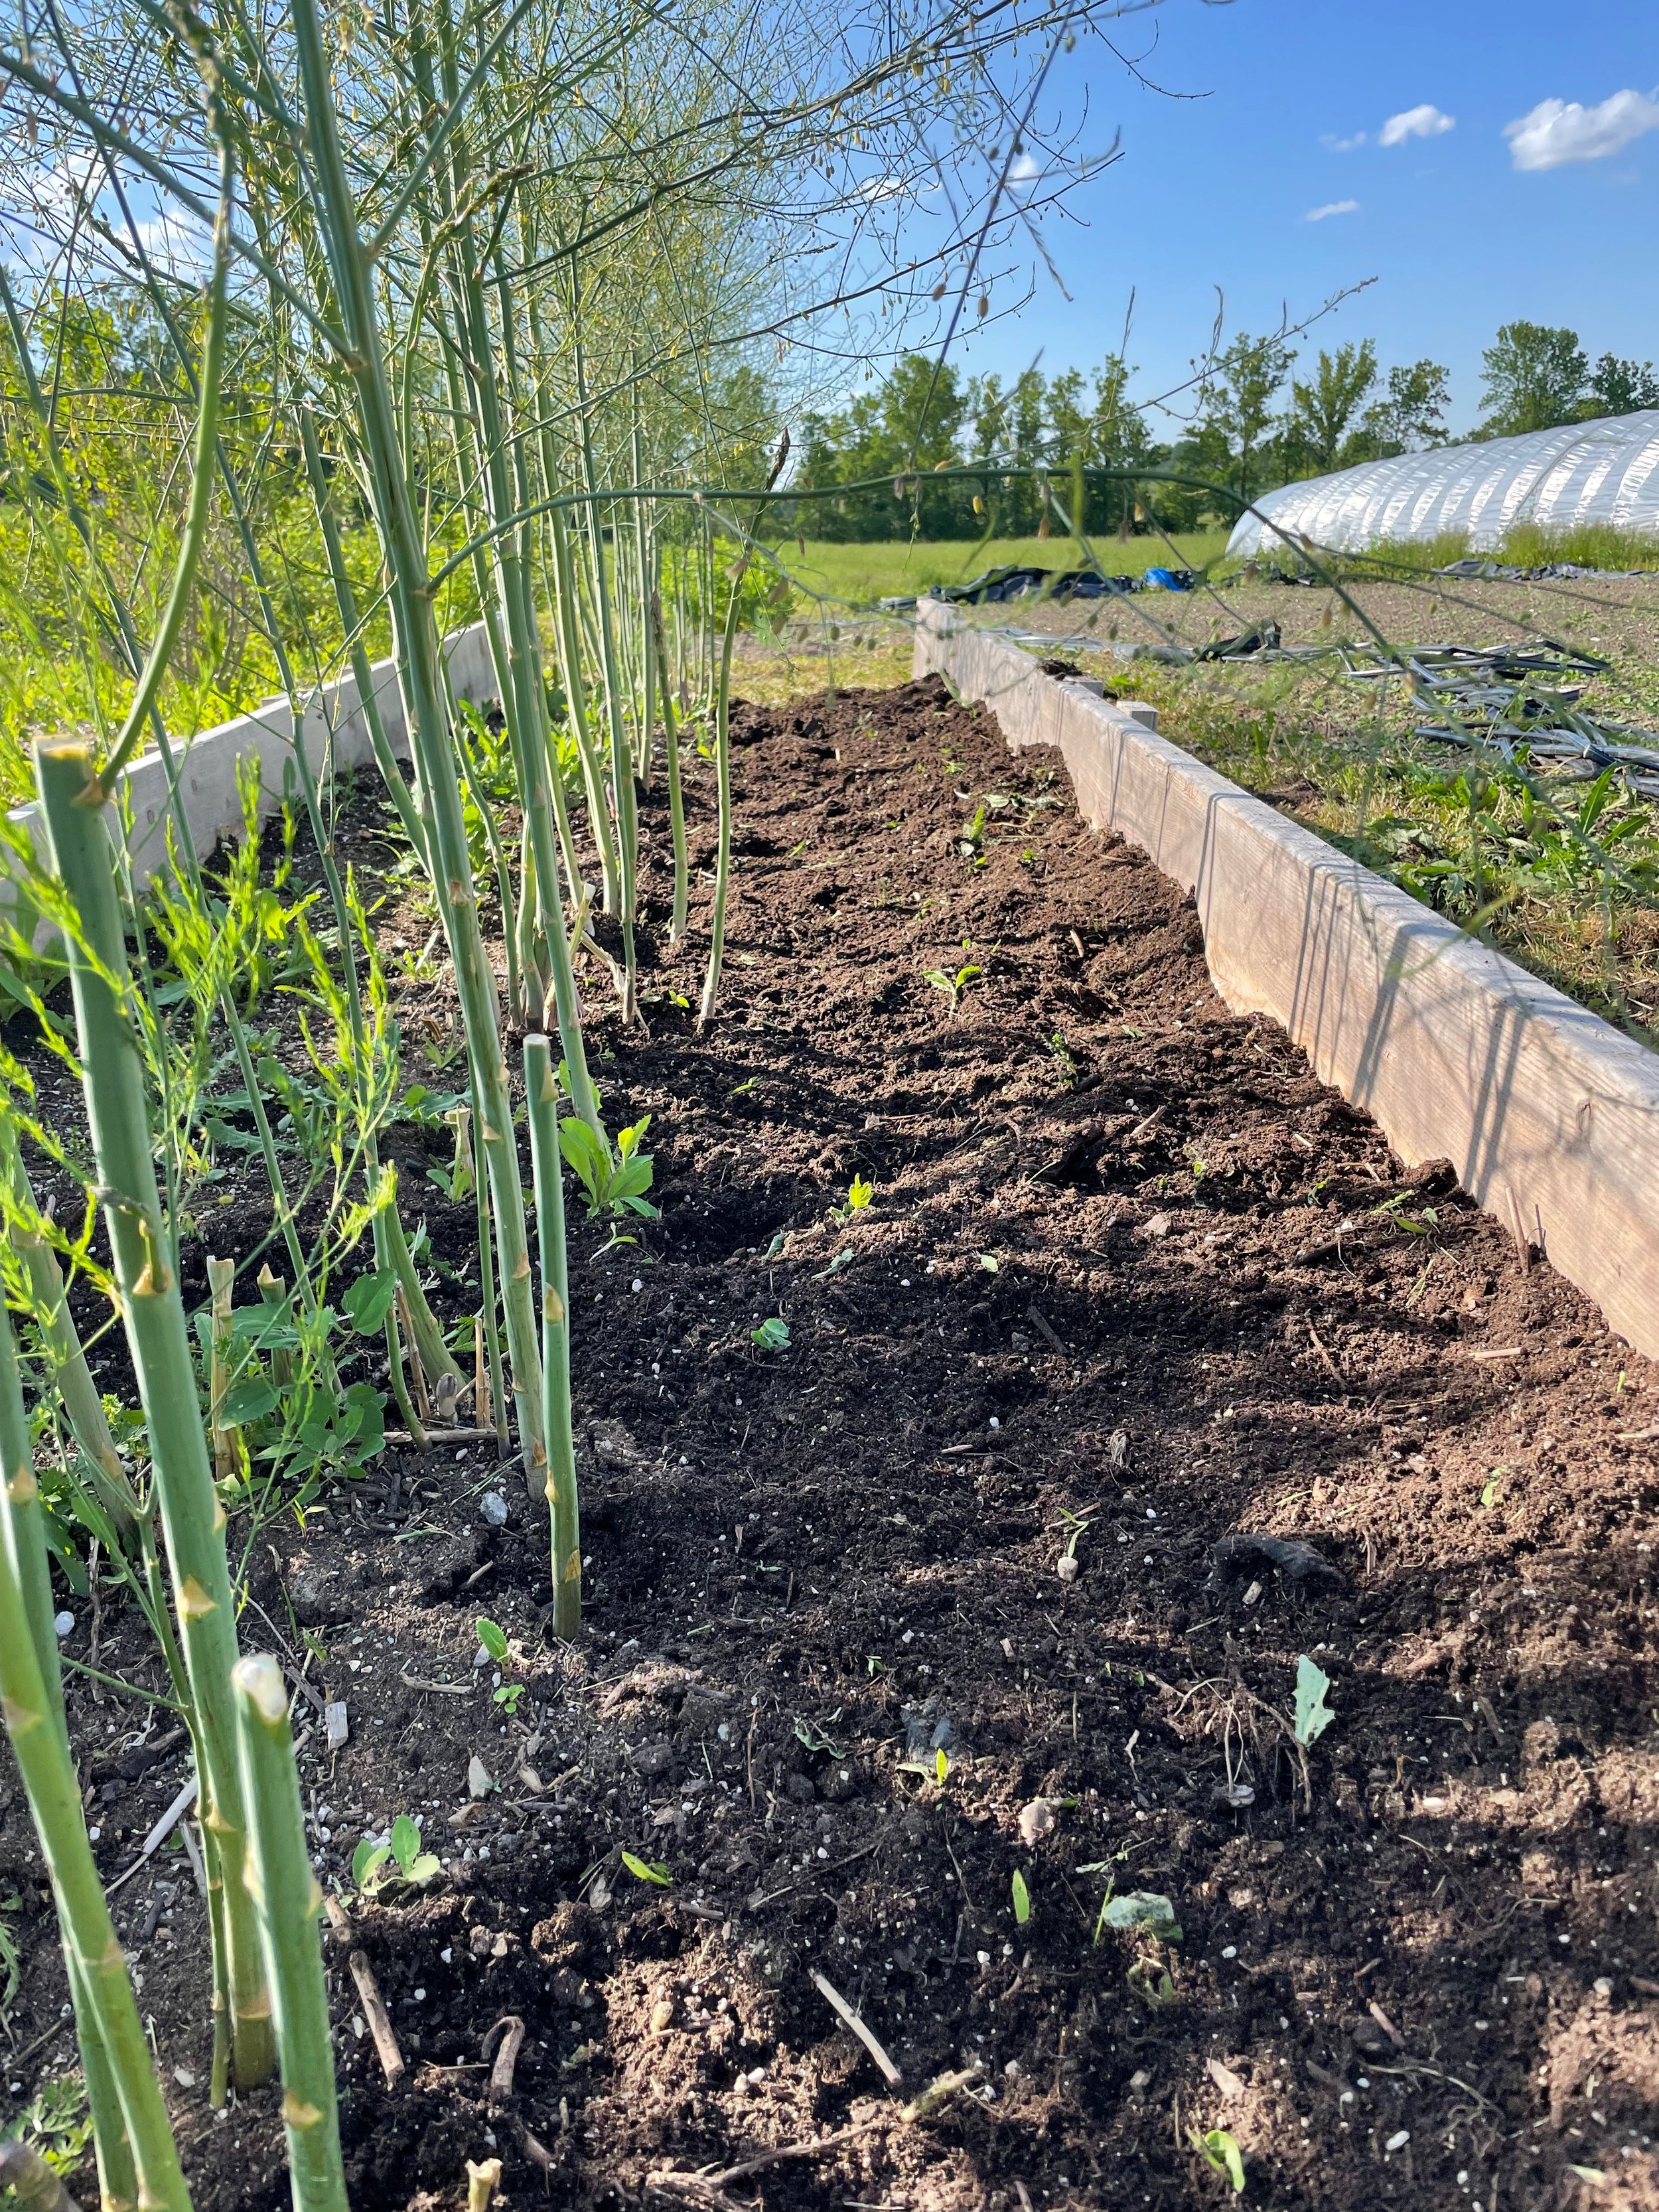
After weeding.
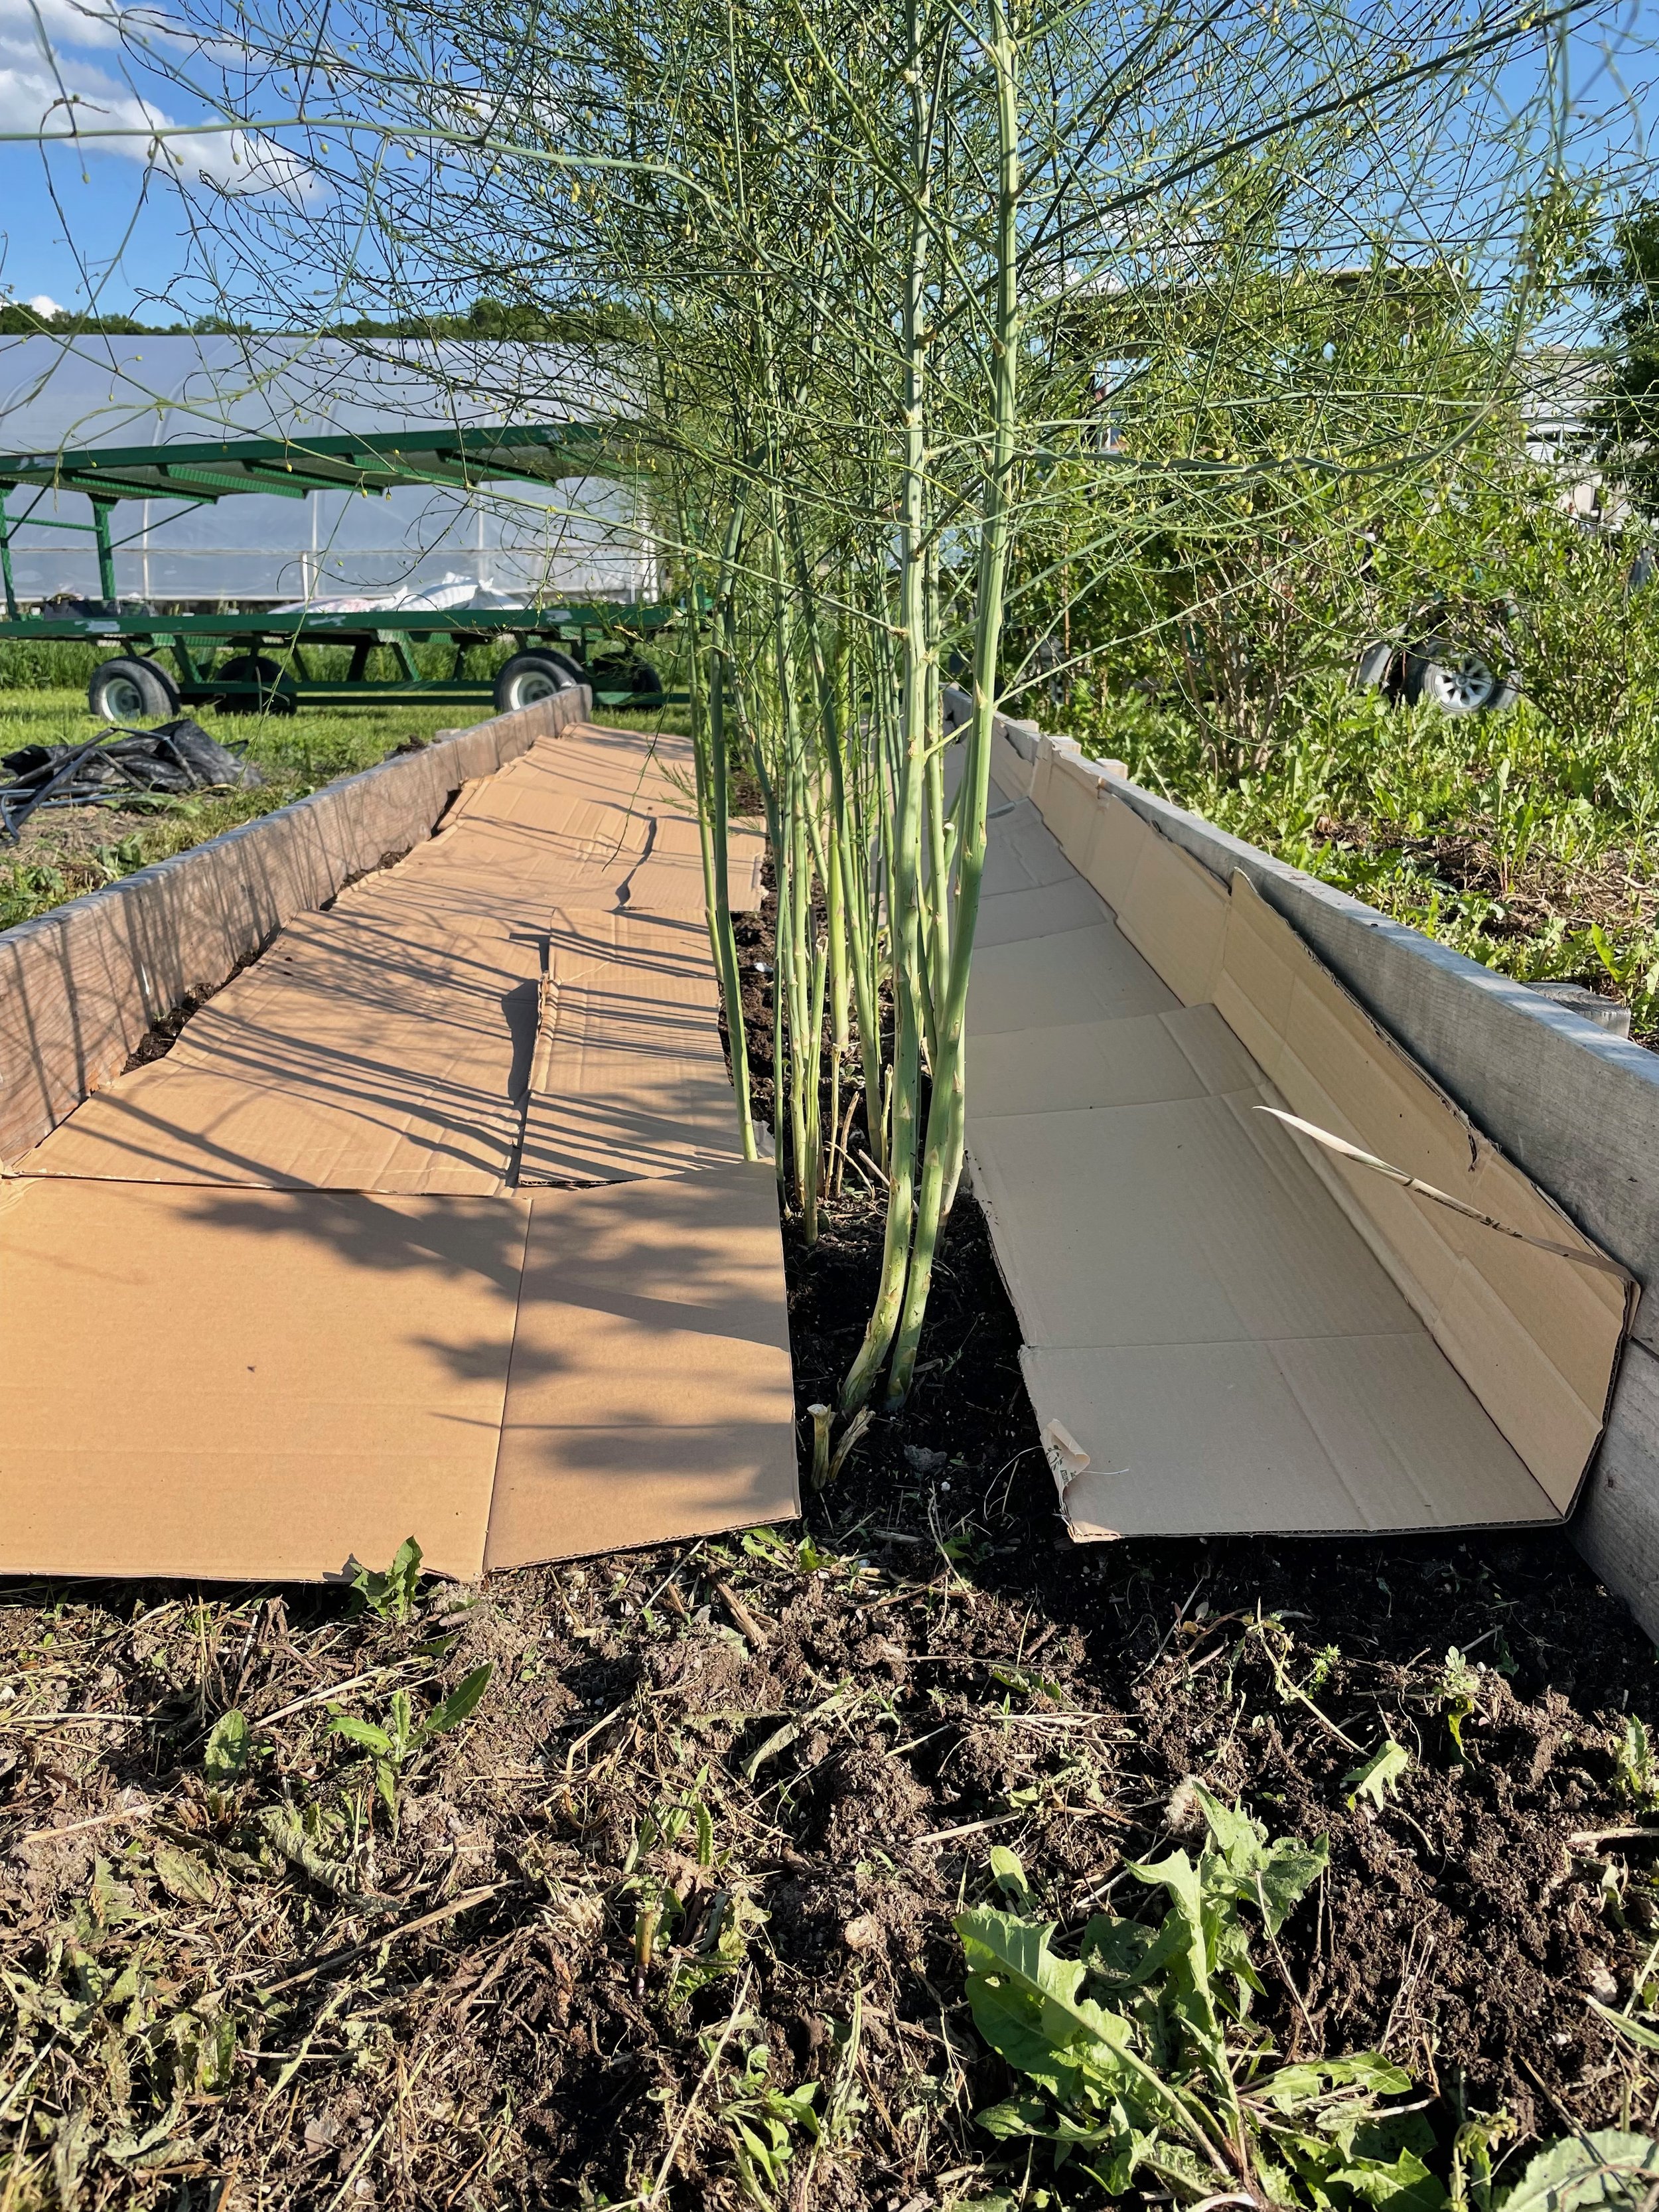
In order to not disturb the roots later in the season, it is important to prevent weeds from growing during the summer. I laid down cardboard along both sides of the row. This is a young asparagus patch, and still growing in a row. If yours is older, it is likely much wider than this or growing in a circle or oval. If that is the case, mulch the whole perimeter with cardboard.

I use Perennial Blend and compost from VT Compost Company. The Perennial Blend covers the cardboard, which will later break down, turning into soil along with the Perennial Blend. The compost is applied right to the crown of the asparagus and will feed the plant which will in turn feed the roots to make a great patch for next year.
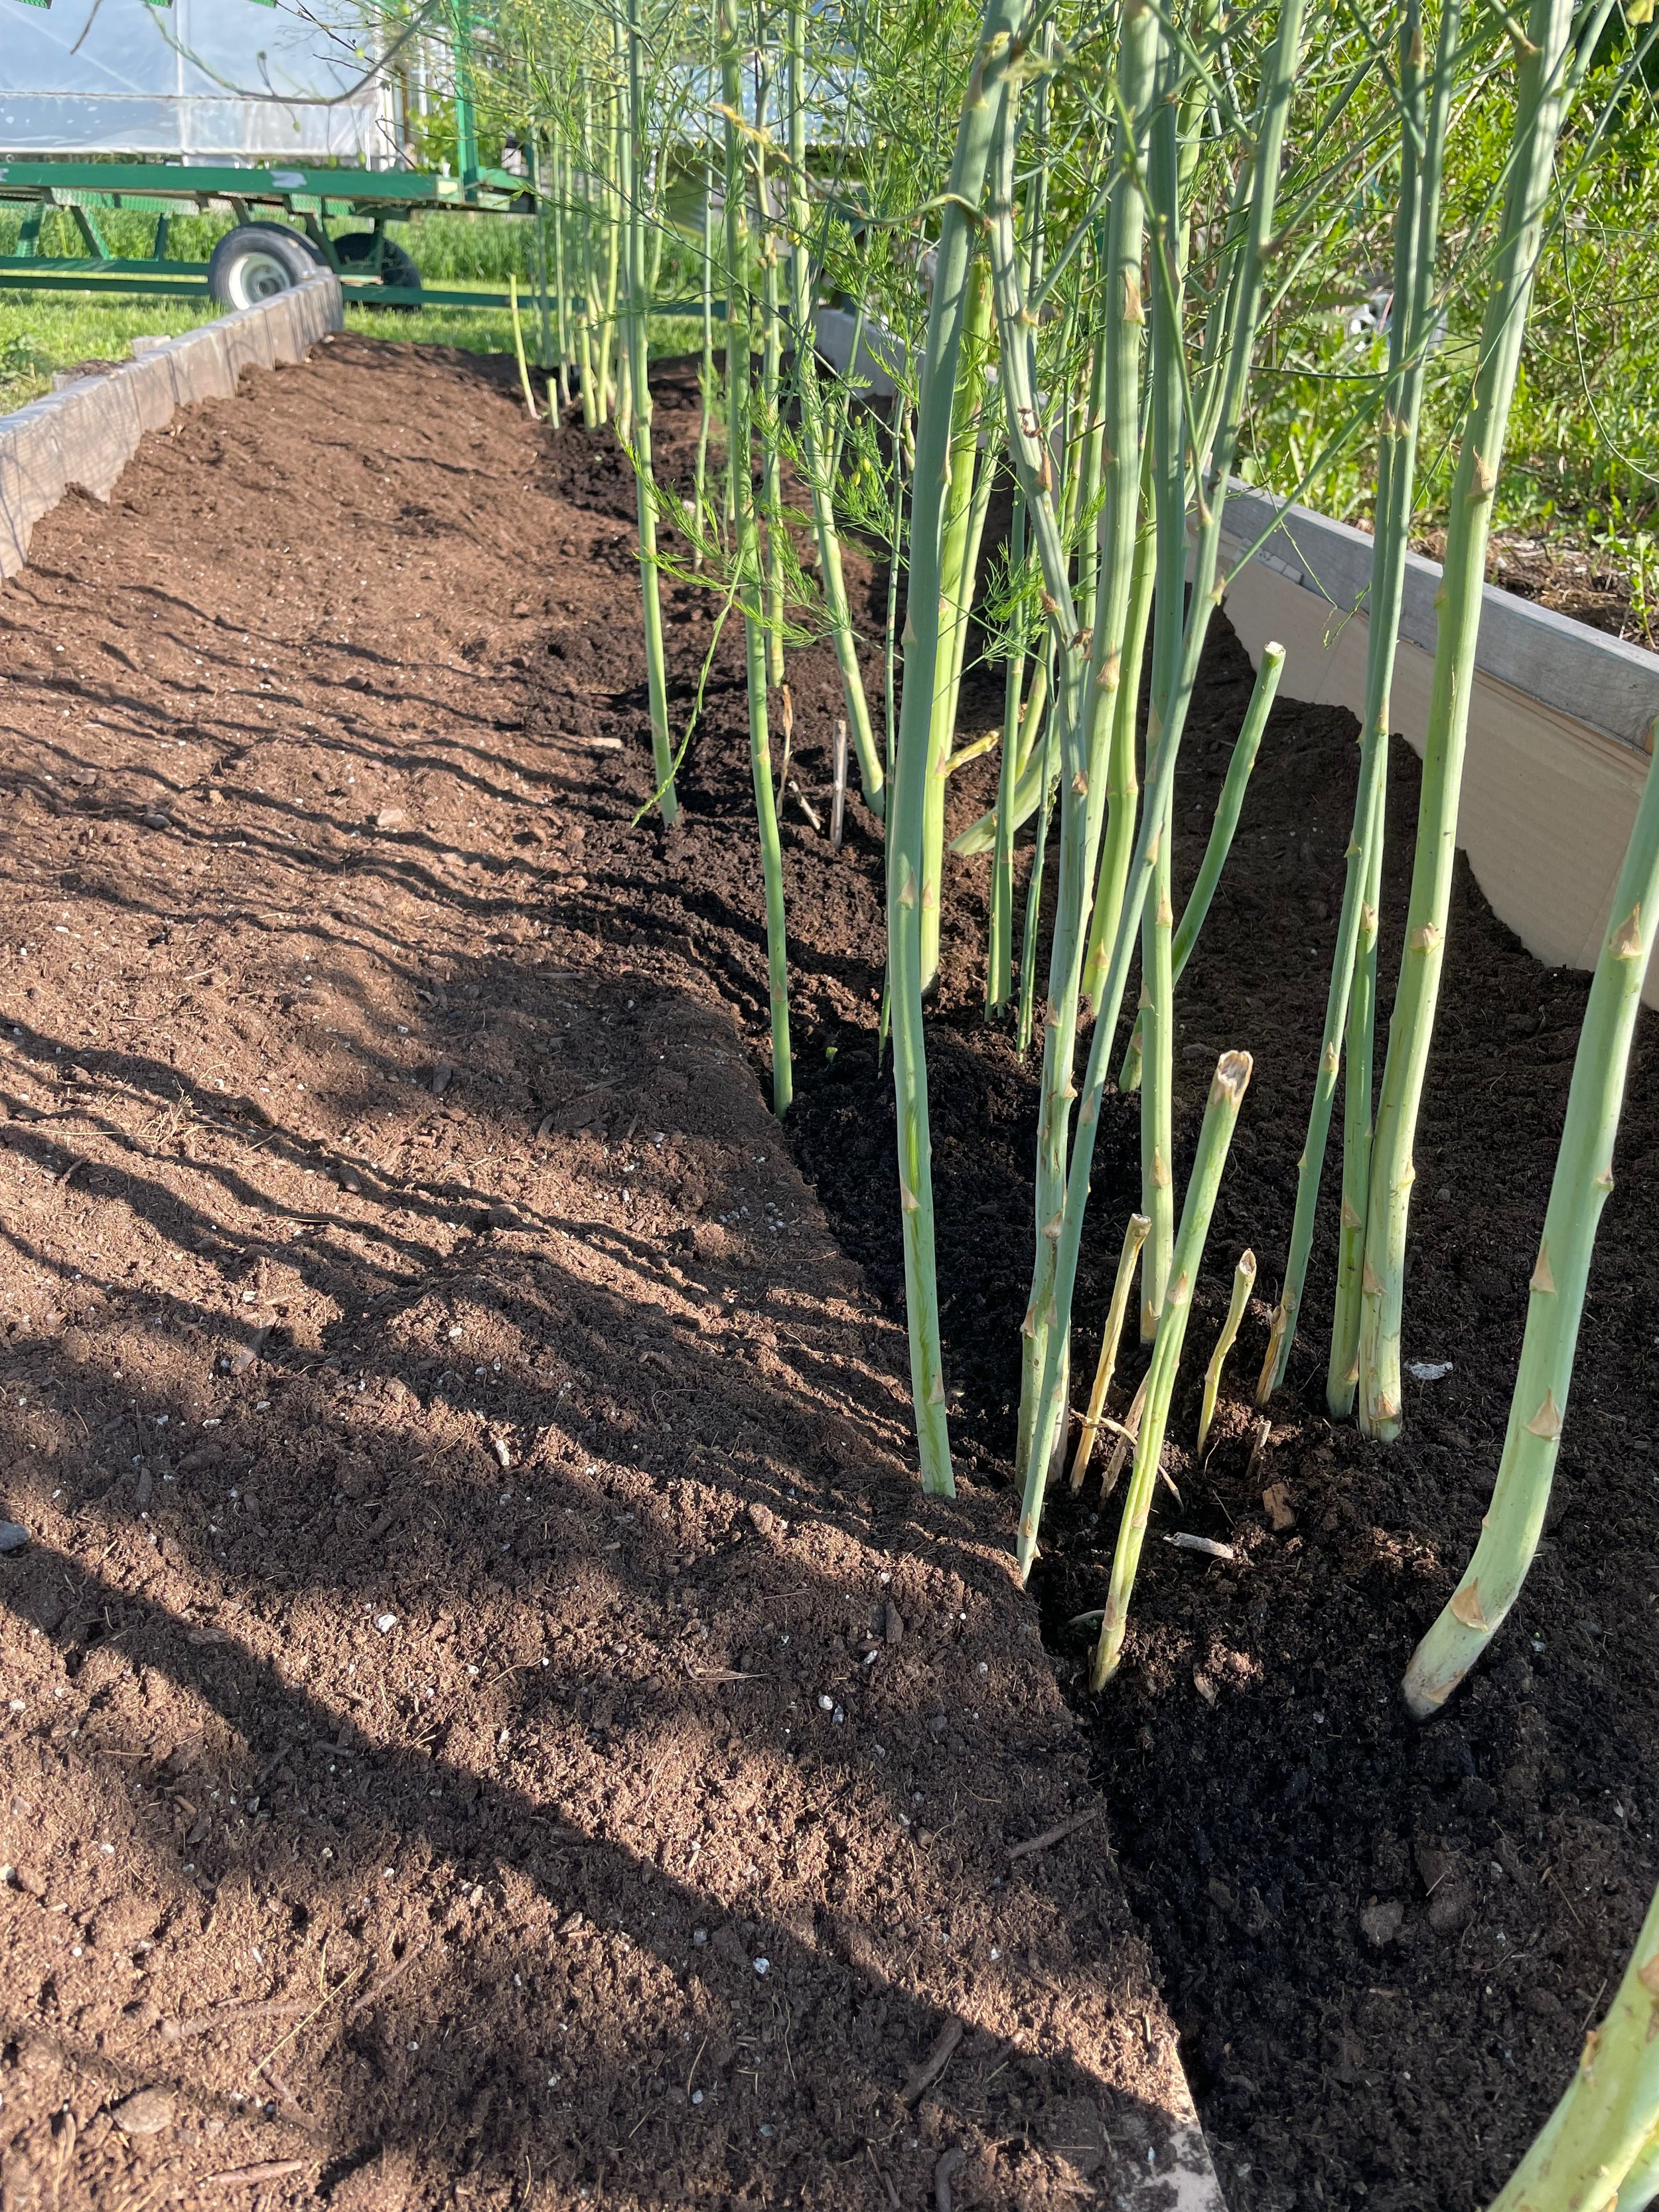
The darker compost is in a strip right over the asparagus crowns. The lighter soil is the Perennial Blend. It hides the cardboard (which blocks out the weeds) and both will break down to feed the soil and the asparagus.
A Poem in Honor of Paul Robeson on this Memorial Day
The writer Anna Blackmer, recently sent us this illuminating and moving poem which she generously agreed to share here. Anna wrote this in the spring of 2020. I am so touched that a tomato plant from us had small role in the spark that created this beautiful piece.

Paul Robeson in 1942
Tomato Harvest
This year, to evade blight, I planted three tomato plants in pots on the south side of the house.
The Green Zebra went in last, because all the plants had sold out amid the pandemic rush
to imagined self-sufficiency in late May.
A week or two earlier I’d bought a Sun Gold
and the Paul Robeson, each maybe six inches tall, from Julie R., whose father came to Vermont from France and baked the best bread anybody around here ever tasted. Julie’s greenhouses are miracles of care and warmth, the tiny heirloom seeds laid down into cells months before we flock to buy them.
Now the three plants have grown so much
they entwine and escape their cages, fruits
turning ripe every day, faster than I can imagine how to eat them. No canning, probably
no freezing—these fleshpots deserve more
than thrift or prudence. Every day
I pick seven or eight of the small, orange Sun Golds and eat some before I go inside.
I roast them, sauce them, cut them in half
to expose the seeds and jelly. The Zebras
are tricky—they can turn yellow and soft overnight, and the trick is to eat them before they lose that subtle bite, the citrus edge that sets them apart from any other tomato. I avoid cooking them, though maybe I shouldn’t— it makes me feel innocent to eat them
plain with salt.
But the Robesons are my favorites—rarer,
redder, bigger, darker. Thin-skinned, almost always cracked across their olive-green shoulders,
and when sliced across the grain,
there’s a universe inside. They taste smoky
and sweet and stay on the tongue.
When I harvest them, I have to cut the stem carefully, and hold each fruit in two hands.
But the plants are hardier, can stand
some cold, because they were bred in Siberia,
no one seems to know exactly when or where.
Somehow, I imagine it was a woman who created this tomato, as it was a woman, Marina Danilenko,
who, with her mother, started the first seed company in Russia
in1991 after the fall of Communism,
and brought the seeds of the Pol Robeson to America. The young women farmers at my local Saturday market grow them now, and they’ve never heard of Paul Robeson, even though they probably have a Black Lives Matter sticker on their cargo van.
They don’t yet know his father was a minister
who’d escaped slavery, his mother a Quaker,
that he was born in Princeton but wasn’t admitted to the university because of his skin color, that
he was a football star at Rutgers,
that he earned a law degree from Columbia
but couldn’t stomach the racism he encountered in the law, so turned to acting and singing.
That he played in the NFL, then played
Othello on Broadway, that he changed the lyrics to Ol’ Man River, that he made more than a dozen films before he eventually stopped taking demeaning roles, that he traveled to Spain during the Civil War
and sang for the International Brigades
and went to the Soviet Union many times,
where he said, “This is home to me.”
That he used his celebrity to fight lynching,
support white steelworkers,
and promote anti-colonialism in Africa and Aboriginal rights in Australia.
Until I grew this tomato I didn’t know, either,
that he had an affair with an English actress
that almost destroyed his marriage, that he ended segregation in Los Angeles hotels by sitting
in the lobby of the Beverly Wilshire every day
he stayed there, that he was never a member
of the Communist Party but was hauled before the HUAC, where he said, “Whatever has happened to Stalin, gentlemen, is a question for the Soviet Union.…
You are responsible, and your forebears,
for 60 million to 100 million black people dying in the slave ships and on the plantations,
and don’t ask me about anybody, please.”
I didn’t know that he was blacklisted, that his films and records were soon hard to come by, that
his passport was confiscated for several years
so he had to sing over a telephone cable to 5,000 people in England, or that when he went to court and won his passport,
he left the US and was hospitalized
in London for heart problems and manic depression, then tried to kill himself in a Moscow hotel after a wild party.
For years he was dogged by the CIA, MI5, the FBI, treated in clinics with drugs and electro-shock therapy, until he came back to America and retired. He argued with James Farmer and Bayard Rustin over his political beliefs, never renouncing Stalin, and lived with his sister in Philadelphia,
in seclusion, until he died in 1976.
He was a complicated man, and I’m in tears now, just thinking about his life,
what he did and didn’t do, what he could
and couldn’t do. What I’ve done,
and not done.
The tomato sits on my cutting board,
waiting for me to slice it open.
Anna Blackmer
September, 2020
Edible Annual Flowers
Many of our beloved annual flowers have applications beyond their beauty in the garden or the vase. You may already be growing edible flowers without realizing it! These flowers are great for adding color and flavor to summer dishes or freezing in ice cube trays for magical floral beverages. Choose from this list when growing a kid-friendly cutting garden to allow for as much hands on interaction as possible.
It’s important to note that “edible” does not necessarily translate to “delicious”. But many of these flowers do offer a nice addition of flavor, and those that are more bland or bitter are still worthwhile choices for decorating cakes or using as a garnish.
Additionally, as with anything headed for the kitchen, it’s important to either grow from seed or purchase plants from an organic greenhouse like Red Wagon, so that you know they haven’t been treated with chemicals that would render the flowers less than lovely to eat.
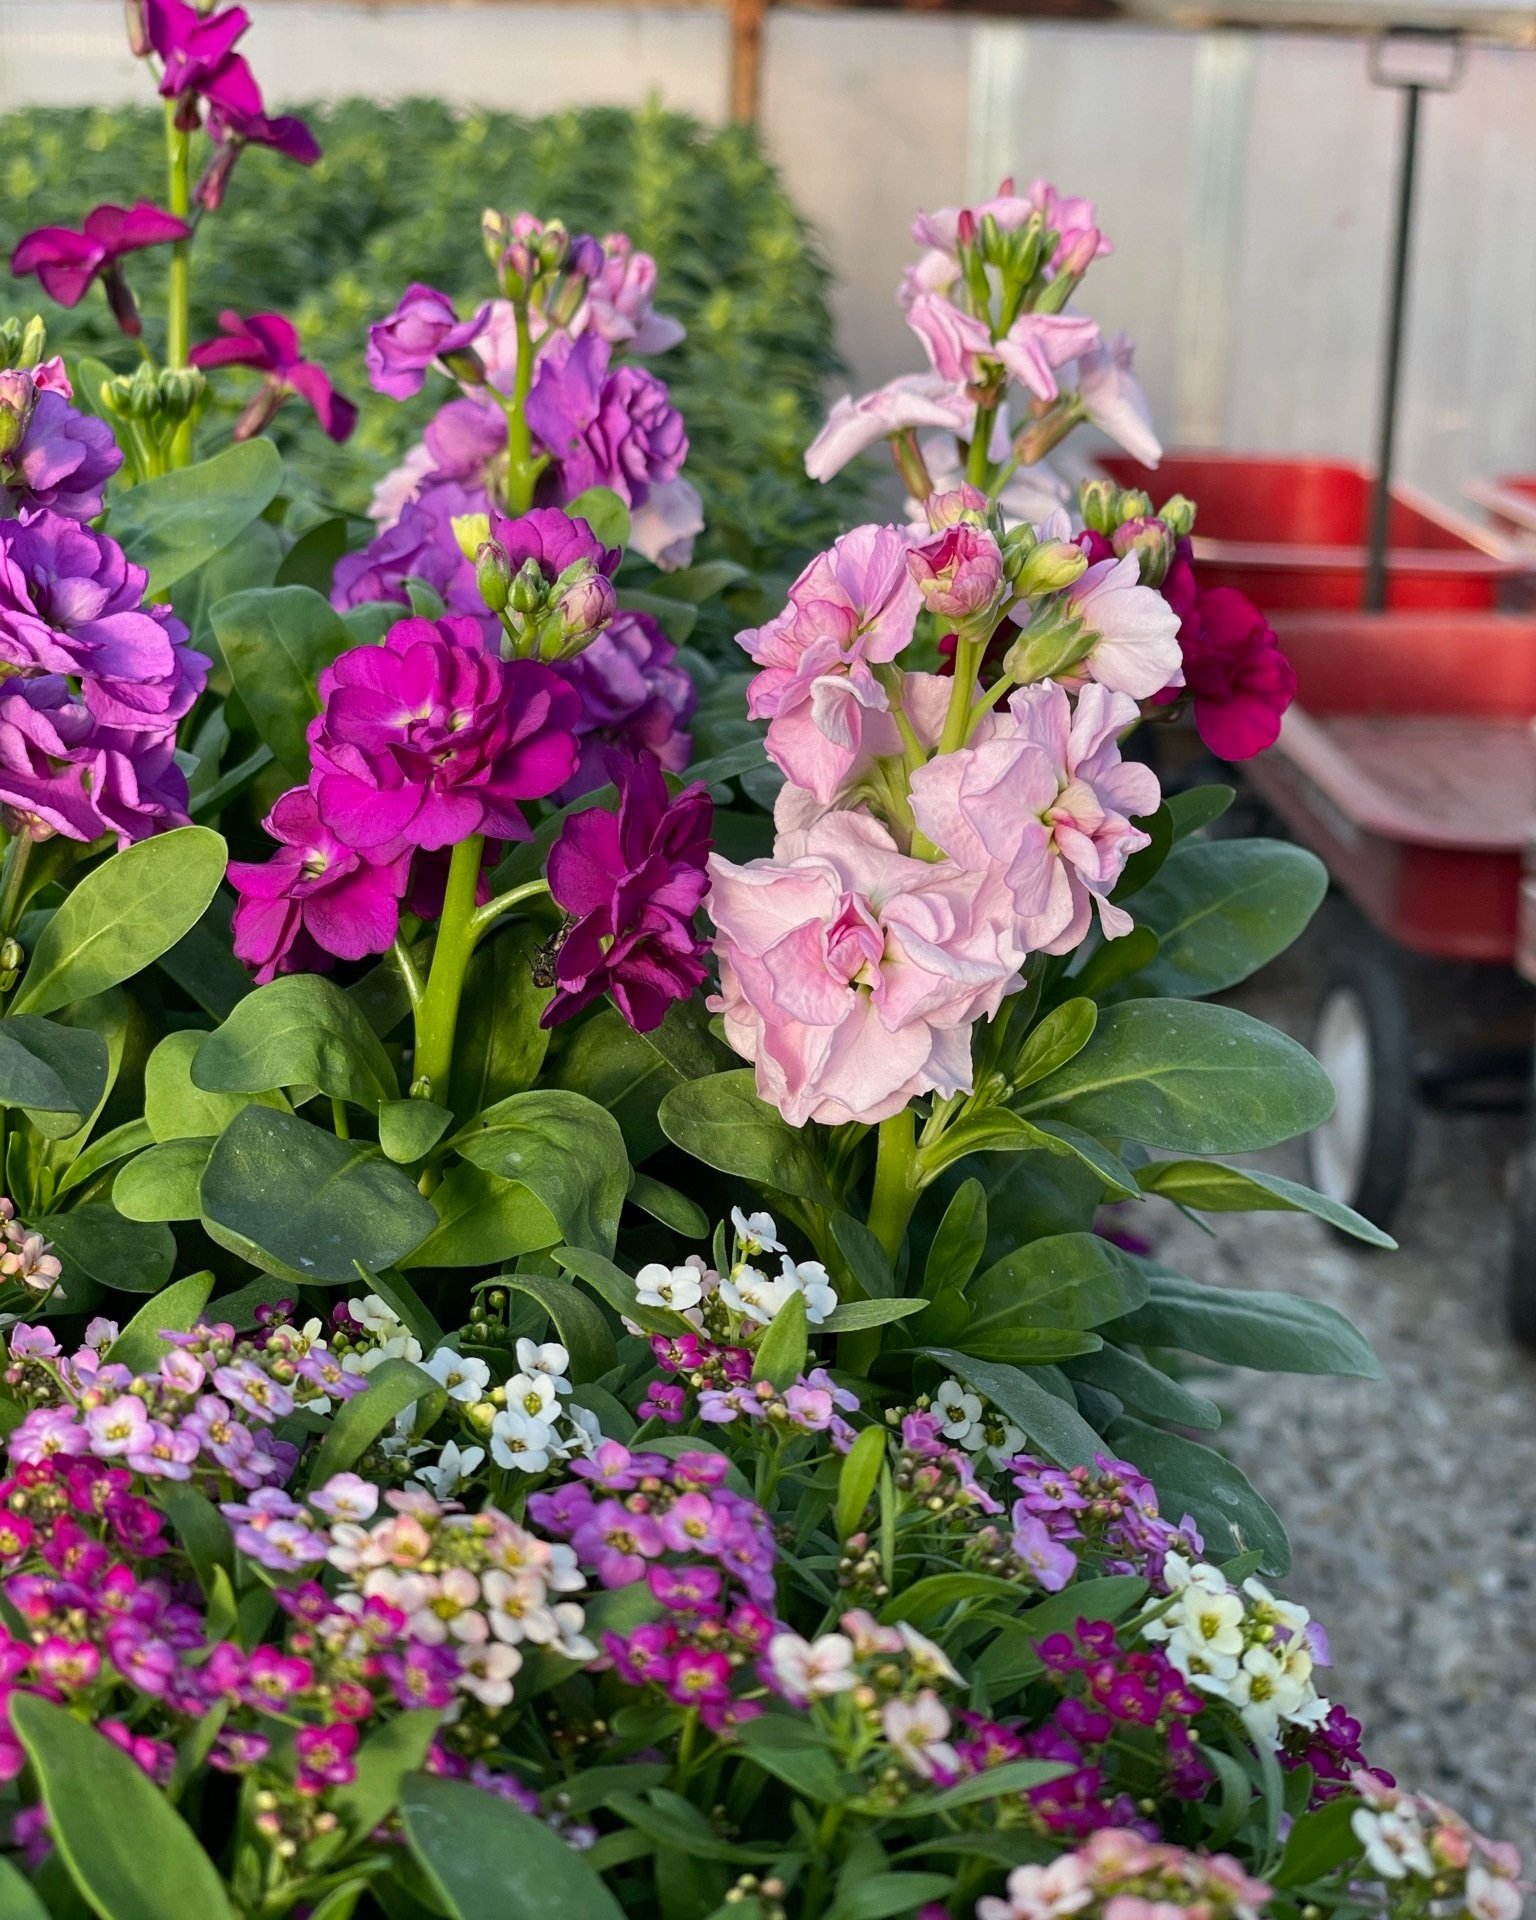
Stock and Sweet Alyssum, both edible flowers in the Brassica family
Sweet Alyssum (Lobularia maritima): This sprawling member of the Brassica family has the four-petaled flowers that identify that genus, and the leaves and flowers are characteristically peppery. Include in an arugula salad for some color and extra zing. As a bonus, alyssum (and its bigger cousin, the Lobularia cultivar) provide some helpful early pollinator habitat and pest protection when planted in the vegetable garden.
Violets and Pansies (Viola spp.): The colorful violas and pansies found early in spring at the greenhouse are nearly identical to those sweet spring flowers poking through the grass in your backyard, and all parts of the plant are edible. The fresh flowers have a sweet, almost wintergreen-like flavor and look gorgeous when candied and pressed into cookies or iced cakes.
Calendula and Marigold (Tagetes spp.): We’re such big fans of these two genus we made a whole other blog post about them! Calendula has long been used as a tea herb, and the different marigold species have a wide array of edible and medicinal uses dating back to Aztec times.
Bachelor Buttons (Centaurea cyanus): One of the easiest “true blue” flowers to grow, Bachelor’s Button flowers also come in a sweet array of purples, whites and pinks, with a mildly sweet and vegetal flavor. The petals retain their blue color quite well when dried, so be sure to harvest and dry some to brighten up herbal tea blends this winter.

White Snapdragons against a backdrop of African Blue basil
Snapdragons (Antirrhinum spp.): While the flowers of this eye-catching species certainly aren’t going to win any taste tests (they are typically described as “bland” and “bitter”), they are in fact edible. Pluck the petals from the bitter base of the flower and arrange on a platter to create a showstopper garnish for any summer meal.
Nasturtium (Tropaeolum spp.): Nasturtiums are one of the most commonly used edible flowers, and are well known for their bright, spicy flavor. Add leaves and flowers to salads, infuse a flower vinegar, pickle the buds and seed pods… the possibilities are only limited by your imagination and affinity for their peppery bite.
Stock (Matthiola incana): A longtime favorite of florists, four-petaled stock is in the Brassica family like sweet alyssum. The flowers are peppery and clove-like, so try adding them to salads or atop grilled fish and vegetables for a colorful kick.
Dianthus (Dianthus caryophyllus): The annual species of this classic carnation has been in cultivation for well over 2,000 years. The flower petals are fragrant and have a mild clove-like flavor, perfect for adding to iced beverages and fancy desserts. Pluck petals off the bitter green base before use.
Scarlet Runner Bean ‘Painted Lady’ (Phaseolus coccineus): This vining relative of the common bush bean is native to the highlands of Central America. The beautiful red and white flowers can be enjoyed as a snack or in salads, or left to ripen to mature beans which can be eaten fresh or dried down.
Hyacinth Bean Vine (Lablab purpureus):This gorgeous vining bean is similar in habit and use to scarlet runner bean, and has been cultivated as a food crop in Africa and the tropics for millenia. The elegant purple leaves make a good cooking green, and the beans are edible when fully cooked.

Ruby Moon Hyacinth bean vine
Plant of the Week: 3 Native perennials
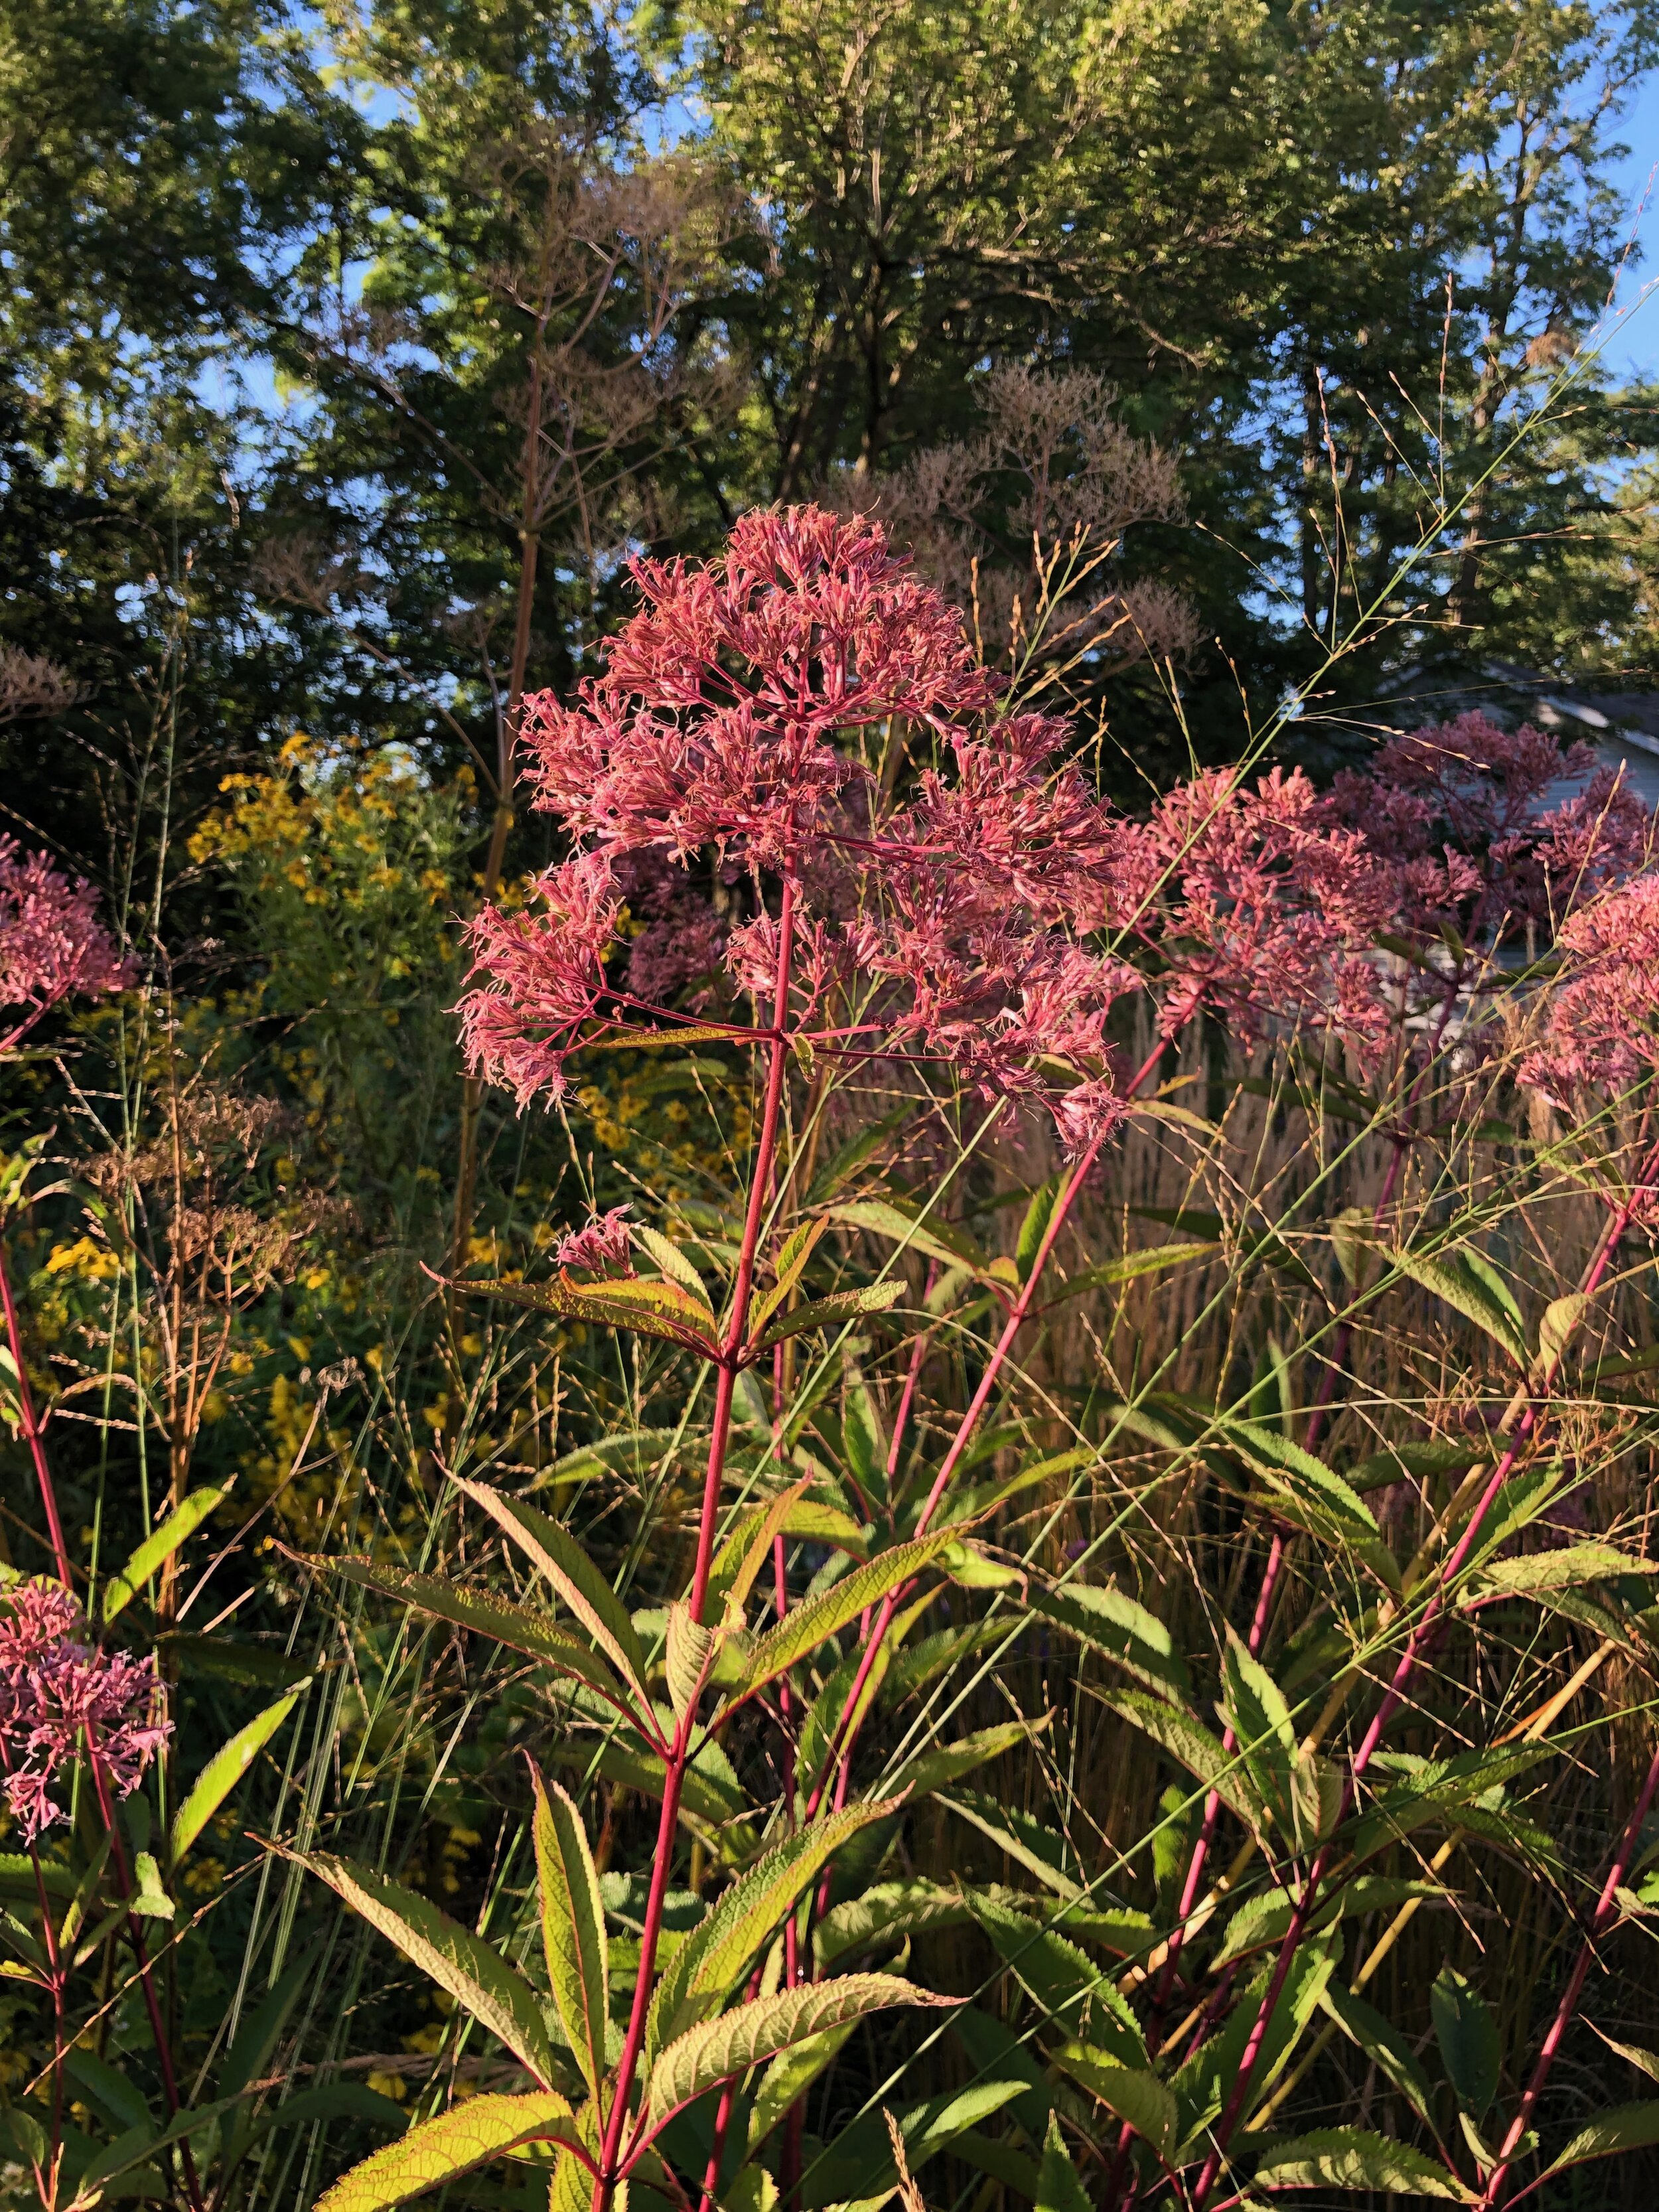
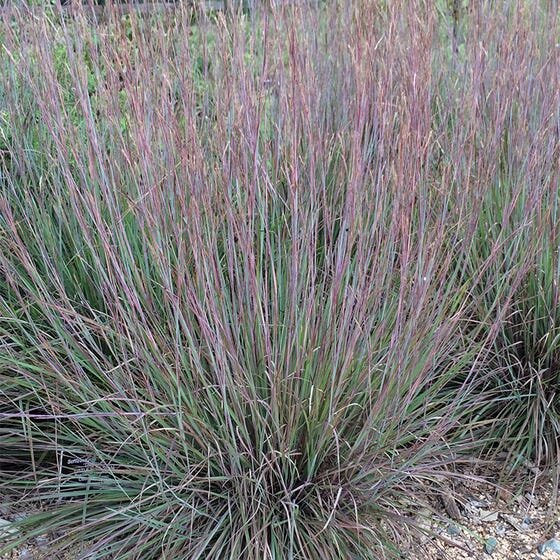
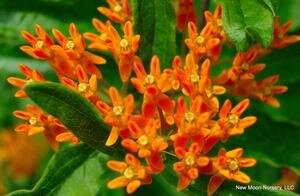
In our attempt to reduce plastic, we have been growing a few plants in fiber pots. They are not perfect, but they have been good for a few things. One of our experiments was with native perennials. We wanted to give you an option that feels ecological for those extra-eco plantings, so this week’s Plant(s) of the Week are a trio of power house perennials for the native / pollinator garden:
Asclepias tuberosa, a.k.a. Butterfly Weed - a little slow to get established, but once it takes off, it provides a bright pop of orange all summer long.
Eupatorium maculatum, a.k.a. Joe Pye Weed - a tall meadow plant that looks so striking in the landscape and is always covered in bees and butterflies
Schizachrium scoparum, a.k.a. Little Bluestem - the Audubon calls this a living bird feeder.
You can buy one ($5.99), get one free of any of the plants in this power trio. It is okay to mix and match, and we encourage you to bring home all three so that you can create a little pollinator habitat with three plants that bloom at different times, at three different heights, and create a perfect little haven for our smallest friends.
In addition, we have lots of great perennials in smaller sizes this year so that you can add to your existing garden or create a new flower bed without breaking the bank. Quarts are $9.99, 4” pots are $4.99.
We have the following in smaller sizes:
Eupatorium perfoliatum, a.k.a. Boneset
Saponaria ocymoides, a.k.a. Rock Soapwort
Heuchera a.k.a. Coral Bells in lots of different varieties
Rudbeckia hirta ‘Indian Summer’, ‘Goldilocks’, and ‘Cherokee Sunset’
Allium cernuum, a.k.a. Nodding Onion
Centranthus ruber a.k.a. Rosy Red Valerian or Jupiter’s Beard
Chasmanthium latifolium, a.k.a. Northern Sea Oats
Hibiscus moscheutos, a.k.a. Hardy hisbiscus ‘Luna Swirl’
Dianthus - lots of varieties
Monarda bradburiana - a favorite native plant of mine. It makes a great ground cover and grows well in all sorts of conditions
Monarda didyma, a.k.a. Scarlet Beebalm
Eryngium yuccifolium - another favorite native plant of mine. It’s got great architecture in the summer garden.
Echinacea purpurea ‘White Swan’
Achillea millefolium ‘Moonshine’ and ‘Sassy Summer Sangria’
Nepeta x faassenii ‘Junior Walker’
Heliopsis helianthiodes ‘Summer Night’ - this won’t stay at this size / price point for long. It is a fast growing, big plant, and will get bumped up to a gallon or two gallon pot soon. It is a great filler for the back of the border where you want late July (yellow) color and height. It would look great with this week’s power trio Plant(s) of the Week!
In the Garden
It is time to harvest garlic. While the rains have made it hard to find a good time to pick, we want to encourage you to do it sooner rather than later. The longer the garlic sits in wet soil, the less success you will have to cure it properly. Harvest now so that the skins don’t rot and leave all the cloves exposed all winter long. To learn more about harvesting and curing garlic, you can read these blog posts from the way back machine.
Now is a great time to assess the perennial gardens and take notes about changes you would like to make. It is often a time of year with less color in the garden. The early bloomers are done, and the late season flowers haven’t started quite yet. Some great additions: salvias, echinacea, flowering shrubs such as smooth leaf hydrangea, Russian sage, geranium, Eryngium, and lots more. We can help you out with your selection if you tell us what you are looking for in terms of height, color and exposure.
I am ripping out the old peas and planting more greens of all sorts. I have been harvesting lettuce, beets, kohlrabi, cucumbers, greens of all sorts, and radicchios of all sorts. Take a look at anything that is sub-par in the garden, and turn that space into something productive. We have lots of new 4-pack veggies each week and can help you make the most of the summer and fall with succession plantings that you will harvest until the ground freezes.
I have to admit that there is a pile of bark mulch in my driveway that doesn’t seem to magically go away. I bought it to add to my arsenal of murder weapons in my attempt to eradicate the Bishop’s Weed at our house. But it is still there, and so is the Bishop’s Weed. Do you have any projects that you can never make time for? We all do, right? I am hoping to wrap up some of those danglers this week. And no, I don’t think bark mulch will really help to kill the Bishop’s Weed. But it will hide the ugly black plastic that I will smother it with first. Wish me luck.
Happy gardening,
Julie